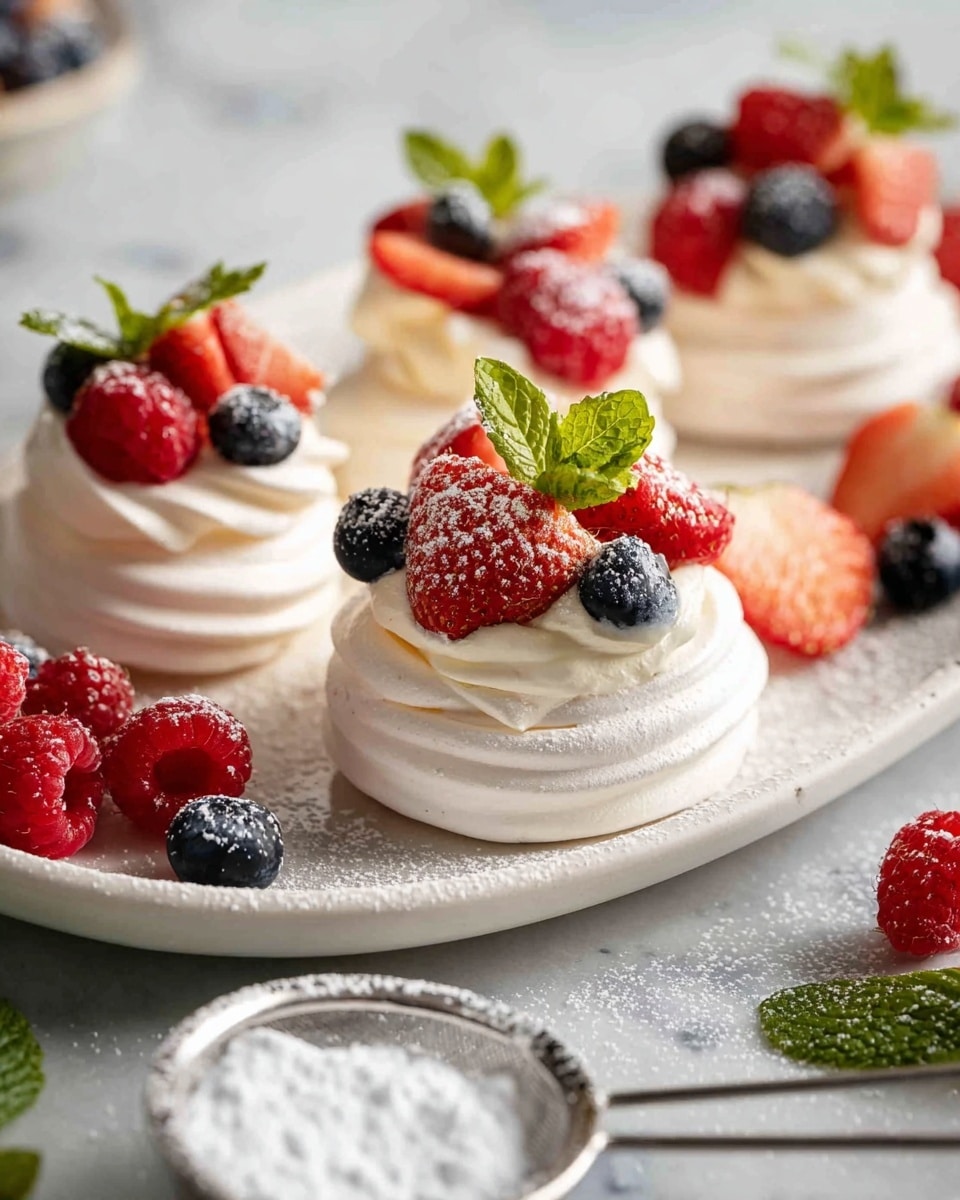
Mini Pavlovas with Fresh Fruit and Whipped Cream Recipe
If you are looking for a dessert that feels like a celebration on a plate, the Mini Pavlovas with Fresh Fruit and Whipped Cream Recipe is your new best friend. These light-as-air, crisp meringue nests are perfectly crunchy on the outside and tender inside, crowned with cloud-like whipped cream and a burst of colorful fresh fruit. It’s a dessert that delights the eyes and the palate, mixing flavors and textures in the most joyful way. Whether it’s a special occasion or just because you deserve an extraordinary treat, this recipe will quickly become a cherished classic in your kitchen.

Ingredients You’ll Need
The beauty of this Mini Pavlovas with Fresh Fruit and Whipped Cream Recipe lies in its simplicity—each ingredient plays a vital role in building the perfect balance of fluff, structure, and fresh zest. Let’s walk through the essentials that you’ll need to create this irresistible dessert.
- Egg whites: Use 5 to 6 large eggs to get about 2/3 cup; room temperature egg whites whip better, giving your pavlovas lovely volume.
- Caster sugar: Superfine sugar dissolves quickly, ensuring a glossy, smooth meringue without any graininess.
- Cornflour (cornstarch): Adds stability and helps create that marshmallow-like interior that makes pavlovas so irresistible.
- White vinegar: A subtle acid that strengthens the meringue’s structure and helps maintain its shape during baking.
- Heavy/thickened cream: This rich cream whips into a fluffy topping that pairs beautifully with the crisp meringue base.
- Vanilla extract: Brings a warm, sweet aroma that elevates the whipped cream, adding depth to every bite.
- Fresh fruit: Choose vibrant strawberries, mango, blueberries, raspberries, kiwi, and passionfruit pulp to add juicy bursts of freshness and color.
- Small mint sprigs: Adds a refreshing garnish and a little extra charm.
- Icing sugar: For a delicate dusting that makes your mini pavlovas look as pretty as they taste.
How to Make Mini Pavlovas with Fresh Fruit and Whipped Cream Recipe
Step 1: Prepare the Egg Whites
Start by separating the egg whites from the yolks while they’re cold from the fridge—this makes separation easier. Measure out 2/3 cup (160 ml) and then let the egg whites sit at room temperature for about 30 minutes. This little patience step ensures that your meringue whips up to a perfect, fluffy consistency that’s the foundation of your mini pavlovas.
Step 2: Beat in the Sugar
Preheat your oven to 150°C/325°F. Using a stand mixer or electric beater, whip the egg whites on high speed for one minute until frothy. Slowly add the caster sugar, one dessert spoon at a time, while beating continuously. This slow addition is key to dissolving the sugar evenly, resulting in a silky, glossy meringue free from grit.
Step 3: Whip to Perfection
Continue beating the mixture on high for about 8 minutes. You’ll know it’s ready when the meringue is fluffy and shiny, and if you rub a bit between your fingers, you shouldn’t feel any sugar grains. Now gently fold in the white vinegar and cornflour, then whip for an additional 30 seconds to just combine—this enhances the meringue’s stability and texture.
Step 4: Pipe the Meringue
Line two baking trays with parchment paper, securing it down by dabbing a little meringue on the corners. Transfer your meringue mixture into a large piping bag fitted with your favorite nozzle. Pipe 12 to 13 mounds about 6 to 7 cm wide and 5 cm tall onto the trays. Use a spoon to flatten the tops slightly and create gentle hollows—these nests will hold the luscious cream and fruit topping beautifully after baking.
Step 5: Bake Low and Slow
Place both trays into the oven and immediately reduce the temperature to 110°C/225°F (or 100°C fan). Bake the meringues for 1 hour and 30 minutes, until they feel dry to the touch. Every oven is different, so if they feel sticky, leave them in a little longer. This gentle baking dries out the meringue while keeping the interior soft and chewy—a pavlova hallmark.
Step 6: Cool Completely
Once baked, turn off the oven and leave the pavlovas inside to cool for at least 4 hours, ideally overnight. This slow cooling process prevents cracks and helps the texture set perfectly. When fully cool, store the pavlovas in an airtight container placed in a cool, dry spot until you are ready to decorate.
Step 7: Whip the Cream
In a chilled bowl, whip the heavy cream, caster sugar, and vanilla extract on high speed until soft peaks form—this usually takes about 1 minute with a stand mixer. For extra stability, you can incorporate a stabilizing technique, such as folding in a bit of mascarpone or using gelatin according to your preference.
Step 8: Assemble Your Mini Pavlovas with Fresh Fruit and Whipped Cream Recipe
Right before serving, spoon a generous dollop of whipped cream into the cavity of each pavlova. Top with a colorful assortment of fresh fruit and finish with a delicate sift of icing sugar. Each bite is a dream come true—a harmonious dance of sweetness, creaminess, and fresh, tangy fruitiness.
How to Serve Mini Pavlovas with Fresh Fruit and Whipped Cream Recipe
Garnishes
Fresh mint sprigs add a lovely aroma and a vibrant green pop against the white cream and colorful fruit, making the pavlovas impossible to resist visually as well as in taste. A light dusting of icing sugar not only elevates the presentation but also adds a touch of extra sweetness.
Side Dishes
These mini pavlovas shine as a standalone dessert but can be served alongside a scoop of lemon sorbet to add a refreshing citrus twist, or a glass of sparkling wine for a truly celebratory feel. A simple green salad with toasted almonds and vinaigrette can also complement the sweetness perfectly if you’re serving at a larger meal.
Creative Ways to Present
For an elegant summer party, serve your mini pavlovas on rustic wooden boards with additional fresh fruit arranged around them. Alternatively, use decorative plates with vibrant colors to contrast with the pavlova’s pristine whites. You could even layer them in clear glass trifle bowls for a stunning visual effect that lets everyone see the layers of cream and fresh fruit before the first bite.
Make Ahead and Storage
Storing Leftovers
If you have any leftover pavlova shells, keep them in an airtight container away from moisture to maintain their crispness. The assembled desserts are best eaten immediately after adding cream and fruit since the meringue will soften over time.
Freezing
Meringue shells can be frozen for up to a month when stored properly in an airtight container. Thaw at room temperature before decorating. However, avoid freezing once the pavlovas are assembled with cream and fruit as the fresh toppings do not freeze well.
Reheating
Reheating baked pavlova shells isn’t recommended because the delicate meringue can become soft or sticky. They are best enjoyed as freshly assembled to keep the perfect texture intact.
FAQs
Can I use powdered sugar instead of caster sugar for the meringue?
It’s best to stick with caster sugar for this recipe because it dissolves more readily, yielding a smooth and glossy meringue. Powdered sugar contains cornstarch, which can affect the texture.
Why do I need to add vinegar and cornflour to the meringue?
The vinegar adds acidity that strengthens the egg whites, while cornflour helps give the pavlova’s interior a gentle marshmallow-like softness. Together, they ensure your pavlovas hold their shape and texture beautifully.
How do I know when the pavlovas are fully baked?
The pavlovas should feel dry to the touch and easily lift off the parchment paper without sticking. If they feel sticky, bake for a little longer at the same low temperature.
Can I make the whipped cream ahead of time?
Yes, you can whip the cream a few hours ahead, but keep it refrigerated and cover it tightly. Give it a quick whisk before serving to restore its volume if it settles.
What fruits work best for topping mini pavlovas?
Bright, crisp fruits with a balance of sweetness and tartness, like strawberries, kiwi, mango, blueberries, raspberries, and passionfruit, complement the creamy and sweet pavlova perfectly and add vibrant color.
Final Thoughts
Making the Mini Pavlovas with Fresh Fruit and Whipped Cream Recipe is a rewarding experience that brings a special sparkle to any gathering. There’s something magical about combining light meringue, rich cream, and fresh fruit that makes every bite a celebration of flavor and texture. Give this recipe a try—you’ll soon find it impossible to resist sharing this beautiful dessert with everyone you know.
PrintMini Pavlovas with Fresh Fruit and Whipped Cream Recipe

Delightfully crisp on the outside and soft on the inside, these Mini Pavlovas are a classic dessert featuring light meringue nests topped with fluffy whipped cream and fresh vibrant fruits. Perfect for special occasions or an elegant treat, they combine a sweet and tangy flavor profile with a beautiful presentation.
- Prep Time: 45 minutes
- Cook Time: 1 hour 30 minutes
- Total Time: 3 hours 15 minutes (including cooling time)
- Yield: 12 servings 1x
- Category: Dessert
- Method: Baking
- Cuisine: Australian
- Diet: Gluten Free
Ingredients
Meringue
- 160 ml / 2/3 cup egg whites (from 5 – 6 large eggs, room temperature)
- 1 1/4 cups caster sugar (superfine sugar)
- 2 1/2 tsp cornflour / cornstarch
- 1 tsp white vinegar
Whipped Cream
- 1 1/2 cups heavy/thickened cream (whipping cream), cold
- 3 tbsp caster sugar / superfine sugar
- 1 tsp vanilla extract
Toppings
- Strawberries, diced into 1cm / 1/3″ cubes
- Mangoes, diced into 1cm / 1/3″ cubes
- Blueberries
- Raspberries
- Kiwi, sliced
- Passionfruit pulp
- Small mint sprigs
- Icing sugar / powdered sugar (for dusting)
Instructions
- Prepare Egg Whites: Separate the egg yolks from the egg whites while they are cold from the fridge as it’s easier. Measure out 160 ml (2/3 cup) of egg whites and set aside to reach room temperature for about 30 minutes, which helps them fluff better when whipped.
- Preheat Oven: Set your oven to 150°C (325°F) for all oven types to begin the initial preparation of the meringues.
- Beat Egg Whites and Sugar: Using a stand mixer or electric beater, beat egg whites on high speed for 1 minute. While continuing to beat, gradually add caster sugar 1 dessert spoon at a time to ensure it dissolves properly without graininess.
- Continue Beating: Beat the mixture on high for 8 more minutes until it becomes fluffy and glossy. Test for dissolved sugar by rubbing a small amount between your fingers. Add vinegar and cornflour, then beat for an additional 30 seconds to stabilize the meringue.
- Prepare Baking Trays: Dab a small amount of the meringue mixture in the corners of two baking trays and cover each with baking paper (parchment) to keep it in place.
- Pipe Meringue Mounds: Transfer the meringue into a large piping bag fitted with your preferred nozzle. Pipe 12 to 13 mounds about 6-7 cm (2.5 inches) wide and 5 cm (2 inches) tall on the trays. Use a spoon to slightly flatten and create a slight dent on the surface to hold cream and fruit later. Pavlovas should finish about 4 cm (1.6 inches) high.
- Bake Pavlovas: Place both trays in the oven and immediately reduce the temperature to 110°C (225°F) or 100°C fan. Bake for 1 hour 30 minutes or until the meringues feel dry to touch. If still sticky, continue baking as needed since times may vary depending on oven.
- Cool in Oven: After baking, turn the oven off and leave the pavlovas inside to cool completely for 4 hours or ideally overnight (around 10 hours) to prevent cracking and ensure ideal texture.
- Store Properly: Once fully cooled, transfer pavlovas into an airtight container and store in a cool, dry place until ready to serve, keeping them crisp and fresh.
- Make Whipped Cream: In a large bowl, beat cold heavy cream with caster sugar and vanilla extract on high speed until soft peaks form. This takes about 1 minute with a stand mixer or 2-3 minutes with a hand-held beater. For stabilised whipped cream, follow your chosen method.
- Decorate and Serve: Just before serving, spoon a generous dollop of whipped cream into the center dents of each pavlova. Top with assorted fresh fruits like strawberries, mangoes, blueberries, raspberries, kiwi, and passionfruit pulp. Garnish with small mint sprigs and dust lightly with icing sugar if desired for a finishing touch.
Notes
- Separating egg whites from cold eggs is easier and helps achieve better volume when whipped.
- Cornflour and white vinegar help stabilize and create the perfect texture for the meringue.
- Allowing the pavlovas to cool slowly in the oven prevents cracks and keeps them crisp.
- Exact baking time may vary depending on oven; ensure meringues are dry to touch before cooling.
- Store pavlovas in an airtight container in a cool dry place to maintain crispness until serving.
- Using cold heavy cream helps achieve better whipped cream consistency.
- Use fresh seasonal fruits for topping for best flavor and presentation.
Keywords: mini pavlova, meringue dessert, whipped cream, fruit pavlova, Australian dessert, gluten free dessert