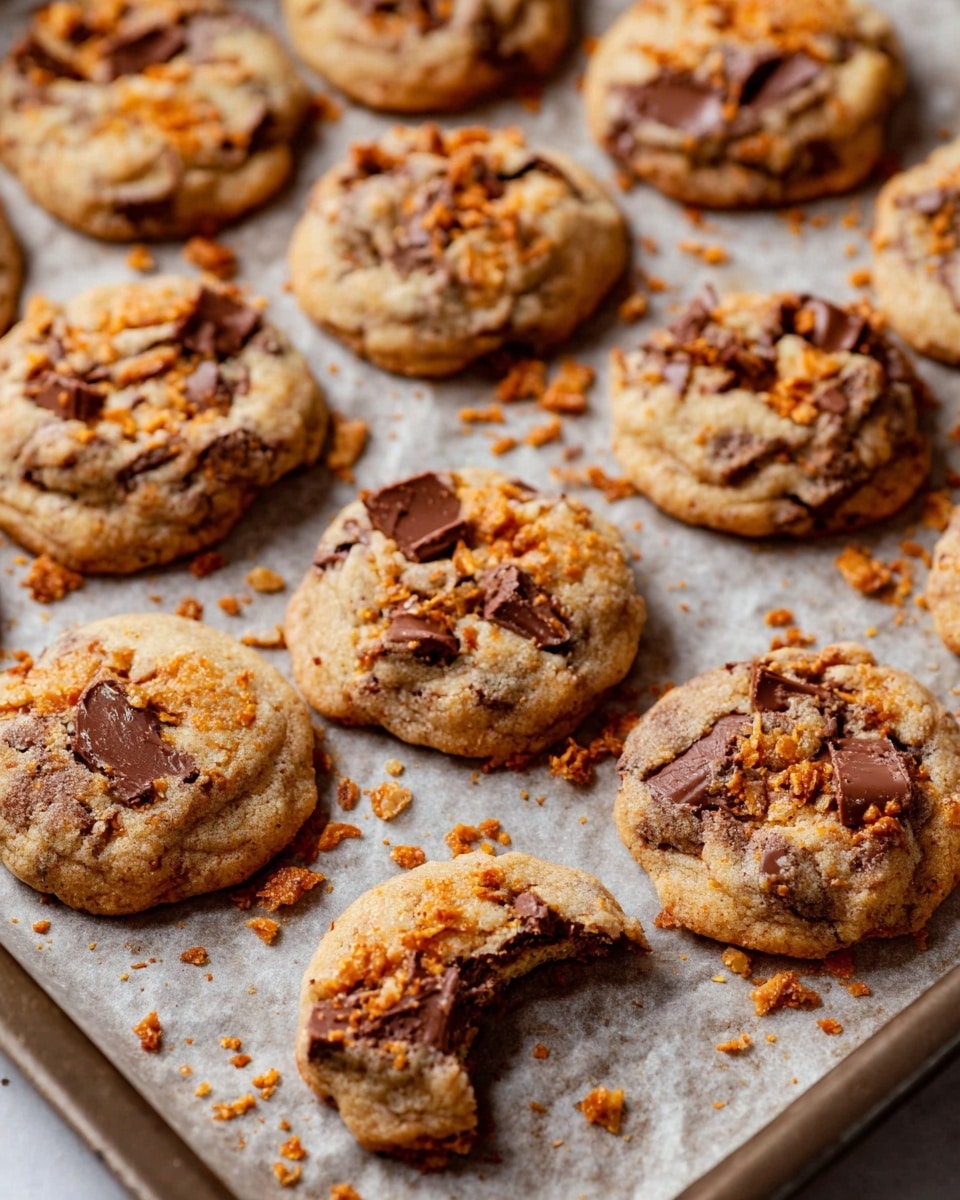
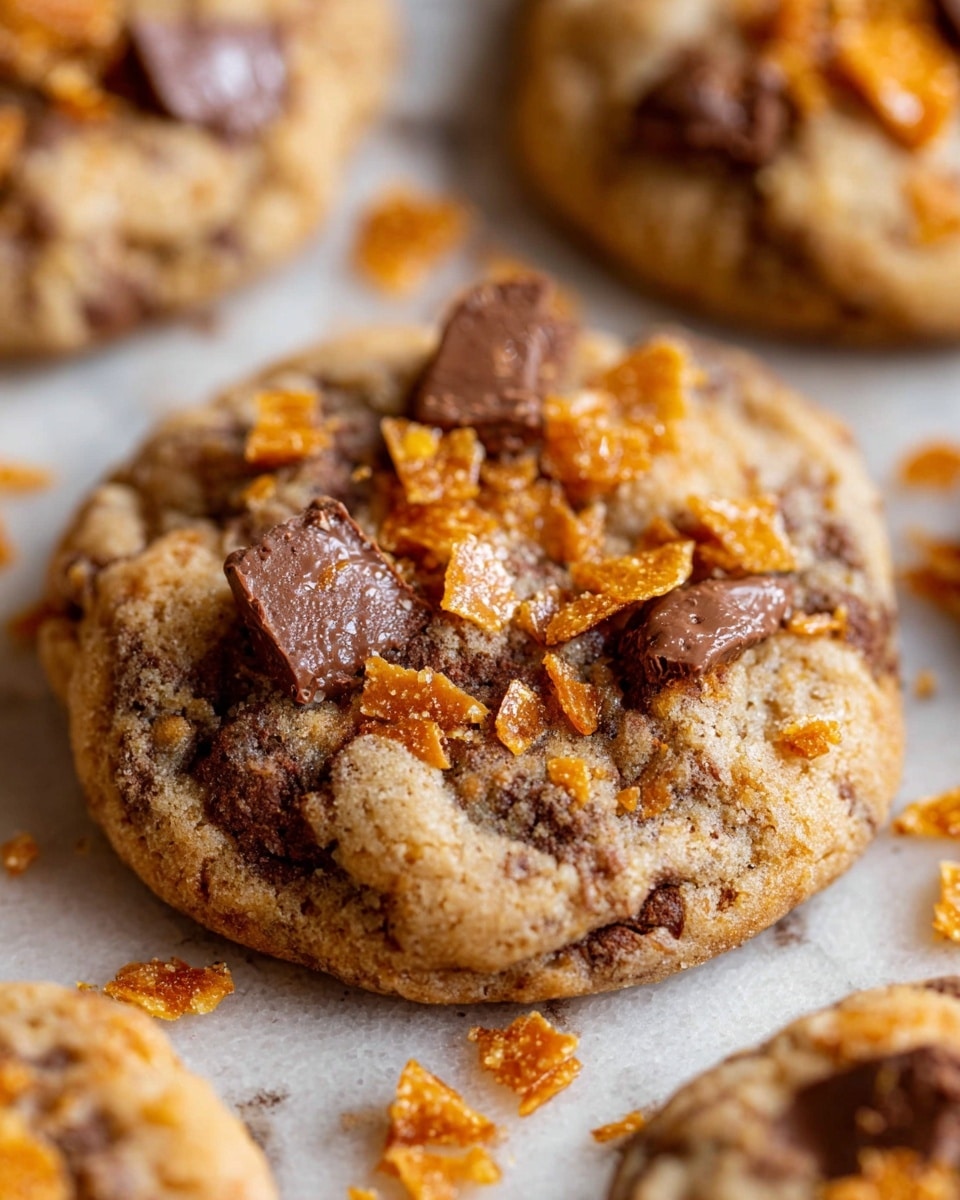
Peanut Butter Butterfinger Cookies Recipe
If you are on the hunt for a cookie that brings together rich peanut butter flavor and the irresistible crunch of candy bars, then this Peanut Butter Butterfinger Cookies Recipe is your new best friend. Imagine soft, chewy cookies loaded with pieces of Butterfinger candy, balancing sweet and salty notes with a satisfyingly crispy texture. These crave-worthy cookies are simple to make yet deliver a gourmet taste that feels straight from a bakery, perfect for sharing with friends or treating yourself to a little moment of cookie bliss.
Ingredients You’ll Need
These ingredients are wonderfully straightforward but each one plays a crucial role in bringing the Peanut Butter Butterfinger Cookies Recipe to life. From the creamy peanut butter that lends richness to the crisp chopped Butterfingers that give every bite a delightful crunch, every component is essential.
- 3/4 cup butter (softened): Provides a creamy base for rich flavor and soft texture.
- 1/2 cup granulated sugar: Adds sweetness and helps with cookie structure.
- 1/2 cup brown sugar (packed): Brings moisture and a hint of caramel depth to the dough.
- 1 cup peanut butter (not natural): The star ingredient offering that classic nutty flavor and creamy texture.
- 1 large egg: Binds the ingredients together and adds tenderness.
- 1 1/2 teaspoons vanilla extract: Enhances all other flavors with a sweet, warm aroma.
- 1 1/2 cups all-purpose flour (spooned and leveled): The structural backbone of the cookies.
- 1/2 teaspoon baking soda: Helps the cookies rise just enough for softness.
- 1/2 teaspoon baking powder: Adds a light lift contributing to a tender crumb.
- 1/4 teaspoon kosher salt: Balances the sweetness and accentuates flavors.
- 16 ounces Butterfinger candy, chopped: The magical crunch and flavor surprise that sets these cookies apart.
How to Make Peanut Butter Butterfinger Cookies Recipe
Step 1: Cream the Butter and Sugars
Start by beating the softened butter until it’s perfectly smooth and creamy. Slowly add both the granulated and brown sugars, beating the mixture until it’s light and fluffy with no chunks of butter in sight. This step is key to creating a delicate texture in your cookies.
Step 2: Add Peanut Butter, Egg, and Vanilla
Next, stir in a full cup of peanut butter — I love using Jif here for the ideal consistency and flavor. Followed by one egg and the vanilla extract, which rounds out the dough with just the right aromatic sweetness. Beat everything together until fully combined, making sure to scrape the sides so nothing is left behind.
Step 3: Combine Dry Ingredients
In a separate bowl or on top of the flour in your mixing bowl, mix together the baking soda, baking powder, and kosher salt. This little trio ensures your cookies rise beautifully while keeping their tender crumb. Then gently fold these dry ingredients into your wet mixture, taking care not to overwork the dough to avoid tough cookies.
Step 4: Fold in the Chopped Butterfinger Pieces
This is the exciting part! Add in the generous 16 ounces of chopped Butterfingers, folding them in carefully so they’re evenly dispersed without breaking down the candy too much. These nuggets promise every cookie bite will have sweet, crunchy pops of candy-coated peanut buttery goodness.
Step 5: Chill the Dough
Cover your dough and refrigerate for at least 15 minutes, though an hour or even up to 24 hours will deepen the flavors and keep the dough from spreading too much while baking. The chill time also makes it easier to scoop and shape the dough into perfect balls.
Step 6: Shape and Bake
Preheat your oven to 350 degrees Fahrenheit and line your baking sheets with parchment paper or silicone mats. Scoop the dough into 2-inch balls, spacing them an inch or two apart. Bake for about 10 minutes, watching for the edges to set and the middle to lose its shiny wetness. If your cookies stay too rounded, gently press them down right after baking for that perfect cookie shape.
How to Serve Peanut Butter Butterfinger Cookies Recipe
Garnishes
For an extra touch of decadence, sprinkle some finely chopped Butterfinger pieces on the warm cookies just as they come out of the oven. It adds an inviting sparkle and a fresh hit of candy crunch that will have everyone swooning over presentation.
Side Dishes
Serve these cookies with a tall glass of cold milk or a creamy latte for the ultimate combo. They also pair beautifully with simple vanilla ice cream, making a fun dessert experience that balances the cookie’s salty-sweet profile perfectly.
Creative Ways to Present
If you’re sharing these cookies at a party or gifting them, stack them with parchment paper between layers in adorable mason jars or festive tins. Decorative ribbons and a handwritten tag with “Peanut Butter Butterfinger Cookies Recipe” will make it extra special and personal.
Make Ahead and Storage
Storing Leftovers
After they’ve fully cooled, store your cookies in an airtight container at room temperature. They will keep their fresh-baked softness and candy crunch for up to three days, making them perfect for weekday treats or weekend indulgences alike.
Freezing
This recipe is wonderfully freezer-friendly! You can freeze cookie dough balls in a ziplock bag for up to three months. When you’re ready, bake them straight from frozen — just add an extra minute or two to the baking time. You can also freeze baked cookies in a sealed container for up to four weeks, thawing them at room temperature before enjoying.
Reheating
Warm your cookies gently in a low oven or microwave for just a few seconds if you want that just-baked feeling. However, many fans of this Peanut Butter Butterfinger Cookies Recipe actually prefer eating them at room temperature, when the Butterfinger chunks hold their perfect crisp texture.
FAQs
Can I use natural peanut butter instead of regular peanut butter?
It’s best to use a regular, non-natural peanut butter for this recipe because natural peanut butter’s oil separation can affect the dough’s texture and the cookies’ consistency.
What if I can’t find Butterfinger Bits?
No worries! Simply chop standard Butterfinger candy bars into chunks about the size of small nuts. This provides the same texture and flavor impact in your cookies.
How can I prevent my cookies from spreading too much?
Chilling the dough before baking helps control spreading. Also, avoid adding too much butter or overmixing the dough to maintain the ideal cookie shape.
Are these cookies crunchy or soft?
These cookies have a beautiful balance: soft, tender centers with crisp edges and crunchy bits of Butterfinger throughout for an amazing texture contrast.
Can I make these cookies gluten-free?
You can substitute the all-purpose flour with a gluten-free baking mix, but results may vary slightly in texture. Be sure to use a blend designed for baking to keep that perfect cookie crumb.
Final Thoughts
You really can’t go wrong with this Peanut Butter Butterfinger Cookies Recipe. It’s an exciting twist on a classic peanut butter cookie that brings delightful crunch and candy bar flair to each bite. Whether you’re baking for a holiday, a party, or simply to brighten your day, these cookies promise smiles with every mouthful. I encourage you to dive into this joyful recipe and watch it quickly become a cherished favorite in your cookie collection.
PrintPeanut Butter Butterfinger Cookies Recipe

These Peanut Butter Butterfinger Cookies combine creamy peanut butter with crunchy, chopped Butterfinger candy bars for a crisp, sweet treat perfect for cookie lovers. Soft and chewy with bursts of candy crunch, these cookies bake to golden perfection and deliver a delightful blend of peanut butter richness and chocolatey candy bar pieces. Enjoy these homemade delights that are great for sharing or a special snack.
- Prep Time: 15 minutes
- Cook Time: 10 minutes
- Total Time: 40 minutes (including chilling time)
- Yield: Approximately 25 cookies 1x
- Category: Dessert
- Method: Baking
- Cuisine: American
Ingredients
Wet Ingredients
- 3/4 cup butter, softened (1 and 1/2 sticks)
- 1/2 cup granulated sugar
- 1/2 cup packed brown sugar
- 1 cup peanut butter (non-natural, I prefer Jif)
- 1 large egg
- 1 and 1/2 teaspoons vanilla extract
Dry Ingredients
- 1 and 1/2 cups all-purpose flour (spooned and leveled)
- 1/2 teaspoon baking soda
- 1/2 teaspoon baking powder
- 1/4 teaspoon kosher salt
Add-ins
- 16 ounces Butterfinger, chopped (approximately 2 standard 8-ounce candy bars or one package of Butterfinger Bits if available)
Instructions
- Cream the butter: In a large bowl or stand mixer, beat 3/4 cup softened butter until smooth and creamy, scraping the sides of the bowl as needed.
- Add sugars: Add 1/2 cup granulated sugar and 1/2 cup brown sugar. Beat on medium speed for about 2 minutes until the mixture is fluffy with no butter chunks remaining, scraping down the bowl as necessary.
- Incorporate peanut butter: Add 1 cup of peanut butter and mix until fully combined and creamy.
- Add egg and vanilla: Crack in 1 large egg and pour in 1 and 1/2 teaspoons vanilla extract. Beat the mixture until smooth, scraping the bowl occasionally to ensure even mixing.
- Combine dry ingredients: In a separate bowl or on top of the wet ingredients, spoon 1 and 1/2 cups all-purpose flour, then sprinkle 1/2 teaspoon baking soda, 1/2 teaspoon baking powder, and 1/4 teaspoon kosher salt over it. Stir gently with a teaspoon to break up clumps and blend dry ingredients partially together.
- Mix dry with wet: Turn the mixer on low to incorporate the dry ingredients into the dough. Stop mixing as soon as the dough just starts to come together but still shows some flour. Scrape the bowl sides and bottom carefully to combine without overmixing, which can cause tough cookies.
- Add chopped Butterfinger: Fold in 16 ounces of finely chopped Butterfinger candy bars (or Butterfinger Bits) just enough to distribute pieces evenly without crushing them.
- Chill the dough: Cover the dough and chill in the refrigerator for 15 minutes to 1 hour, or up to 24 hours for enhanced flavor and texture development.
- Preheat oven: Heat the oven to 350°F (175°C). Line two baking sheets with parchment paper or silicone baking mats to prevent sticking.
- Shape cookies: Use a 2-inch cookie scoop or spoon to form balls of dough. Slightly overpack the scoop to get substantial cookies.
- Arrange on baking sheet: Place dough balls on the prepared baking sheets spacing them at least 1 to 2 inches apart to allow room for spreading during baking. About 12 cookies fit on a half-sheet pan (12×18 inches).
- Bake cookies: Bake at 350°F for about 10 minutes, until edges are set and the centers are no longer shiny but cookies remain puffy.
- Shape if needed: If cookies haven’t spread enough, gently press tops with a spatula immediately after removing from oven or a couple of minutes before baking completes. Optionally, top with extra Butterfinger crumbles if available.
- Cool cookies: Let cookies rest on the baking sheet for at least 5 minutes to firm up, then transfer to a wire rack to cool completely.
- Serving tip: These cookies taste best at room temperature, as the melted Butterfinger candy inside cools and firms to a pleasant texture rather than chewy melted candy.
- Storage: Store leftovers in a tightly sealed container for up to 3 days at room temperature to maintain freshness.
- Freezing dough: Cookie dough balls freeze well in a ziplock bag for up to 3 months. Bake from frozen, adding 1-2 minutes to baking time and press cookies flat with a spatula after baking if needed.
- Freezing baked cookies: Baked cookies also freeze well sealed for up to 4 weeks; thaw at room temperature before serving.
Notes
- Use conventional peanut butter like Jif for best texture and flavor; natural peanut butters are too oily and can affect dough consistency.
- If Butterfinger Bits are unavailable, chop two standard 8-ounce Butterfinger candy bars into small, coarse pieces.
- Do not overmix the dough to avoid tough cookies; stop mixing when dough just starts to come together.
- Chilling dough improves flavor and makes handling easier but is optional.
- Cookies are best eaten at room temperature rather than warm to enjoy the ideal texture of melted and then set Butterfinger pieces.
- Dough and baked cookies freeze well for convenient future baking and snacking.
Keywords: Peanut Butter Cookies, Butterfinger Cookies, Candy Bar Cookies, Chocolate Candy Cookies, Crunchy Peanut Butter Treats, Dessert Cookies