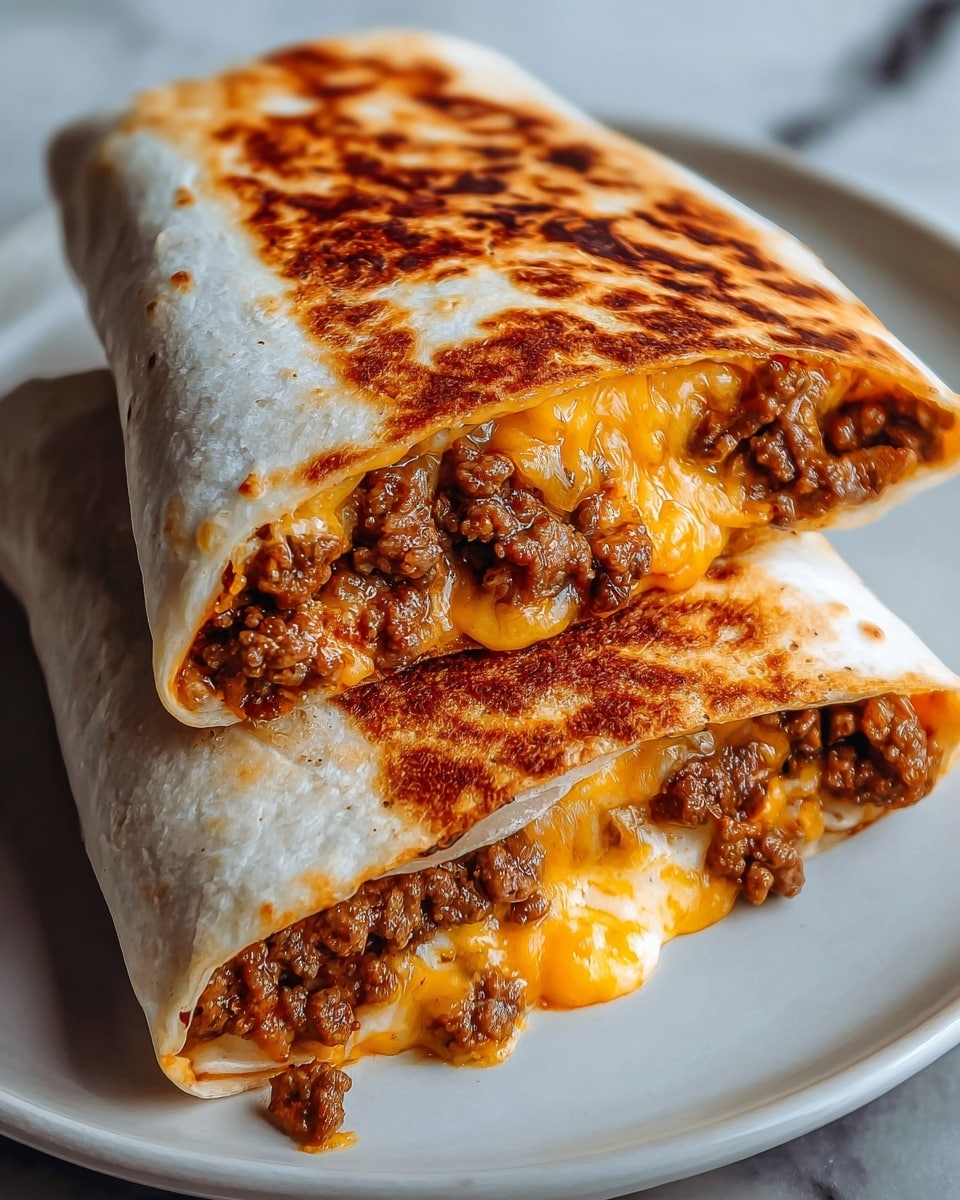
Irresistible Easy Grilled Cheese Burrito Recipe
Picture this: the warm, buttery scent of a perfectly grilled tortilla gently sizzling on the pan, mingling with the rich aroma of melted cheddar and mozzarella cheeses oozing out with every fold. Your mouth waters as you unwrap this golden beauty, the crispy exterior giving way to a melty, flavorful fiesta of seasoned beef, creamy sour cream, and a hint of smoky chipotle sauce. This isn’t just any meal—it’s comfort wrapped in a tortilla, ready in under 30 minutes and guaranteed to become your new favorite crave-worthy delight.
Let me share with you the magic behind this Irresistible Easy Grilled Cheese Burrito Recipe, a little treasure that turns everyday ingredients into a culinary hug. Whether you need a quick dinner fix, a crowd-pleasing snack, or simply want to impress without the stress, this recipe brings all those dreams to life with cheesy, spicy, and savory layers that satisfy every craving.
Why You’ll Love This Irresistible Easy Grilled Cheese Burrito Recipe
- Ready in 30 minutes: Perfect for busy weeknights or spontaneous cravings, this recipe comes together swiftly, delivering maximum taste in minimal time.
- Uses simple ingredients: You’ll find everything you need right in your pantry or fridge, no need for exotic components or tricky preparations.
- Perfect for beginners: Even if you’re new to cooking, this recipe’s clear steps and forgiving nature make success almost guaranteed.
- Impressive presentation: Crispy, golden grilled edges and gooey cheese pulls make it a feast for the eyes as well as the palate.
- Customizable: Easily swap proteins, cheeses, or spice levels to suit your taste buds or dietary needs—endless delicious possibilities!
Why This Irresistible Easy Grilled Cheese Burrito Recipe Works
The secret that makes this recipe shine is the harmony of textures and flavors. Starting with well-seasoned, browned ground beef ensures a juicy, savory filling that packs a punch. Layering it with fluffy rice and a silky nacho cheese sauce keeps every bite smooth, preventing dryness. Grilling the burrito seam-side down seals all the ingredients perfectly and creates that coveted crunchy, buttery crust that contrasts so wonderfully with the melty center. This careful balance of seasoning, cheese, and technique transforms a humble burrito into an irresistible meal.
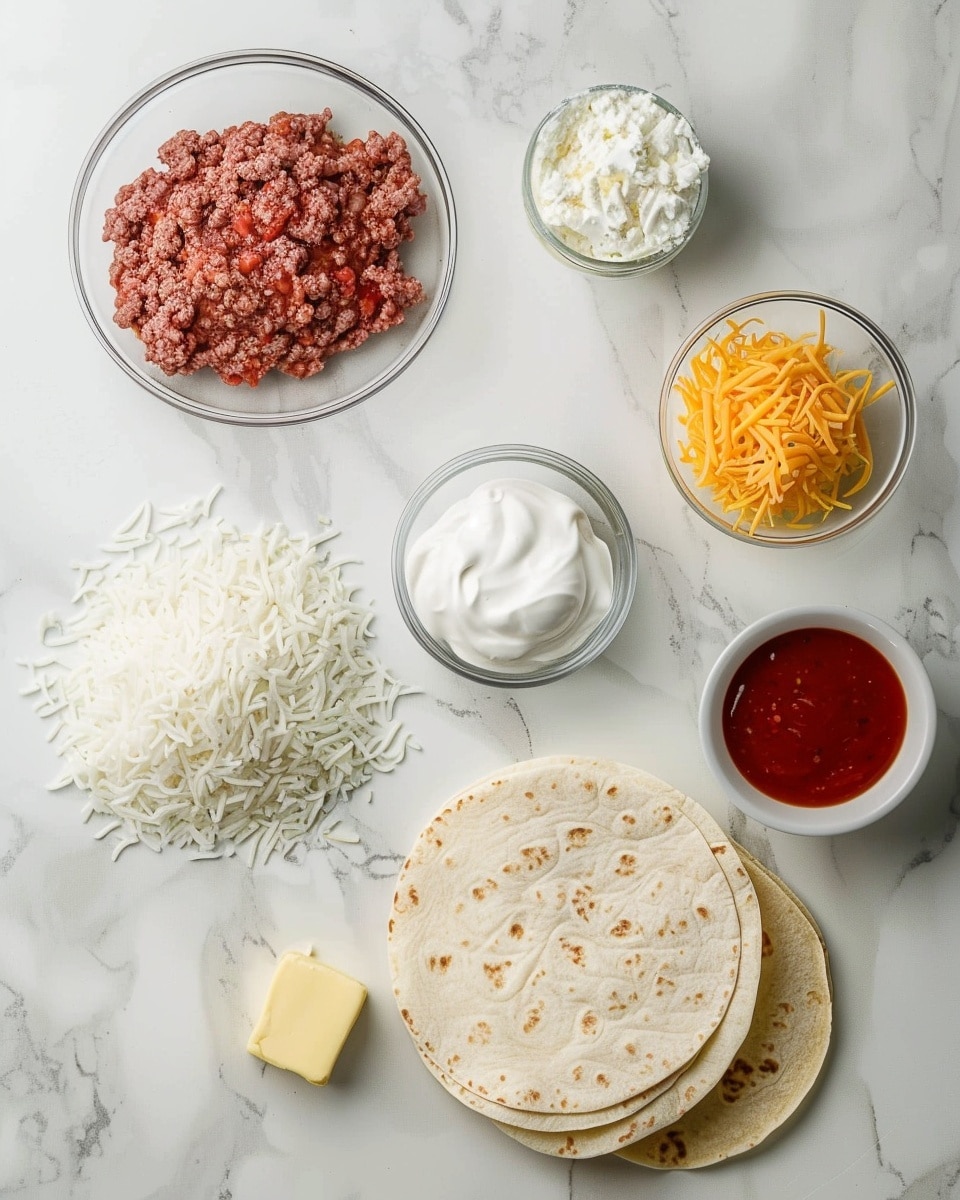
Ingredients You’ll Need
Gathering just a handful of accessible ingredients, this recipe invites you to dive in with confidence while promising bold, satisfying flavors.
- Ground Beef: The hearty base, adding rich, meaty flavor and protein.
- Taco Seasoning: Infuses the beef with aromatic spices and warmth.
- Cooked White Rice: Provides a tender, comforting filler that absorbs the flavors beautifully.
- Sour Cream: Adds creamy tang and moisture to balance the spices.
- Nacho Cheese Sauce: Brings luscious, velvety richness and that iconic cheese flavor.
- Shredded Cheddar Cheese: Delivers sharpness and melt-in-your-mouth goodness.
- Shredded Mozzarella Cheese: Adds gooey stretchiness and milder creaminess.
- Chipotle Sauce: Injects smoky heat and depth, customizable to your spice level.
- Flour Tortillas: The perfect pliable shell that crisps beautifully when grilled.
- Butter or Oil: Used to toast the burritos to golden, crispy perfection.
Ingredient Substitutions & Tips
- Ground Beef: Swap for ground turkey, chicken, or a plant-based substitute for a lighter or vegetarian option.
- Taco Seasoning: Use homemade blends with cumin, paprika, garlic, and chili powder for a fresher taste and no preservatives.
- Cooked White Rice: Brown rice or quinoa serve as fantastic healthier, fiber-packed alternatives.
- Sour Cream: Try Greek yogurt or dairy-free coconut cream alternatives for differing tang and creaminess.
👨🍳 Pro Tips for Perfect Results
- Tip 1: Make sure to drain excess grease from the beef before adding seasoning to avoid a soggy burrito.
- Tip 2: Warm tortillas gently to prevent cracking when you fold your burrito.
- Tip 3: Don’t overload the burrito; balance the fillings for easy wrapping and even heating.
- Tip 4: Grilling seam-side down first seals your burrito tightly and keeps everything inside.
- Tip 5: Use a mix of cheeses for depth—mozzarella for stretch, cheddar for sharpness, and a sprinkle of Mexican blend for festive flair.
How to Make Irresistible Easy Grilled Cheese Burrito Recipe
Step 1: Brown the Beef
Start by heating a skillet over medium heat and adding the ground beef. Cook and crumble it for 8 to 10 minutes until it’s beautifully browned and no longer pink. Drain the excess grease to keep the burrito from feeling heavy or oily. Stir in your taco seasoning along with a splash of water, then let it simmer gently for 5 minutes. This step infuses the beef with lively spices that bring every bite to life.
💡 Pro Tip: Use a slotted spoon to transfer the beef, leaving behind extra grease for a cleaner filling.
Step 2: Warm the Tortillas
Next, soften your tortillas so they fold without cracking. Place each one in a dry skillet over low heat for about 30 seconds per side or microwave them covered with a damp towel for 20 seconds. Keeping them warm wrapped in a clean towel maintains their pliability and makes rolling a breeze.
💡 Pro Tip: If you find your tortillas drying out, lightly brush with water before warming to retain moisture.
Step 3: Layer the Fillings
Now the fun part: assembly. Lay a warm tortilla flat and spread an even layer of cooked white rice first. Add a generous scoop of the seasoned beef, then drizzle with nacho cheese sauce for creamy comfort. Dollop sour cream and a touch of chipotle sauce if you like things smoky and spicy. Finally, sprinkle on the melty shredded cheddar and mozzarella cheeses to create that irresistible cheesy blanket before folding.
💡 Pro Tip: Keep fillings centered and don’t overfill to avoid tearing or spills.
Step 4: Grill to Golden Perfection
Heat another skillet over medium heat and add butter or oil to coat the surface. Place your burrito seam-side down onto the skillet. Cook for 3 to 4 minutes until the bottom turns a deep, golden brown crust, then carefully flip it and grill the other side for another 3 to 4 minutes. This step seals all the flavors inside while delivering the crave-worthy crispy texture.
💡 Pro Tip: Use a spatula to gently press the burrito for an even grill and extra crunch.
Step 5: Serve and Enjoy
Once grilled to perfection, transfer your burrito to a plate and let it rest for a minute. This allows the cheeses to settle slightly, making slicing easier and cleaner. Cut it in half diagonally to reveal those gooey cheese pulls and layered fillings. Serve with extra chipotle sauce or your favorite guacamole for dipping—the perfect finishing touch!
💡 Pro Tip: A quick sprinkle of fresh cilantro or a squeeze of lime brightens the flavor beautifully.
Common Mistakes to Avoid
Learn from these common pitfalls:
- Overfilling the burrito: Makes it difficult to fold, increasing the chance of tearing and spills.
- Not warming the tortillas: Leads to cracking during rolling and uneven grilling.
- Skipping grease drainage: Results in a soggy, greasy burrito rather than a crispy, satisfying one.
- Using only one cheese: Losing out on layers of flavor and that perfect melty stretchiness.
- Grilling on too high heat: Can burn the tortilla before the inside is heated thoroughly.
- Not sealing seam-side down: Causes the burrito to unravel on the skillet, making a mess.
Delicious Variations to Try
Once you’ve mastered the classic version of this Irresistible Easy Grilled Cheese Burrito Recipe, mix things up with these tasty spins:
Veggie-Loaded Burrito
Swap beef for seasoned black beans or grilled veggies like peppers and onions. Add corn and avocado for creamy textures and vibrant colors.
Spicy Chicken Burrito
Use shredded rotisserie chicken tossed in your favorite hot sauce. Increase chipotle for extra smoky heat and add fresh jalapeños.
Breakfast Burrito
Fill with scrambled eggs, crispy bacon or sausage, and potatoes. Melt cheese over everything and add a dollop of sour cream for a morning boost.
BBQ Pulled Pork Burrito
Swap in tender pulled pork tossed in smoky BBQ sauce, add coleslaw inside for crunch and tang, topped with cheddar cheese.
Vegan Cheesy Burrito
Use plant-based crumbles or lentils, vegan nacho and shredded cheeses, and swap sour cream for vegan yogurt. Add fresh salsa for zest.
Mexican Street Corn Style
Incorporate grilled corn kernels, cotija cheese, a sprinkle of chili powder, and fresh lime juice inside the burrito for a street-food vibe.
How to Serve Irresistible Easy Grilled Cheese Burrito Recipe
Garnishes
Fresh cilantro leaves, sliced green onions, or a squeeze of lime brighten the dish wonderfully. A sprinkle of chopped tomatoes or diced avocado adds color and freshness.
Side Dishes
Serve with crispy tortilla chips and salsa, or a light Mexican-style salad for balance. Refried beans or warm queso dip complete the feast perfectly.
Creative Ways to Present
Slice burritos diagonally to showcase the cheesy layers and arrange on a platter with small bowls of dipping sauces for sharing. Wrap individual burritos with parchment paper tied with twine for a picnic-ready meal.
Make Ahead and Storage
Storing Leftovers
Wrap cooled burritos tightly in plastic wrap or store in an airtight container. Keep refrigerated and consume within 2 to 3 days for optimal freshness.
Freezing
For longer storage, wrap each burrito individually in foil and place in a freezer-safe bag. Freeze for up to 2 months. Thaw overnight in the refrigerator before reheating.
Reheating
Reheat in a skillet over medium heat to regain crispiness, or microwave wrapped in a damp paper towel for 1 to 2 minutes for a quicker option. Finish with a quick pan-sear if needed.
FAQs
Can I use other types of cheese?
Absolutely! Feel free to experiment with Monterey Jack, pepper jack, or a creamy queso fresco to tailor the flavor to your liking.
Is it possible to make this recipe gluten-free?
Yes, just swap regular flour tortillas for gluten-free alternatives. Just warm gently to avoid tearing during rolling.
Can I prepare the filling ahead of time?
Definitely. Cook and season the beef and rice in advance, store them separately in the fridge, and assemble fresh when ready to serve.
How spicy is the chipotle sauce?
It offers a smoky heat that varies based on the amount you use. Start small and add more to match your spice preference.
What’s the best way to prevent a soggy burrito?
Drain grease well, layer ingredients strategically (cheese acts as a moisture barrier), and grill seam-side down first to seal everything in.
Can I freeze these burritos pre- or post-grilling?
Freeze assembled and wrapped burritos before grilling for convenience, or freeze after grilling to preserve crispiness, though reheating the latter requires care.
What sides pair best with this dish?
Tortilla chips with salsa, guacamole, or a fresh salad are fantastic. Black beans or corn salad also complement the flavors beautifully.
Can I make this recipe vegetarian or vegan?
Yes! Replace beef with beans or plant-based crumbles, swap cheeses and sour cream for vegan versions, and enjoy a fully plant-powered burrito.
Final Thoughts
There’s something utterly comforting and downright delicious about biting into this Irresistible Easy Grilled Cheese Burrito Recipe. It’s the perfect marriage of crispy, gooey, savory, and spicy that satisfies cravings and warms the soul in every bite. Whether you’re feeding a hungry family, hosting friends, or just treating yourself after a long day, this recipe delivers pure joy without fuss.
Have you tried this Irresistible Easy Grilled Cheese Burrito Recipe? I’d love to hear how it turned out! Leave a comment below. If you loved this recipe, please share it with friends and family. Happy cooking! 😊
PrintIrresistible Easy Grilled Cheese Burrito Recipe

This Irresistible Easy Grilled Cheese Burrito is a delicious fusion of classic comfort foods featuring seasoned ground beef, rice, creamy sauces, and melty cheddar and mozzarella cheeses wrapped in a warm, buttery flour tortilla and grilled to golden perfection. Ideal for a quick weeknight dinner or a tasty snack, this recipe offers customizable options for meat, cheese, and dietary preferences, promising a satisfying meal you’ll crave again and again.
- Prep Time: 10 minutes
- Cook Time: 20 minutes
- Total Time: 30 minutes
- Yield: 4 servings 1x
- Category: Main Dish
- Method: Frying
- Cuisine: Mexican-American Fusion
Ingredients
Protein
- 1 pound Ground Beef (can substitute with turkey or plant-based)
Seasoning
- 1 packet Taco Seasoning (make your own for a healthier option)
Grains
- 2 cups Cooked White Rice (substitute with brown rice or quinoa if desired)
Dairy & Sauces
- 1 cup Sour Cream (try yogurt or dairy-free alternatives)
- 1 cup Nacho Cheese Sauce (homemade or vegan cheese can be used)
- 1 cup Shredded Cheddar Cheese (mix in mozzarella or Mexican blend for flavor)
- 1 cup Shredded Mozzarella Cheese (can be omitted or replaced with lower-fat cheese)
- 1 tablespoon Chipotle Sauce (adjust based on spice preference)
Wrap & Cooking Fats
- 4 large Flour Tortillas (whole wheat or gluten-free are good alternatives)
- 2 tablespoons Butter or Oil (olive oil or non-stick spray for healthier option)
Instructions
- Brown the Ground Beef: Heat a skillet over medium heat and cook the ground beef for 8–10 minutes until it’s no longer pink. Drain any excess grease, then add the taco seasoning along with a splash of water. Stir and simmer the mixture for about 5 minutes to let the flavors meld.
- Warm the Tortillas: Gently warm the flour tortillas by placing them in a dry skillet over low heat for a minute or two, or microwave them for about 20 seconds. Cover them with a clean towel to keep them soft and warm.
- Assemble the Burritos: Lay each warm tortilla flat and layer with cooked white rice, the seasoned ground beef, nacho cheese sauce, sour cream, and chipotle sauce. Sprinkle the shredded cheddar and mozzarella cheeses evenly on top.
- Grill the Burritos: Heat a skillet over medium heat and add butter or oil. Place each assembled burrito seam-side down onto the skillet. Grill for 3–4 minutes until the bottom is golden and crispy, then carefully flip and grill the other side for another 3–4 minutes. This ensures the cheese melts and the tortilla is crisp.
- Serve: Remove the burritos from the skillet and let them cool for a minute. Slice each burrito in half and serve immediately with extra chipotle sauce or guacamole for added flavor.
Notes
- For a healthier version, substitute ground beef with ground turkey or plant-based meat alternatives.
- Make your own taco seasoning to control sodium and additives.
- Use whole wheat or gluten-free tortillas to accommodate dietary preferences.
- Adjust the amount of chipotle sauce according to your spice tolerance.
- Leftover burritos can be refrigerated and reheated in a skillet or oven for best texture.
Keywords: grilled cheese burrito, easy burrito recipe, comfort food, cheesy burrito, beef burrito, quick dinners, homemade burrito