10-Minute Kimchi Fried Rice Recipe
Picture this: the moment you bite into a warm, vibrant plate of kimchi fried rice, the tangy spice of fermented kimchi dances on your tongue while the comforting savory notes of soy sauce wrap around each grain of fluffy rice. That irresistible sizzle as the kimchi fries in hot oil fills the kitchen with an aroma that instantly sparks joy. This 10-Minute Kimchi Fried Rice Recipe is more than just a meal; it’s a comforting hug on a plate, ready to brighten any day with its bold flavors and effortless preparation.
Why You’ll Love This 10-Minute Kimchi Fried Rice Recipe
- Quick and Easy: Ready in just about 10 minutes, this recipe is perfect when you want a satisfying meal in record time without sacrificing flavor.
- Simple Ingredients: Uses pantry staples and leftover rice, making it budget-friendly and accessible for every home cook.
- Perfect for Weeknights: When you’re craving something tasty and wholesome but short on time, this recipe has got your back.
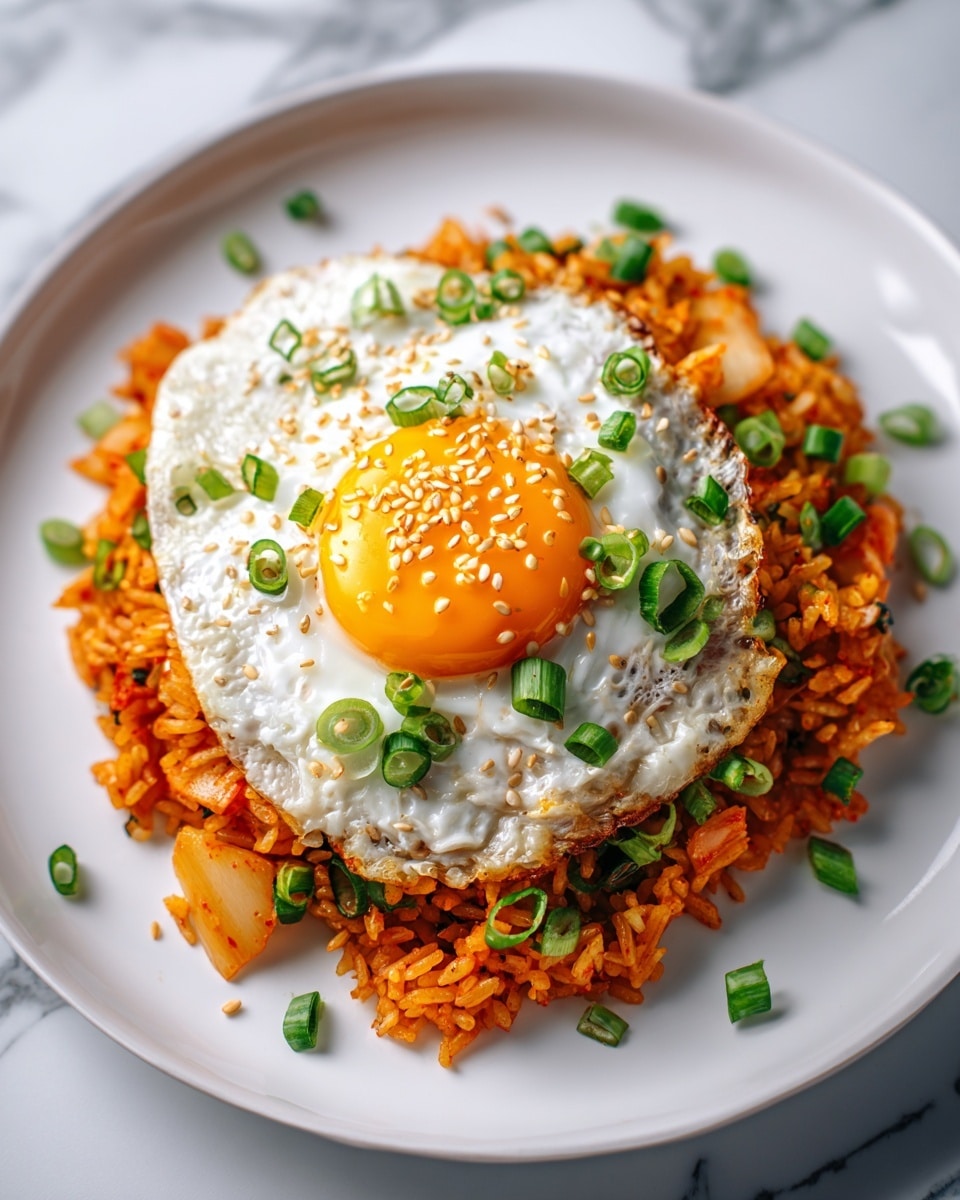
- Impressive Presentation: Topped with a sunny side up egg and sprinkled with sesame seeds and green onions, it looks as delightful as it tastes.
- Customizable: Easily adaptable depending on your kimchi’s heat level and what you have in your fridge for add-ins or garnishes.
Why This 10-Minute Kimchi Fried Rice Recipe Works
This recipe owes its magic to a few simple but essential techniques. First, frying the kimchi in hot oil releases its distinctive tang and depth, infusing the rice with bold flavors. Second, using day-old cooked rice ensures each grain stays separate and slightly chewy, perfect for that ideal fried rice texture. Finally, topping it with a sunny side up egg adds a luscious creaminess that balances the spicy kick of the kimchi, creating a harmonious blend of textures and tastes with minimal effort.
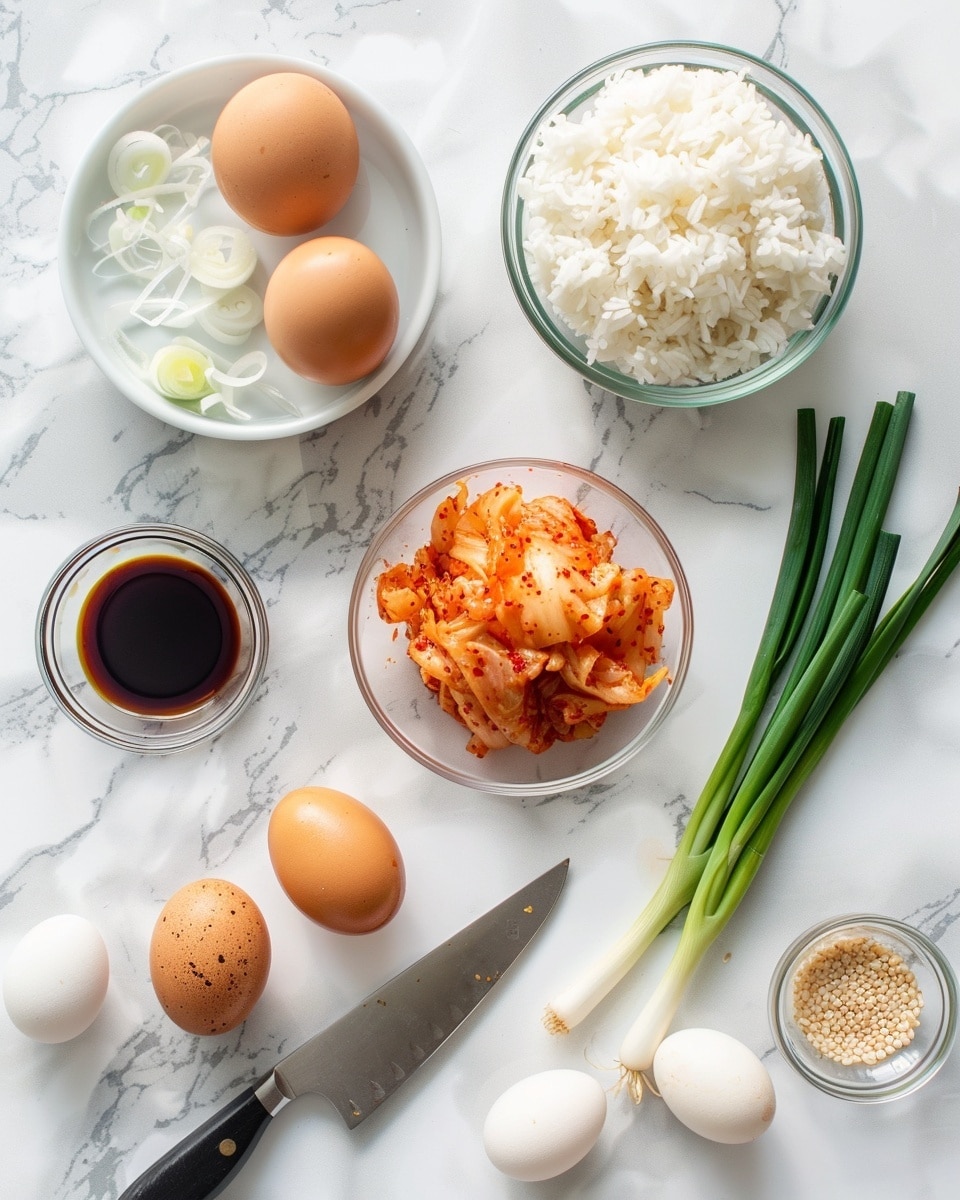
Ingredients You’ll Need
Gather these flavorful staples to whip up the perfect 10-Minute Kimchi Fried Rice Recipe. They’re straightforward, essential, and make all the difference in creating that spicy-sour kick and satisfying finish.
- 2 cups cooked rice: Preferably leftover or day-old to keep the rice fluffy and non-sticky during stir-frying.
- 1 cup chopped kimchi: The star ingredient that provides zest, spice, and a wonderful fermented tang.
- 1 tablespoon kimchi juice (optional): Adds an extra punch of flavor and moisture to the rice.
- 1 tablespoon soy sauce: For salty depth and a touch of umami.
- 2 eggs: Cooked sunny side up to crown the dish with richness and silkiness.
- 2 tablespoons vegetable oil: Ideal for frying the kimchi and eggs without overpowering the dish.
- 2 green onions, chopped: Fresh and crisp, perfect to brighten every bite.
- Sesame seeds for garnish: Adds a nutty crunch and a beautiful finish.
Ingredient Substitutions & Tips
- Cooked rice: If you don’t have leftover rice, quick-cook some jasmine or short-grain rice and let it cool to remove moisture.
- Kimchi: Use any fermented vegetable kimchi available—cabbage or radish varieties work wonderfully.
- Soy sauce: Tamari or coconut aminos are great gluten-free or lower-sodium alternatives.
- Vegetable oil: Feel free to substitute with sesame oil for a more authentic aroma, but use it sparingly to avoid overpowering the dish.
👨🍳 Pro Tips for Perfect Results
- Use day-old rice: It’s dryer and less sticky, helping you get that perfect fried texture instead of a mushy mess.
- Don’t overcrowd the pan: Give the kimchi and rice room to fry properly, allowing them to caramelize slightly and deepen in flavor.
- Keep your kimchi juice: It’s packed with flavor and moisture, so don’t toss it unless your kimchi is super sour or watery.
- Fry eggs sunny side up: The runny yolk mixes into the rice creating a luscious coating that’s pure comfort.
- Use fresh green onions: They add brightness and a fresh crunch that counters the rich, spicy elements beautifully.
How to Make 10-Minute Kimchi Fried Rice Recipe
Step 1: Sauté the Kimchi
Heat 1 tablespoon of vegetable oil in a large skillet over medium-high heat. Add the chopped kimchi and sauté it for 2 to 3 minutes until it’s fragrant and slightly caramelized at the edges. This step unlocks the kimchi’s savory tang and brings out a delightful umami depth.
💡 Pro Tip: Let the kimchi sizzle a bit without stirring too much, so those delicious browned bits develop for extra flavor.
Step 2: Stir-Fry the Rice
Add the cooked rice to the pan with the kimchi. Pour in the kimchi juice (if using) and soy sauce, stirring everything together. Cook for about 2 to 3 minutes until the rice is heated through and each grain is evenly coated with that spicy, savory kimchi goodness.
💡 Pro Tip: Break up any clumps of rice gently with your spatula to keep the texture light and fluffy.
Step 3: Fry the Eggs
In a separate non-stick pan, add the remaining tablespoon of oil and crack the eggs in gently. Fry them sunny side up until the whites are set but the yolks stay runny, creating that irresistible golden crown for your fried rice.
💡 Pro Tip: Sprinkle a pinch of salt on the eggs while cooking to enhance their flavor.
Step 4: Plate and Garnish
Divide the kimchi fried rice evenly between two plates. Carefully place a sunny side up egg on top of each serving. Finish with a generous sprinkle of chopped green onions and sesame seeds for a burst of freshness and crunch. Serve immediately while it’s hot and steamy.
💡 Pro Tip: Add a drizzle of toasted sesame oil on top for an added layer of nutty richness.
Common Mistakes to Avoid
Learn from these common pitfalls to ensure your 10-Minute Kimchi Fried Rice Recipe turns out perfect every time:
- Using freshly cooked rice: Can result in mushy, sticky fried rice that lacks texture.
- Overcrowding the pan: Leads to steaming rather than frying, making the dish soggy.
- Skipping the kimchi juice: Missing out on extra complexity and moisture in the dish.
- Cooking the eggs too long: Overcooked yolks lose that rich creaminess that ties the dish together.
- Not seasoning properly: Soy sauce balances kimchi’s acidity and enhances overall flavor—don’t skip it!
- Forgetting the garnishes: Green onions and sesame seeds add freshness and texture that elevate each bite.
Delicious Variations to Try
Once you’ve mastered the classic version of the 10-Minute Kimchi Fried Rice Recipe, here are some halal-friendly tweaks to make it your own:
Spicy Chicken Kimchi Fried Rice
Add diced cooked chicken breast or thigh to the stir-fry for extra protein and savory richness. Use halal-certified chicken and toss it in soy sauce before mixing.
Vegetarian Kimchi Fried Rice
Omit the eggs and add sautéed mushrooms, tofu cubes, or edamame for plant-based protein and texture while keeping that spicy tang front and center.
Shrimp and Kimchi Fried Rice
Quickly sauté peeled shrimp with garlic and add them before mixing in the rice. The sweetness of shrimp pairs beautifully with the fermented kimchi flavor.
Sesame Ginger Kick
Incorporate freshly grated ginger and a splash of toasted sesame oil during frying for an aromatic, warming twist that’s vibrant and flavorful.
Cabbage and Carrot Kimchi Fried Rice
Stir in shredded cabbage and julienned carrots for extra crunch and nutrition, amplifying the dish’s texture and visual appeal without altering its essence.
How to Serve 10-Minute Kimchi Fried Rice Recipe
Garnishes
Top with sesame seeds, thinly sliced green onions, and for extra flair, a sprinkle of toasted nori flakes or chili flakes for heat lovers.
Side Dishes
Pair with a crisp cucumber salad, steamed baby bok choy, or spicy pickled radishes for a fresh contrast. A light miso soup also complements the bold flavors gorgeously.
Creative Ways to Present
Serve the fried rice in rustic bowls or on colorful plates to amplify its vibrant colors. Add the egg just before serving so the yolk drapes richly over the steaming rice, inviting your guests to dig in immediately.
Make Ahead and Storage
Storing Leftovers
Store any leftover kimchi fried rice in an airtight container in the refrigerator for up to 2 days. The flavors will deepen, making the next meal equally delicious.
Freezing
While you can freeze kimchi fried rice, the texture may change slightly upon thawing. Freeze in portion-sized containers for up to 1 month.
Reheating
Reheat gently over medium heat in a skillet with a splash of oil or water to prevent drying out. Stir frequently to revive the texture and heat evenly.
FAQs
Can I use freshly cooked rice for this recipe?
It’s best to use day-old rice as fresh rice tends to be too moist and sticky, which results in mushy fried rice.
What type of kimchi is best for fried rice?
Traditional napa cabbage kimchi works wonderfully, but radish kimchi can also add a nice crunch and flavor.
Is this recipe spicy?
The heat depends on your kimchi. Some kimchi is mild, while others are spicy. Adjust the amount to suit your heat preference.
Can I make this recipe vegan?
Yes! Simply omit the eggs and use vegetable oil or a vegan butter substitute for frying.
What can I substitute for soy sauce?
Tamari or coconut aminos are excellent substitutes, great for gluten-free or lower-sodium needs.
How do I store leftover kimchi fried rice?
Store refrigerated in an airtight container for up to 2 days. Reheat in a skillet with a little oil or water to brighten the texture.
Can I add other vegetables to this dish?
Absolutely! Mushrooms, carrots, peas, or bell peppers make great add-ins for extra color and nutrition.
What’s the best oil to use for frying?
Vegetable oil is neutral and works well, but you can add a dash of toasted sesame oil at the end for authentic flavor.
Final Thoughts
There’s something undeniably comforting and invigorating about this 10-Minute Kimchi Fried Rice Recipe. It’s like a warm, spicy hug you can make any day of the week with love, speed, and simple ingredients. Whether you’re feeding yourself on a busy night or impressing friends with bold flavors and a stunning presentation, this recipe never fails to deliver joy with every bite.
Have you tried this 10-Minute Kimchi Fried Rice Recipe? I’d love to hear how it turned out! Leave a comment below. If you loved this recipe, please share it with friends and family. Happy cooking! 🍚🔥
Print10-Minute Kimchi Fried Rice Recipe

Kimchi Fried Rice is a quick and flavorful Korean dish featuring spicy, tangy kimchi combined with savory soy sauce and topped with a sunny-side-up egg. Perfect for breakfast or a simple meal, this recipe uses leftover rice and takes only 10 minutes to prepare.
- Prep Time: 5 minutes
- Cook Time: 10 minutes
- Total Time: 15 minutes
- Yield: 2 servings 1x
- Category: Main Course
- Method: Frying
- Cuisine: Korean
Ingredients
Main Ingredients
- 2 cups cooked rice
- 1 cup chopped kimchi
- 1 tablespoon kimchi juice (optional)
- 1 tablespoon soy sauce
For Cooking
- 2 tablespoons vegetable oil
- 2 eggs
Garnish
- 2 green onions, chopped
- Sesame seeds for garnish
Instructions
- Cook Kimchi: Heat 1 tablespoon of vegetable oil in a large skillet over medium-high heat. Add the chopped kimchi and sauté for 2-3 minutes until fragrant and slightly softened.
- Stir-fry Rice: Add the cooked rice, kimchi juice (if using), and soy sauce to the skillet with the kimchi. Stir-fry the mixture until the rice is heated through and well combined with the kimchi, about 3-4 minutes.
- Fry Eggs: In a separate pan, heat the remaining 1 tablespoon of oil over medium heat. Fry the eggs sunny side up, cooking until the whites are set but yolks remain runny.
- Plate and Garnish: Divide the kimchi fried rice evenly between two plates. Top each portion with a sunny-side-up egg. Garnish with chopped green onions and a sprinkle of sesame seeds. Serve immediately while hot.
Notes
- You can substitute vegetable oil with sesame oil for a nuttier flavor.
- For a less spicy version, rinse kimchi before cooking or reduce the amount used.
- Leftover rice works best if it is cold and a bit dry to avoid sticky fried rice.
- Add protein such as cooked chicken or tofu to make it more filling.
- Adjust soy sauce quantity according to your salt preference.
Keywords: kimchi fried rice, Korean rice recipe, quick kimchi dish, fried rice with egg, spicy fried rice