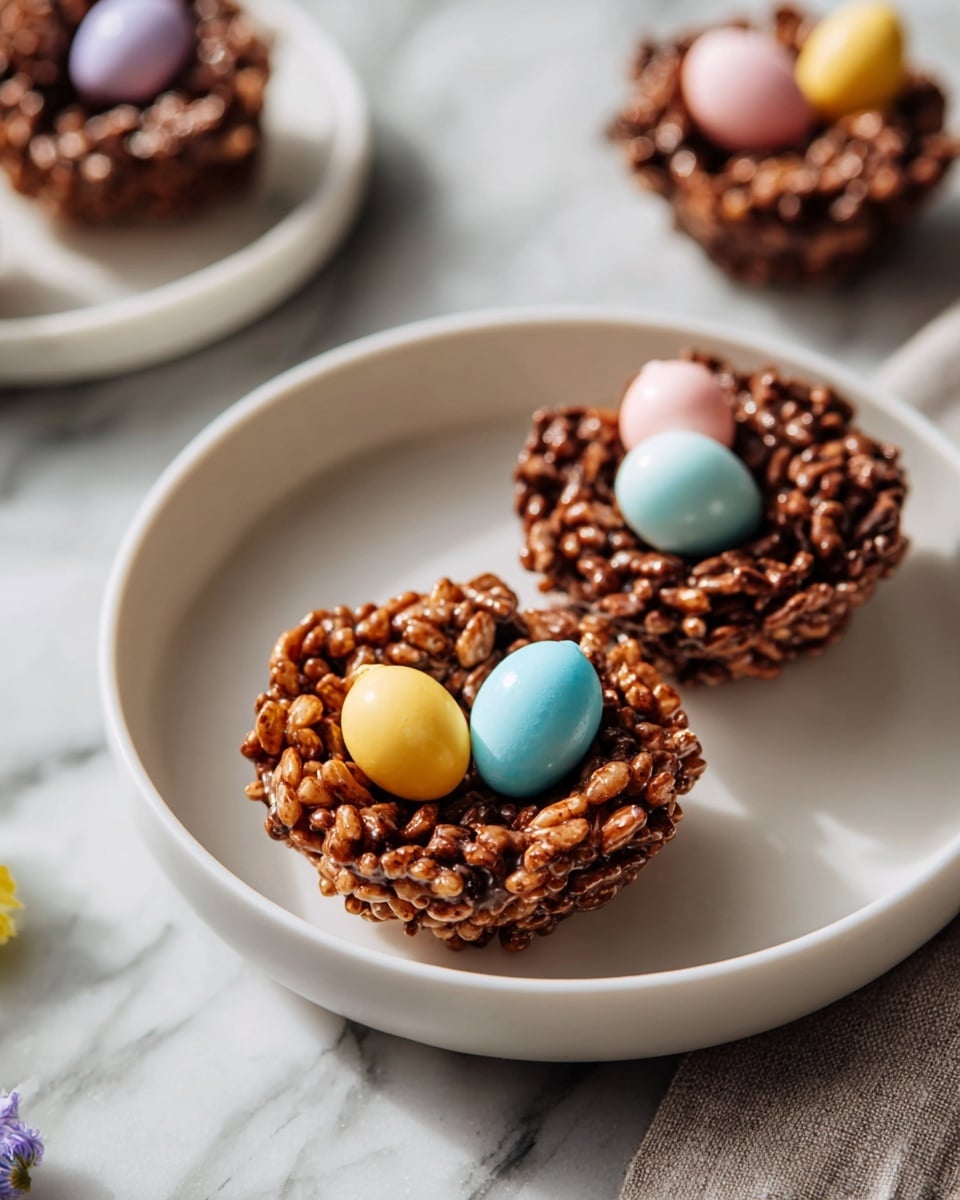
No-Bake Chocolate Bird Nests Recipe
Picture this: the rich aroma of creamy milk chocolate melting gently in your kitchen fills the air, mingling with the subtle, nutty scent of peanut butter. You’re stirring a bowl of glossy chocolate and peanut butter, enveloping crispy, cocoa-infused Rice Krispies into irresistible little nests. These no-bake chocolate bird nests don’t just look charming with their pastel Cadbury mini eggs nestling on top—they’re a symphony of flavors and textures that melt on your tongue. Whether you’re short on time or simply want to impress without firing up the oven, this recipe delivers magic in less than 20 minutes.
Why You’ll Love This No-Bake Chocolate Bird Nests Recipe
- Quick and Easy: Ready in just 10 minutes, these sweet treats come together faster than you can say dessert!
- Simple Ingredients: Made from familiar pantry staples like peanut butter, chocolate chips, and Rice Krispies, no elaborate shopping necessary.
- Perfect for Any Occasion: Whether it’s a festive gathering, a school treat, or an after-dinner delight, these nests charm every crowd.
- Impressive Presentation: The delicate “bird nest” shape topped with colorful Cadbury mini eggs looks professionally crafted but requires zero fancy skills.
- Customizable: Easy to tweak with your favorite mix-ins or toppings for a personal twist.
Why This No-Bake Chocolate Bird Nests Recipe Works
This recipe’s brilliance lies in its simple yet perfect balance of flavors and textures. The creamy peanut butter melds beautifully with melted milk chocolate, creating a luscious coating that clings to every Rice Krispie for a satisfying crunch in every bite. Melting chocolate in short bursts prevents burning, ensuring silky smoothness, while the chilled setting helps the nests hold their iconic hollow shape—perfect little nests just waiting for their candy eggs. These thoughtful techniques make this no-bake chocolate bird nests recipe a dependable favorite every time.
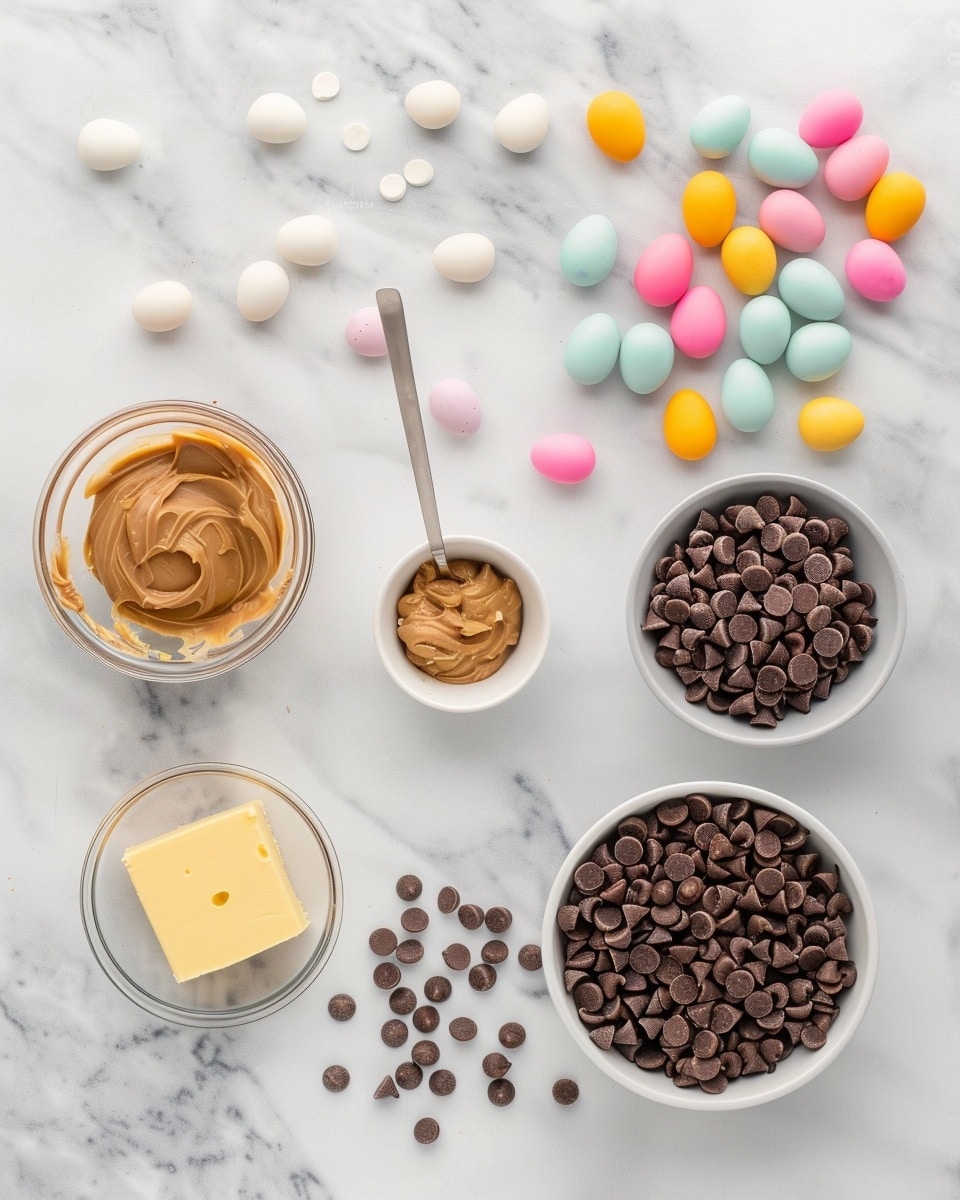
Ingredients You’ll Need
With just five straightforward ingredients, this recipe is refreshingly simple yet delightfully rich. Each component plays a starring role in creating that perfect balance of crunch, creaminess, and sweetness.
- Cocoa Rice Krispies: Provides the crispy, airy crunch with a cocoa twist that makes every bite extra special.
- Peanut Butter: Adds creamy richness and a subtle nuttiness that complements the chocolate beautifully.
- Milk Chocolate Chips: The heart of the flavor—smooth, sweet, and melt-in-your-mouth.
- Cadbury Mini Eggs: These pastel-colored candies add a pop of color and a lovely creamy center for a festive look.
- Butter or Cooking Spray: Used for greasing the muffin tin to ensure easy removal of the nests.
Ingredient Substitutions & Tips
- Peanut Butter: Swap for almond butter or sunflower seed butter for a nut-free or different nutty flavor.
- Milk Chocolate Chips: Use dark chocolate chips or white chocolate chips depending on your sweetness preference.
- Cocoa Rice Krispies: Traditional Rice Krispies work fine if you can’t find cocoa-flavored.
- Cadbury Mini Eggs: Any small candy eggs or jelly beans work well to keep the festive vibe.
👨🍳 Pro Tips for Perfect Results
- Use low power on your microwave: Melting chocolate slowly prevents scorching and keeps it silky smooth.
- Stir often: Ensuring the peanut butter and chocolate blend evenly creates the perfect coating for the cereal.
- Grease your muffin tin well: This step is key to popping out the nests intact after chilling.
- Hollow out the nests carefully: Using a rounded spoon or measuring scoop works best to create even cavities.
- Chill thoroughly: Give those nests enough time in the fridge or freezer to harden completely before decorating.
How to Make No-Bake Chocolate Bird Nests Recipe
Step 1: Melt the Chocolate
Place your milk chocolate chips in a microwave-safe bowl and melt on low-power in 30-second intervals. After each burst, stir gently to help the chocolate melt evenly and prevent burning. Once completely smooth, remove from the microwave.
💡 Pro Tip: Don’t rush this step — gradual melting is the secret to luscious, glossy chocolate.
Step 2: Combine Peanut Butter and Chocolate
Immediately stir the creamy peanut butter into the warm melted chocolate. This ensures a smooth mixture that will coat the cereal perfectly without clumping or separation.
💡 Pro Tip: Use a flexible spatula to scrape the bowl, making sure you get every last bit of the chocolate-peanut butter mix.
Step 3: Coat the Cocoa Rice Krispies
Pour the chocolate-peanut butter mixture over the cocoa Rice Krispies and gently fold using a spatula or wooden spoon. Stir until every Rice Krispie is glossy and fully coated with the rich mixture for that perfect crunch and flavor burst.
💡 Pro Tip: Be gentle to keep the cereal pieces intact while ensuring even coverage.
Step 4: Prepare the Muffin Tin
Grease a 12-count muffin tin with butter or cooking spray to prevent sticking. This will make removing your bird nests a breeze once they’re chilled and hardened.
💡 Pro Tip: Use just enough grease—too much can make the nests greasy while too little will make removal tricky.
Step 5: Form the Nests
Spoon the chocolate-coated cereal mixture evenly into each muffin cup, filling them to the top. Then, use a round measuring spoon or the back of a teaspoon to gently hollow out the center of each nest, creating the signature cavity.
💡 Pro Tip: Take your time—this hollow is key to holding your Cadbury mini eggs perfectly.
Step 6: Chill Until Firm
Place the muffin tin in the refrigerator or freezer for at least 15-20 minutes to let the nests harden completely. They should feel solid to the touch before adding the finishing touch.
💡 Pro Tip: Freezing speeds up the process, but fridge chilling develops a slightly softer, chewier texture—choose based on your preference!
Step 7: Add Your Mini Eggs and Serve
Once hardened, place three colorful Cadbury mini eggs in the center of each nest. Voilà, your charming, edible bird nests are ready to wow!
💡 Pro Tip: Press the eggs lightly so they nestle securely without squashing the brittle edges.
Common Mistakes to Avoid
Learn from these common pitfalls:
- Burning the chocolate: Using high heat melts can cause the chocolate to seize or burn, ruining the silky texture.
- Not stirring enough: Inadequate mixing of peanut butter and chocolate can lead to uneven coating and clumpy nests.
- Insufficient greasing: Skipping or skimping on greasing can make it very difficult to remove the nests cleanly.
- Filling nests unevenly: Too little mixture results in fragile nests; too much means they won’t form the classic hollow shape.
- Skipping the chill step: Removing nests too soon will cause them to fall apart when you add the mini eggs.
- Pressing eggs too hard: Careless placement can crack delicate nests or cause mini eggs to melt prematurely.
Delicious Variations to Try
Once you’ve mastered the classic No-Bake Chocolate Bird Nests Recipe, why not experiment with some tasty twists to keep your treats exciting?
White Chocolate and Almond Nests
Swap the milk chocolate chips for white chocolate, and substitute almond butter for peanut butter. Top with slivered almonds or white chocolate chips instead of mini eggs for a nutty, elegant twist.
Dark Chocolate and Hazelnut Delight
Use dark chocolate chips and add chopped toasted hazelnuts into the mix before shaping your nests. Garnish with whole roasted hazelnuts for a rich, luxurious flavor profile.
Peanut Butter and Jelly Nests
After chilling, fill the nests with a spoonful of your favorite jam or jelly instead of mini eggs for a nostalgic peanut butter and jelly combo.
Coconut and Chocolate Crunch
Add toasted shredded coconut to the Rice Krispies mixture and sprinkle extra coconut on top with the mini eggs. This adds a tropical flair to your classic nests.
Salted Caramel Drizzle
Drizzle a little salted caramel sauce over the nests once set for a perfect balance of sweet and salty.
Nut-Free Chocolate Sunflower Seed Nests
Use sunflower seed butter instead of peanut butter and add chopped dried fruit for a nut-free option that’s equally indulgent.
How to Serve No-Bake Chocolate Bird Nests Recipe
Garnishes
Fresh edible flowers, a dusting of powdered sugar, shredded coconut flakes, or a drizzle of colored white chocolate can elevate presentation beautifully.
Side Dishes
Pair these nests with a crisp fruit salad or a light vanilla yogurt for a balanced dessert plate that contrasts textures and flavors.
Creative Ways to Present
Serve nestled on a bed of fresh mint leaves or edible grass to enhance the garden-nest vibe. Arrange them on pretty tiered dessert stands to wow guests at parties or celebrations.
Make Ahead and Storage
Storing Leftovers
Keep any leftover nests in an airtight container in the refrigerator. They will stay fresh and crunchy for up to 5 days—perfect for snacking throughout the week.
Freezing
Freeze nests on a baking sheet until solid, then transfer to a sealed freezer bag or container. They can be frozen for up to 2 months. Thaw in the refrigerator before serving.
Reheating
These treats are best enjoyed cold, so no reheating is necessary. If you want them slightly softer, leave them at room temperature for 10-15 minutes before eating.
FAQs
Can I use a different cereal than cocoa Rice Krispies?
Absolutely! Regular Rice Krispies or puffed rice cereals work well, too. You can even try cornflakes for a different texture.
Is it necessary to chill the nests in the fridge?
Yes, chilling helps the nests set firmly so they hold their shape and can support the mini eggs without falling apart.
Can I make these nests vegan?
Yes! Use dairy-free chocolate chips and a plant-based peanut butter substitute. Just ensure your mini eggs are also vegan or swap for vegan-friendly candies.
What can I substitute for Cadbury mini eggs?
Any small pastel-colored candy coated chocolates, jelly beans, or even fresh berries can be used as a fun topping.
How long do these nests keep fresh?
Stored airtight in the fridge, they stay fresh for about 5 days.
Can I double or triple this recipe?
Yes, just multiply ingredients accordingly but be sure to give yourself enough space and appropriate containers for chilling.
Is it okay if the peanut butter and chocolate mixture looks thick?
Yes, a thicker mixture helps the cereal stick together and creates sturdy nests that hold their shape well after chilling.
Can I use crunchy peanut butter instead of smooth?
You can, but smooth peanut butter blends more evenly and gives a uniform texture. Crunchy will add extra nutty bits for texture if you prefer.
Final Thoughts
This No-Bake Chocolate Bird Nests Recipe feels like a warm hug wrapped in chocolate and crunch. It’s my go-to when I want to wow friends and family with something sweet, playful, and incredibly easy. Plus, it brings out the childlike joy in all of us watching those colorful mini eggs settle perfectly into their cozy nests.
Have you tried this No-Bake Chocolate Bird Nests Recipe? I’d love to hear how it turned out! Leave a comment below. If you loved this recipe, please share it with friends and family. Happy cooking! 😊
PrintNo-Bake Chocolate Bird Nests Recipe

These No-Bake Chocolate Bird Nests are a quick and fun treat perfect for Easter or spring celebrations. Made with cocoa Rice Krispies, creamy peanut butter, and melted milk chocolate, these nests are filled with colorful Cadbury mini eggs. Ready in just 10 minutes without any baking, they’re easy to make and loved by kids and adults alike.
- Prep Time: 10 minutes
- Cook Time: 0 minutes
- Total Time: 10 minutes
- Yield: 12 servings 1x
- Category: Dessert
- Method: No-Cook
- Cuisine: American
Ingredients
Ingredients
- 3 cups cocoa Rice Krispies
- 1 cup peanut butter
- 1 cup milk chocolate chips
- 36 Cadbury mini eggs
- Butter or cooking spray (for greasing muffin tin)
Instructions
- Melt Chocolate: In a microwavable-safe bowl, melt the milk chocolate chips by heating in 30-second intervals on low power. Stir thoroughly between each interval until the chocolate is smooth and fully melted.
- Combine Peanut Butter and Chocolate: Immediately after removing the chocolate from the microwave, stir in the peanut butter to combine it thoroughly with the melted chocolate.
- Mix with Rice Krispies: Pour the peanut butter and chocolate mixture into a bowl containing the cocoa Rice Krispies. Stir gently yet thoroughly until all the cereal is evenly coated with the chocolate-peanut butter mixture.
- Prepare Muffin Tin: Grease a 12-count muffin tin using butter or cooking spray to prevent sticking and allow easy removal of the nests later.
- Fill Muffin Cups: Evenly scoop the coated Rice Krispies mixture into each muffin cup, making sure each cup is filled and compacted slightly.
- Create Nest Shape: Using a round measuring spoon or your fingers, gently hollow out the center of each filled muffin cup to form a nest shape.
- Chill to Harden: Place the muffin tin into the refrigerator or freezer to allow the bird nests to set and harden, which usually takes about 20-30 minutes.
- Add Mini Eggs: Once the nests are firm, place three Cadbury mini eggs into the center of each nest. Serve immediately or store in the fridge until ready to enjoy.
Notes
- You can substitute peanut butter with almond butter or sunflower seed butter to accommodate allergies.
- Ensure the chocolate chips are melted slowly to prevent burning, stirring well after each microwaving interval.
- If you don’t have cocoa Rice Krispies, you can use plain Rice Krispies and add a tablespoon of cocoa powder to the melted chocolate mixture for chocolate flavor.
- Store the bird nests in an airtight container in the refrigerator for up to 3 days.
- For a festive variation, try colorful candy-coated chocolates or jelly beans instead of Cadbury mini eggs.
Keywords: No-bake, chocolate bird nests, Easter treats, Rice Krispies, peanut butter dessert, quick dessert, kid-friendly, no bake dessert