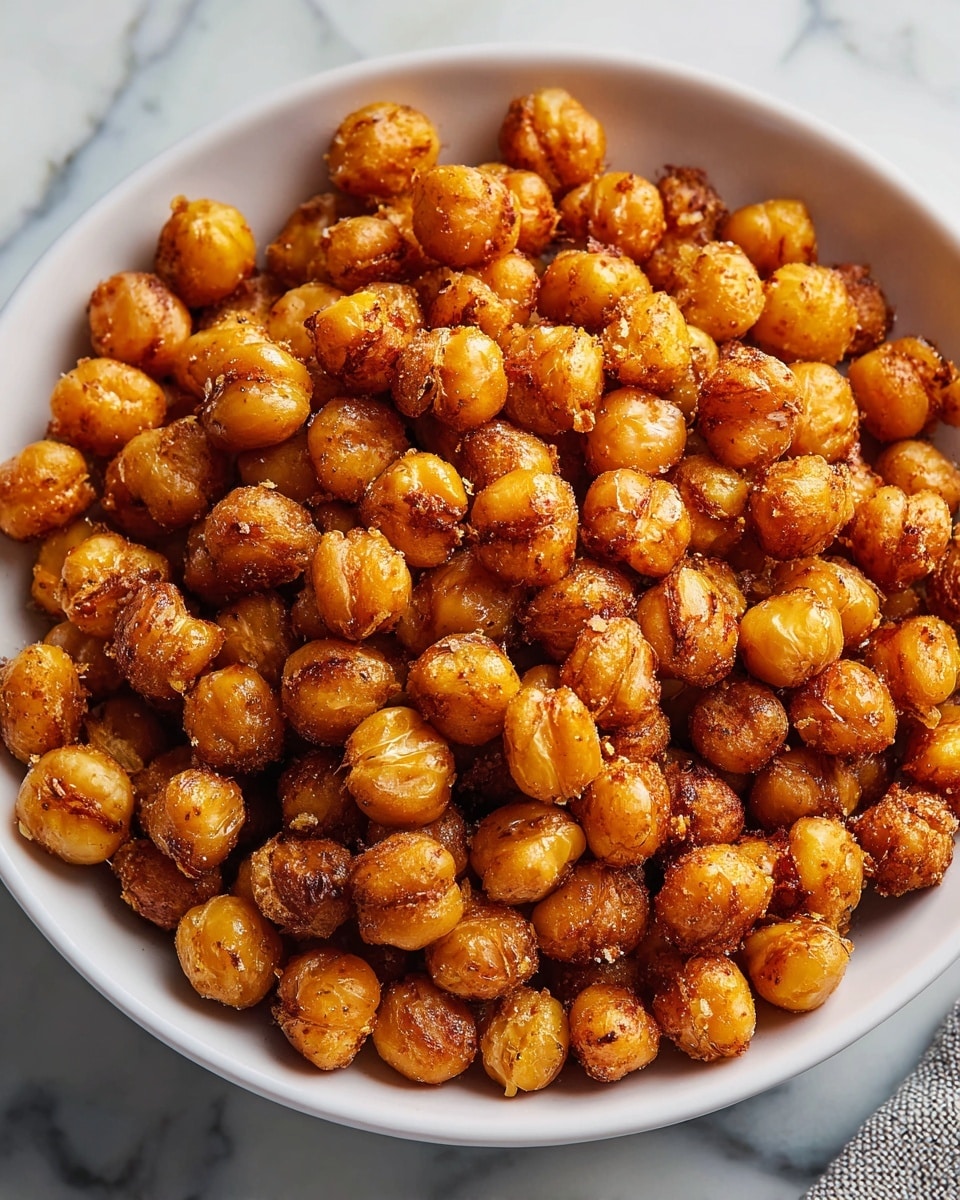
Crispy Air-Fried Chickpea Poppers Recipe
Picture this: the irresistible crackle of perfectly crisped chickpeas as you bite into warm, golden poppers infused with smoky paprika and a hint of garlic. The aroma alone is enough to draw everyone into the kitchen, eager for that first flavorful crunch. These little gems are not just tasty—they are simple, quick, and utterly addictive. If you’re craving a snack that’s both wholesome and irresistibly savory, this Crispy Air-Fried Chickpea Poppers Recipe is about to become your new go-to. Imagine easy prep, heart-healthy ingredients, and a snack that impresses friends and family alike.
Why You’ll Love This Crispy Air-Fried Chickpea Poppers Recipe
- Quick and Easy: Ready in just 25 minutes, making it perfect for busy days or spontaneous cravings without fuss.
- Simple Ingredients: Uses common pantry staples like canned chickpeas and basic spices—no complicated shopping required.
- Perfect for Weeknights: A wholesome snack or side dish that comes together fast when you want something satisfying and flavorful.
- Impressive Presentation: Golden and crunchy little bites that look fancy but are so easy to make—great for guests and kids alike!
- Customizable: Adjust spices for mild or fiery heat, swap oils, or blend in herbs to suit your tastes and dietary needs.
Why This Crispy Air-Fried Chickpea Poppers Recipe Works
This recipe shines thanks to a few clever tricks that guarantee crispiness and flavor. First, thoroughly drying the chickpeas before seasoning is essential to achieve that coveted crunch—it prevents steam from making them soggy during cooking. Next, tossing them evenly in olive oil and a perfectly balanced spice mix coats every little popper, creating a golden crust packed with smoky and savory notes. Using an air fryer blasts high heat rapidly around the chickpeas, cooking them uniformly and locking in texture without excess oil. These combined techniques transform simple chickpeas into an addictive snack sensation.
Ingredients You’ll Need
These ingredients are delightfully simple yet essential for that perfect popper flavor and texture. Each one plays a role in building a crispy, richly spiced snack you’ll want to make again and again.
- Canned Chickpeas: The foundation of the recipe, providing a nutritious and hearty base that crisps up beautifully.
- Olive Oil: Adds just enough moisture to help the spices stick while promoting crunch in the air fryer.
- Paprika: Brings a warm, smoky undertone that layers the chickpeas with depth and color.
- Garlic Powder: Offers a gentle savory punch without overpowering the delicate chickpeas.
- Onion Powder: Enhances the flavor with subtle sweetness and complexity.
- Salt: Balances all the flavors and helps draw out moisture for crispiness.
- Black Pepper: Adds a light kick and rounds out the seasoning.
- Optional Cayenne Pepper or Chili Powder: Customize the heat level to your liking for a spicy twist.
- Optional Dried Herbs (Oregano, Thyme, Rosemary): Invites fresh herbal notes for a vibrant and aromatic finish.
Ingredient Substitutions & Tips
- Canned Chickpeas: You can swap for cooked chickpeas if you prefer making from scratch; just ensure they are well dried.
- Olive Oil: Avocado oil or any neutral oil will work well if you want a milder base flavor.
- Paprika: If you love heat, cayenne pepper or smoked chili powder adds a smoky spicy kick.
- Garlic Powder: Fresh minced garlic can be used but add it sparingly to avoid burning in the air fryer.
👨🍳 Pro Tips for Perfect Results
- Pat the Chickpeas Dry: The drier, the crispier. Don’t skip this step for the perfect crunch.
- Shake the Basket Halfway: Tossing during cooking ensures even browning on all sides.
- Preheat Your Air Fryer: Jumpstarting the heat helps lock in the crispy texture right from the start.
- Don’t Overcrowd: Give chickpeas space in the basket so hot air can circulate freely.
- Experiment with Spices: Try smoked paprika or herbs for tailored flavor profiles each time.
How to Make Crispy Air-Fried Chickpea Poppers Recipe
Step 1: Prepare the Chickpeas
Start by rinsing your canned chickpeas thoroughly under cold water, then drain them well. Lay them out on a clean towel and pat dry, ensuring every chickpea is as moisture-free as possible. This step is crucial to achieve that satisfying crunch once air-fried.
💡 Pro Tip: For even better crispness, let the chickpeas air dry for 10 minutes after patting them with a towel.
Step 2: Season the Chickpeas
Transfer the dried chickpeas into a large mixing bowl. Drizzle with olive oil, then sprinkle paprika, garlic powder, onion powder, salt, black pepper, and any optional spices or herbs you’re using. Gently toss everything together until each chickpea shines with an even coat of oil and spices. The aroma starting to build here is already irresistible!
💡 Pro Tip: Use your hands or two spoons to toss gently, so chickpeas don’t break or smash.
Step 3: Preheat the Air Fryer
Set your air fryer to 400°F (200°C) and let it preheat completely. This ensures the chickpeas begin cooking the moment they hit the basket, locking in texture and flavor.
💡 Pro Tip: Preheating saves time and prevents sogginess from uneven heating.
Step 4: Air Fry the Chickpeas
Spread the seasoned chickpeas in a single layer inside the air fryer basket. Air fry them for 12 to 15 minutes, pausing halfway through to give the basket a good shake. This redistributes the chickpeas, allowing every popper to crisp up beautifully on all sides.
💡 Pro Tip: If your air fryer is small, cook in batches to avoid overcrowding.
Step 5: Check for Crispiness and Cool
When the timer dings, check if your chickpeas are golden brown and perfectly crunchy. If not, pop them in for a few more minutes, checking frequently. Once they’ve reached your desired crispness, transfer to a plate and let them cool for a couple of minutes to firm up even more.
💡 Pro Tip: Cooling helps the chickpeas maintain their crunch rather than steaming inside.
Common Mistakes to Avoid
Learn from these common pitfalls:
- Not Drying Chickpeas Thoroughly: Moisture causes soggy poppers instead of crisp crackers.
- Overcrowding the Air Fryer Basket: Chickpeas need space for hot air circulation to crisp evenly.
- Skipping the Seasoning Toss: Unevenly coated chickpeas won’t have consistent flavor or texture.
- Using Too Much Oil: Excess oil can lead to greasy rather than crunchy snacks.
- Not Shaking the Basket Halfway Through Cooking: This prevents even browning on all sides.
- Eating Immediately: Chickpeas need a few minutes to cool down and firm up to the perfect crunch.
Delicious Variations to Try
Once you’ve mastered the classic Crispy Air-Fried Chickpea Poppers Recipe, it’s fun to explore these flavor twists:
Spicy Harissa
Add a teaspoon of harissa powder and a splash of lemon juice for a bold, North African-inspired snack with a fiery kick.
Lemon Herb
Toss chickpeas with dried oregano, thyme, rosemary, and zest of a lemon before air frying for a bright, herbal bouquet.
Smoky BBQ
Combine smoked paprika, a pinch of cumin, and a sprinkle of brown sugar for a sweet and smoky barbecue flair.
Za’atar Delight
Coat chickpeas with za’atar seasoning and a drizzle of olive oil for a tangy, nutty flavor bursting from the Middle East.
Curry Infused
Mix in curry powder and a little turmeric to add warmth and an exotic twist to these crunchy poppers.
How to Serve Crispy Air-Fried Chickpea Poppers Recipe

Garnishes
Sprinkle with freshly chopped parsley, coriander, or a squeeze of lemon juice for freshness. A dusting of flaky sea salt just before serving can elevate the flavor even more.
Side Dishes
These poppers are fantastic on their own as a snack, but also serve brilliantly alongside fresh veggies, yogurt-based dips like tzatziki, or a smooth tahini sauce for dipping.
Creative Ways to Present
Package them in small mason jars for party favors, sprinkle over salads for an added crunch, or serve in colorful bowls alongside a vibrant dip spread to wow guests.
Make Ahead and Storage
Storing Leftovers
Keep any leftovers in an airtight container at room temperature for up to 2 days. To maintain their crispiness, avoid sealing them while still warm or moist.
Freezing
While freezing isn’t recommended as it can compromise texture, you can freeze cooked chickpeas before air frying. Thaw fully and pat dry before air frying for best results.
Reheating
Re-crisp leftover chickpeas by placing them in the air fryer at 350°F (175°C) for 3-5 minutes. Keep an eye to prevent burning while restoring that fresh crunch.
FAQs
Can I use dried chickpeas instead of canned?
Yes! Just soak and cook them fully beforehand, then dry thoroughly before seasoning and air frying.
How spicy are these chickpea poppers?
The base recipe is mildly spiced, but you can easily adjust the heat by adding cayenne pepper or chili powder to your liking.
Can I make these in a regular oven?
Absolutely. Bake at 400°F (200°C) for 25-30 minutes, shaking the pan halfway through for even crisping.
Are these chickpea poppers gluten-free?
Yes, they are naturally gluten-free, making them a great snack option for those avoiding gluten.
How should I store leftover poppers so they stay crispy?
Store in an airtight container at room temperature only after they’ve completely cooled to avoid sogginess.
Can I use other spices instead of the suggested ones?
Definitely! Feel free to customize with cumin, curry powder, or your favorite seasoning blends.
Are these suitable for kids?
They’re a fun, crunchy snack kids love and you can easily tone down any spice for milder flavors.
Is air frying healthier than roasting in an oven?
Air frying uses less oil than traditional frying methods and cooks faster, which helps preserve nutrients, making it a healthier choice.
Final Thoughts
There’s something wonderfully comforting about snacks that are both delicious and wholesome, especially when they come together effortlessly. This Crispy Air-Fried Chickpea Poppers Recipe delivers exactly that—a golden, crunchy delight bursting with flavor, made from pantry staples you likely already have. Whether you’re enjoying them solo, sharing at a gathering, or adding a special touch to your meal, these little poppers are proof that simple can be spectacular.
Have you tried this Crispy Air-Fried Chickpea Poppers Recipe? I’d love to hear how it turned out! Leave a comment below. If you loved this recipe, please share it with friends and family. Happy cooking! 😊
PrintCrispy Air-Fried Chickpea Poppers Recipe

These Crispy Air-Fried Chickpea Poppers are a delicious and healthy snack option. Made with simple pantry ingredients and cooked quickly in the air fryer, they offer a crunchy texture with a perfect blend of spices. Ideal for snacking or adding to salads, these chickpea poppers are easy to make and customizable according to your taste preferences.
- Prep Time: 5 minutes
- Cook Time: 15 minutes
- Total Time: 20 minutes
- Yield: 4 servings 1x
- Category: Snack
- Method: Air Frying
- Cuisine: Mediterranean
- Diet: Vegetarian
Ingredients
Chickpea Poppers
- 1 can Chickpeas (Garbanzo Beans), rinsed and drained
- 2 tablespoons Olive Oil (or Avocado Oil)
- 1 teaspoon Paprika
- 1 teaspoon Garlic Powder
- 1 teaspoon Onion Powder
- 1 teaspoon Salt
- 1/2 teaspoon Black Pepper
- 1/2 teaspoon (Optional) Cayenne Pepper or Chili Powder
- 1 teaspoon (Optional) Dried Herbs (Oregano, Thyme, or Rosemary)
Instructions
- Prepare the Chickpeas: Rinse and drain the canned chickpeas thoroughly. Pat them dry with a clean kitchen towel ensuring they are as dry as possible to achieve maximum crispiness when air fried.
- Season the Chickpeas: Place the dried chickpeas into a large mixing bowl. Add olive oil, paprika, garlic powder, onion powder, salt, black pepper, and any optional spices like cayenne pepper and dried herbs. Toss gently until all the chickpeas are evenly coated with oil and seasonings.
- Preheat the Air Fryer: Set your air fryer to 400°F (200°C) and let it preheat fully to ensure even cooking and crispiness.
- Air Fry the Chickpeas: Place the seasoned chickpeas in the air fryer basket in a single layer. Cook for 12 to 15 minutes, shaking the basket halfway through cooking to ensure that the chickpeas crisp evenly on all sides.
- Check for Crispiness: After the timer goes off, check the chickpeas—they should be golden brown and crunchy. If necessary, continue air frying for a few additional minutes to reach your desired level of crispiness.
- Cool and Serve: Remove the chickpeas from the air fryer and let them cool for a couple of minutes. Serve them as a snack alone or with your preferred dipping sauce.
Notes
- Ensure the chickpeas are very dry before seasoning to get the crispiest texture.
- Adjust the spices to suit your taste, adding more cayenne for heat or dried herbs for extra flavor.
- If you don’t have an air fryer, the chickpeas can be baked in a conventional oven at 400°F (200°C) for 20-25 minutes, shaking halfway through.
- Store any leftovers in an airtight container to maintain crispiness.
- Use fresh garlic or chopped onions as an alternative to garlic and onion powders for a more robust flavor.
Keywords: air-fried chickpea poppers, crispy chickpeas, healthy snack, easy air fryer recipe, vegetarian snack, gluten free snack