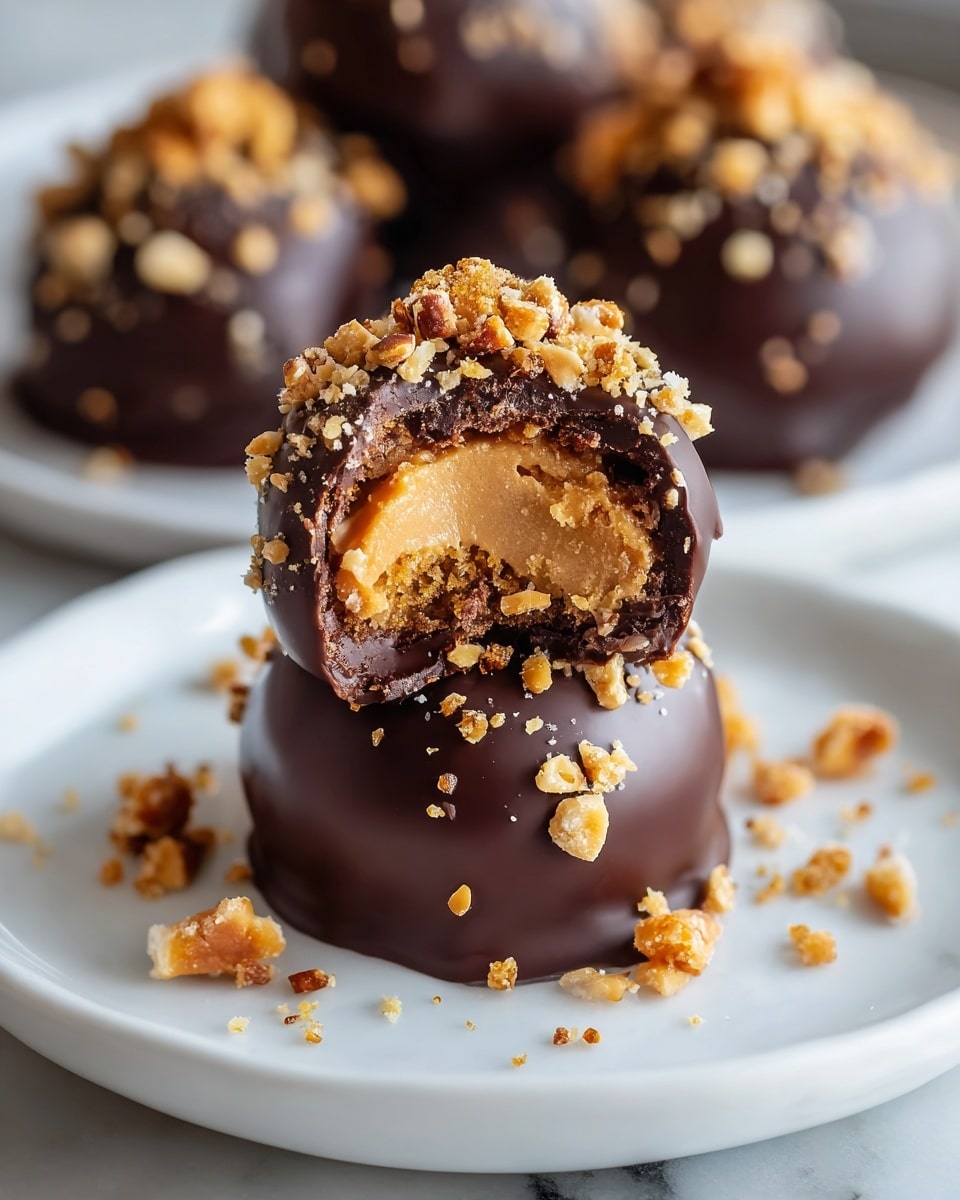
Butterfinger Balls Recipe
Picture this: The sweet, nutty aroma of creamy peanut butter mingles with the unmistakable buttery crunch of Butterfinger candy bars. Your hands gently roll these luscious bites, and soon you’re greeted with chocolate-dipped, golden morsels that sparkle with promise. These Butterfinger Balls are not just a treat—they’re a little moment of joy wrapped up in every bite. Whether you’re craving a quick indulgence or looking to impress friends with a homemade delight, this recipe will have you hooked from the very first taste.
Why You’ll Love This Butterfinger Balls Recipe
- Quick and Easy: Ready in under an hour, these balls satisfy your sweet tooth without a long wait.
- Simple Ingredients: Uses classic pantry staples and everyone’s favorite Butterfinger candy.
- Perfect for Gifting: These bite-sized beauties look impressive, making them an ideal homemade gift or party favor.
- Irresistible Texture: Creamy peanut butter meets crisp Butterfinger crunch — pure bliss!
- Customizable: Choose semisweet or milk chocolate coating to suit your mood or guests’ preferences.
Why This Butterfinger Balls Recipe Works
This Butterfinger Balls Recipe succeeds because of a few key secrets. First, combining creamy peanut butter with softened butter and powdered sugar creates a perfectly smooth yet firm base that’s easy to shape. Folding in finely crushed Butterfinger candy bars adds just the right amount of crunch and signature flavor without overwhelming the texture. Lastly, dipping the balls in melted chocolate not only enhances the taste with a silky finish but also adds an elegant shell that seals in the deliciousness for a satisfying crunch with each bite.
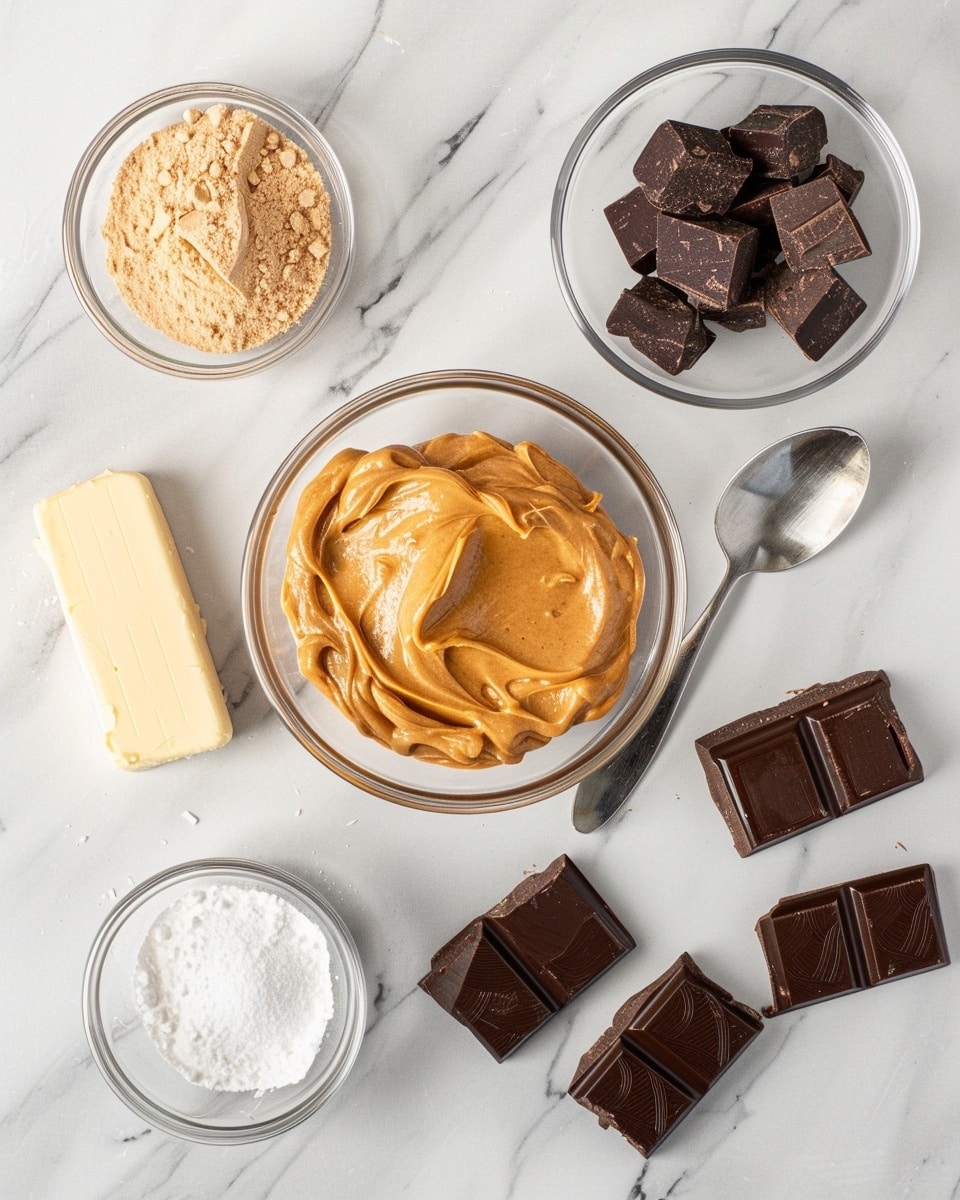
Ingredients You’ll Need
These few, straightforward ingredients come together to create a delectable snack that feels rich and fancy without any fuss.
- Creamy peanut butter: Provides the creamy, nutty backbone to the balls.
- Unsalted butter, softened: Adds smooth richness and helps bind the mixture.
- Powdered sugar: Sweetens the mixture and helps achieve a firm consistency perfect for rolling.
- Vanilla extract: A subtle, warming flavor enhancer that brightens the peanut butter.
- Pinch of salt: Balances sweetness and intensifies the nutty notes.
- Butterfinger candy bars, finely crushed: Adds that iconic crunchy, buttery flavor everyone loves.
- Semisweet or milk chocolate, chopped (optional): For dipping, to create a luscious coating.
Ingredient Substitutions & Tips
- Creamy peanut butter: You can use natural peanut butter if you prefer, but make sure it’s well-stirred for easier mixing.
- Unsalted butter: Salted butter can be used; just reduce or omit the added pinch of salt.
- Powdered sugar: You can substitute with powdered erythritol for a lower-sugar option, keep texture in mind.
- Chocolate for dipping: Dark chocolate or white chocolate works nicely depending on your desired sweetness level.
👨🍳 Pro Tips for Perfect Results
- Use softened butter: This ensures your mixture blends smoothly without lumps.
- Crush Butterfinger finely: Smaller pieces disperse better and create an even crunch throughout.
- Chill your hands: Rolling the balls can get sticky—cool hands help maintain neat shapes.
- Tempering chocolate: If dipping in chocolate, temper it for a shinier finish and snappier shell.
- Refrigerate well: Letting the coated balls set in the fridge gives that perfect firm texture before serving.
How to Make Butterfinger Balls Recipe
Step 1: Mix the Base
In a large mixing bowl, combine 1 cup creamy peanut butter, 1/4 cup softened unsalted butter, 2 cups powdered sugar, 1 teaspoon vanilla extract, and a pinch of salt. Use an electric mixer for a few minutes until the mixture becomes smooth, creamy, and easy to work with. If you don’t have a mixer, a sturdy spoon or spatula will do the trick with a bit of elbow grease.
💡 Pro Tip: Make sure your butter is fully softened but not melted. This will make mixing effortless and avoid a greasy mess.
Step 2: Add the Crunch
Gently fold in 6 finely crushed Butterfinger candy bars until they are evenly distributed throughout the peanut butter mixture. These little bursts of buttery crisp make every bite unforgettable.
💡 Pro Tip: Place the Butterfinger bars in a sealed plastic bag and crush them with a rolling pin if you want to avoid large, uneven chunks.
Step 3: Shape Into Balls
Line a baking sheet with parchment or wax paper to prevent sticking. Scoop out tablespoon-sized portions of the mixture and roll them between your hands to form smooth, firm balls. Set each ball carefully on your prepared baking sheet.
💡 Pro Tip: If the mixture feels sticky, pop it in the fridge for 10 minutes. Chill hands in cool water for easier rolling.
Step 4: Dip in Chocolate (Optional)
If you’re indulging in the dipped version, melt 12 ounces of chopped semisweet or milk chocolate gently in a small saucepan over low heat or in short bursts in the microwave, stirring often so it doesn’t scorch.
Using a fork or dipping tool, submerge each peanut butter ball in the melted chocolate. Lift, let the excess drip off, then return to the parchment-lined baking sheet. This step turns your treats into shiny chocolate-covered gems.
💡 Pro Tip: To get an even coating, tap the fork lightly on the side of the bowl to shed extra chocolate.
Step 5: Chill Until Set
Place the baking sheet in the refrigerator for about 30 minutes or until the chocolate coating solidifies. Once set, your Butterfinger Balls are ready to be savored or packed away.
💡 Pro Tip: Store the finished Butterfinger Balls in an airtight container in the fridge to keep their fresh texture and flavor.
Common Mistakes to Avoid
Learn from these common pitfalls:
- Using cold butter: It won’t blend smoothly, leading to a lumpy mixture.
- Crushing Butterfinger bars too roughly: Large chunks can overpower texture and make rolling difficult.
- Skipping the refrigeration step: Not chilling the balls before rolling or after dipping can cause them to lose their shape.
- Overheating chocolate: This can cause burning or thickened chocolate that won’t coat well.
- Rolling balls that are too big: These can be messy and harder to dip or eat neatly.
- Not sealing storage containers properly: Leads to stale or dry Butterfinger Balls.
Delicious Variations to Try
Once you’ve mastered the classic Butterfinger Balls recipe, why not shake things up with some exciting twists?
Chocolate-Peanut Butter Swirl
Mix in some mini chocolate chips with the peanut butter base before rolling for an extra chocolate burst inside.
Crunchy Almond Butterfinger
Substitute creamy peanut butter with almond butter for a slightly different nutty flavor that pairs fantastically with Butterfinger crunch.
White Chocolate Drizzle
Instead of fully dipping, drizzle melted white chocolate over the balls for a delicate, pretty contrast.
Coconut Butterfinger Balls
Add shredded coconut into the mix or roll finished balls in toasted coconut flakes for tropical flair.
Spiced Butterfinger Balls
Add a pinch of ground cinnamon or nutmeg to the peanut butter mixture for a cozy hint of warmth.
Double Chocolate Honey Butterfinger
Fold in cocoa powder to the peanut butter base and dip in dark chocolate for chocolate lovers wanting deeper richness.
How to Serve Butterfinger Balls Recipe
Garnishes
Top your Butterfinger Balls with a sprinkle of crushed candy bars, chopped peanuts, or even a light dusting of powdered sugar for a festive finish.
Side Dishes
These treats shine alongside a chilled glass of milk, a robust cup of coffee, or even a scoop of vanilla ice cream for an indulgent dessert platter.
Creative Ways to Present
Place the balls in colorful mini cupcake liners or arrange them on a decorative platter with fresh berries and mint leaves for a party-ready display that invites compliments.
Make Ahead and Storage
Storing Leftovers
Store leftover Butterfinger Balls in an airtight container in the fridge for up to 1 week. This keeps them fresh, vibrant, and perfectly textured.
Freezing
You can freeze these treats for longer storage. Arrange the balls in a single layer on a parchment-lined tray and freeze until firm, then transfer to a sealed freezer bag. They keep well up to 3 months.
Reheating
Allow frozen Butterfinger Balls to thaw in the refrigerator overnight. Avoid microwaving as this can melt the chocolate coating and alter texture.
FAQs
Can I make Butterfinger Balls without chocolate coating?
Absolutely! The chocolate dip is optional and they’re delicious on their own with just the peanut butter and Butterfinger mixture.
How finely should I crush the Butterfinger bars?
Fine enough to distribute evenly but with small crunchy bits left for texture—think coarse crumbs rather than powdered sugar.
Can I use crunchy peanut butter?
Yes, but the mixture may be a bit chunkier in texture. For a smoother base, creamy peanut butter is preferred.
What’s the best way to store Butterfinger Balls?
In an airtight container in the refrigerator to keep the chocolate coating firm and the inside fresh.
Can I use nut-free butter substitutes?
Yes, sunflower seed butter would make a great alternative for those with nut allergies.
Is it okay to use salted butter?
Yes, just reduce or omit the added pinch of salt in the recipe for balanced flavor.
How long do Butterfinger Balls last at room temperature?
They’re best kept refrigerated and consumed within 3-4 days if left out, as the chocolate can melt and the texture can change.
Can I double the recipe?
Definitely! Just make sure you have enough space to roll and chill the balls properly.
Final Thoughts
I hope this Butterfinger Balls Recipe brings you the same joy it has brought me time and again—those perfect pops of buttery, peanutty, chocolatey bliss in every bite. It’s such a simple, delightful treat that’s perfect for sharing or sneaking bites whenever the craving hits.
Have you tried this Butterfinger Balls Recipe? I’d love to hear how it turned out! Leave a comment below. If you loved this recipe, please share it with friends and family. Happy cooking! 🍫✨
PrintButterfinger Balls Recipe

Butterfinger Balls are delightful no-bake treats that combine creamy peanut butter, crunchy Butterfinger candy, and a sweet chocolate coating. These bite-sized sweets offer a perfect balance of smoothness, crunch, and rich flavor, making them ideal for satisfying your sweet cravings anytime.
- Prep Time: 15 minutes
- Cook Time: 10 minutes (chocolate melting and dipping)
- Total Time: 55 minutes
- Yield: Approximately 24 Butterfinger Balls 1x
- Category: Dessert
- Method: No-Cook
- Cuisine: American
Ingredients
Base Mixture
- 1 cup creamy peanut butter
- 1/4 cup unsalted butter, softened
- 2 cups powdered sugar
- 1 teaspoon vanilla extract
- Pinch of salt
- 6 Butterfinger candy bars, finely crushed
Chocolate Coating (Optional)
- 12 ounces semisweet or milk chocolate, chopped
Instructions
- Prepare the Base Mixture: In a mixing bowl, combine creamy peanut butter, softened unsalted butter, powdered sugar, vanilla extract, and a pinch of salt. Mix until the mixture is smooth and well incorporated, either using an electric or stand mixer, or by hand with a spoon or spatula.
- Add Butterfinger Candy: Gently fold in the finely crushed Butterfinger candy bars, ensuring they are evenly distributed throughout the peanut butter mixture for added crunch and flavor.
- Form the Balls: Line a baking sheet with parchment paper or wax paper. Scoop tablespoon-sized portions of the mixture and roll them into balls with your hands. Place each ball on the prepared baking sheet.
- Melt the Chocolate: If using, melt the chopped semisweet or milk chocolate in a small saucepan over low heat, stirring constantly until smooth. Alternatively, melt in the microwave in short bursts, stirring between intervals to prevent burning.
- Dip in Chocolate: Using a fork or dipping tool, dip each peanut butter ball into the melted chocolate, coating it evenly. Tap off any excess chocolate and place the coated balls back on the baking sheet.
- Chill to Set: Refrigerate the coated Butterfinger Balls for about 30 minutes or until the chocolate is fully set and firm.
- Store Properly: Once set, transfer the Butterfinger Balls to an airtight container and store them in the refrigerator to maintain freshness until ready to serve.
Notes
- For a firmer texture, chill the mixture before rolling into balls.
- You can substitute peanut butter for almond butter for a different flavor.
- If skipping the chocolate coating, dust the balls lightly with cocoa powder or crushed nuts.
- Store in the refrigerator for up to 2 weeks or freeze for longer storage.
- Handle the chocolate with care to avoid burning; stirring constantly is key during melting.
Keywords: Butterfinger Balls, no-bake dessert, peanut butter candies, chocolate dipped treats, easy sweet recipes