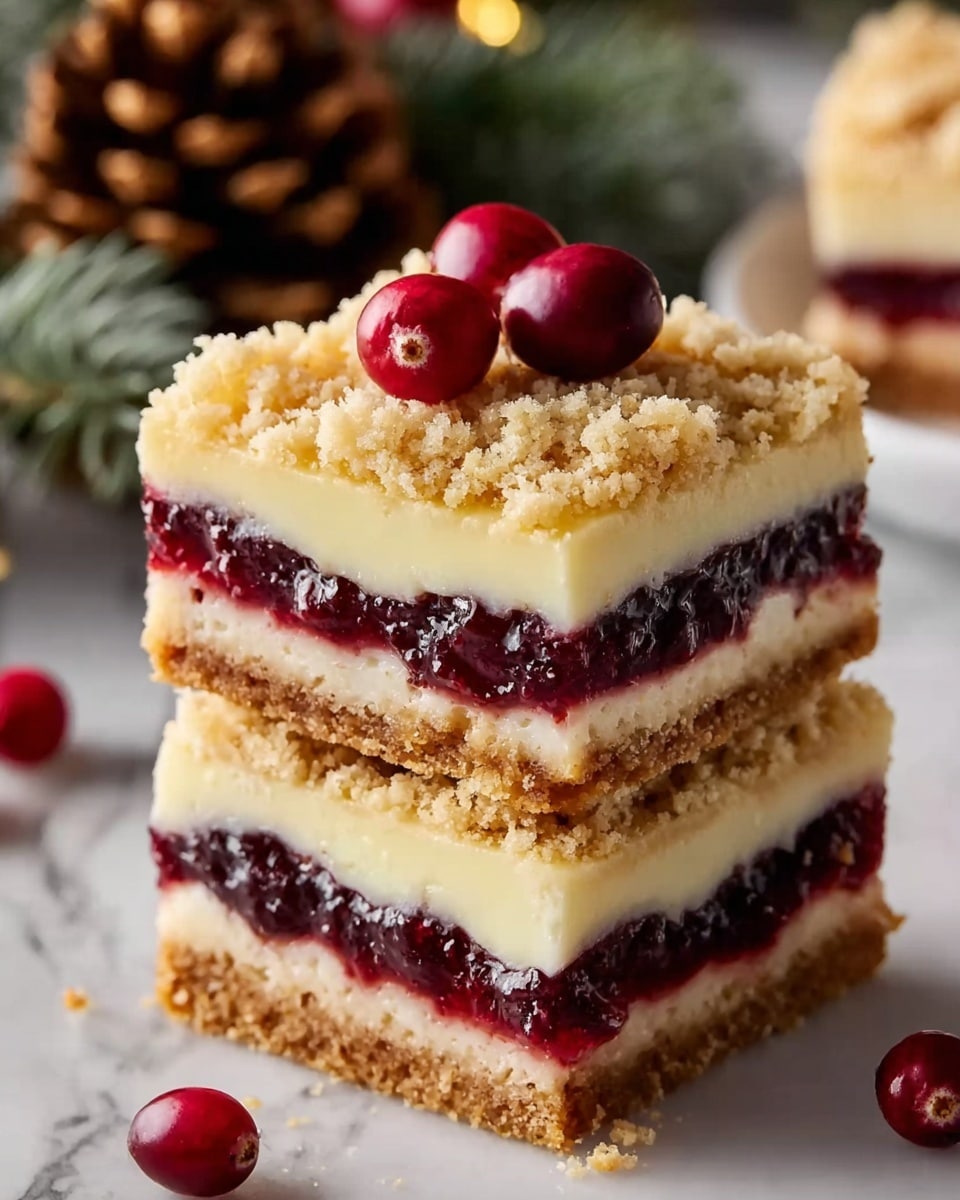
Cherry Cheesecake Bars Recipe
If you are searching for a dessert that perfectly balances creamy richness with a burst of fruity sweetness, this Cherry Cheesecake Bars Recipe is an absolute must-try. Imagine a buttery graham cracker crust layered under a luscious, smooth cheesecake filling, crowned by vibrant cherry pie topping that adds just the right pop of color and flavor. These bars are an irresistible treat for any occasion, combining classic flavors in a convenient, sliceable form that’s perfect for sharing or savoring solo. Once you try this recipe, it might just become your new favorite dessert to make over and over again.
Ingredients You’ll Need
Each ingredient in this Cherry Cheesecake Bars Recipe plays a crucial role, from creating the perfect crust texture to achieving the creamy cheesecake filling and the bright cherry topping that makes every bite memorable. Don’t worry — the ingredient list is straightforward and mostly staples, making it simple to gather everything you need.
- 2 cups graham cracker crumbs: This forms a buttery, slightly crunchy base that supports the creamy cheesecake layer.
- ½ cup unsalted butter, melted: Helps bind the crust together and adds richness without overpowering the flavors.
- ¼ cup granulated sugar: Sweetens the crust evenly for balanced flavor.
- 16 oz cream cheese, softened: The star of the cheesecake filling, providing that signature tang and velvety texture.
- ¾ cup granulated sugar: Sweetens the cheesecake filling, ensuring it’s rich but not overly sweet.
- 2 large eggs: Help set the filling and give it structure while keeping it smooth.
- 1 tsp vanilla extract: Adds warmth and depth to the cheesecake flavor.
- 2 tbsp sour cream: Enhances creaminess and adds a subtle tang.
- 1 tbsp all-purpose flour: Gives the filling just enough stability for perfect slicing.
- 1 can (21 oz) cherry pie filling: The crowning glory that brings bright, juicy sweetness and a glossy finish.
- ½ tsp almond extract (optional): An optional flavor booster that enhances the cherry topping beautifully.
- White chocolate shavings (optional): For an elegant decorative touch with a creamy contrast.
- Festive sprinkles or edible glitter (optional): Adds sparkle and fun, especially during holiday seasons.
- Crushed peppermint or mini candy canes (optional): For a refreshing peppermint crunch and festive flair.
How to Make Cherry Cheesecake Bars Recipe
Step 1: Prepare the crust
Start by preheating your oven to 325°F (160°C). Line a 9×13-inch baking pan with parchment paper, making sure to leave some overhang to easily lift the bars out later. Mix the graham cracker crumbs, melted butter, and sugar until everything is evenly combined. Press this crumbly mixture firmly into the bottom of the pan with the back of a spoon or a flat measuring cup to create an even crust. Bake for 10 minutes, then set it aside to cool slightly while you prepare the filling.
Step 2: Make the cheesecake layer
Next, beat the softened cream cheese in a large bowl until it’s smooth and creamy using an electric mixer. Gradually add the sugar and continue mixing until fully incorporated. Add eggs one at a time, beating well after each addition to avoid lumps. Stir in vanilla extract, sour cream, and flour until the filling is silky and well-blended. This filling is the heart of the Cherry Cheesecake Bars Recipe, so getting it smooth really enhances the final dessert’s texture.
Step 3: Assemble the bars
Pour the cheesecake batter evenly over the cooled crust, smoothing the top with a spatula for a clean finish. Spoon dollops of cherry pie filling onto the surface and gently swirl with a knife or skewer for a marbled effect, or leave it as a distinct topping if you prefer a crisp layered look. For a hint of extra flavor, stir a little almond extract into the cherry topping before adding it if desired.
Step 4: Bake to perfection
Place the pan in the oven and bake for 35 to 40 minutes until the center is mostly set but still has a slight jiggle. Avoid overbaking because that can cause cracks on the surface, which we want to prevent. Once baked, turn off the oven and leave the cheesecake bars inside with the door slightly ajar for 10 minutes. This gentle cooling phase helps maintain a creamy consistency and keeps those cracks away.
Step 5: Chill and set
Remove the pan from the oven and allow the bars to cool to room temperature. Once cooled, cover them tightly and refrigerate for at least 4 hours, or preferably overnight. This chilling time is essential to let the cheesecake layer fully set, making slicing clean and the texture wonderfully dense yet tender.
Step 6: Slice and decorate
Using the parchment paper overhang to lift the chilled cheesecake out of the pan, transfer it to a cutting board. Cut into even squares or rectangles with a sharp knife, cleaning the blade between cuts for neat edges. For an elegant holiday touch, decorate with white chocolate shavings, crushed peppermint, or festive sprinkles. These finishing touches elevate the presentation and make your Cherry Cheesecake Bars Recipe extra special for any celebration.
How to Serve Cherry Cheesecake Bars Recipe

Garnishes
Garnishes not only add appeal but also complement the flavors and textures of the bars. White chocolate shavings lend a creamy richness and visual contrast against the cherry topping, while crushed peppermint adds a delightful crunch and refreshing flavor perfect for winter festivities. Festive sprinkles or edible glitter are a playful way to add sparkle, making your bars look as joyful as they taste.
Side Dishes
While these bars are satisfying on their own, pairing them with light, complementary sides can enhance the experience. Consider serving with a dollop of freshly whipped cream or a scoop of vanilla bean ice cream for extra indulgence. A simple cup of coffee or herbal tea supports the sweetness and balances the richness without competing with the bars’ flavor profile.
Creative Ways to Present
If you want to impress your guests, think beyond the typical plating. Arrange the bars on a decorative platter with fresh cherries or mint leaves scattered around for a fresh look. You can also serve them as mini dessert bites by cutting smaller squares and placing each on individual dessert spoons, making them perfect for parties. For seasonal flair, consider wrapping each bar with a festive ribbon or placing them in pretty mini cupcake liners.
Make Ahead and Storage
Storing Leftovers
After enjoying your Cherry Cheesecake Bars Recipe, store any leftovers in an airtight container placed in the refrigerator. They will keep beautifully fresh for up to 5 days, preserving both taste and texture. Keeping them chilled is key to maintaining the perfect creaminess of the cheesecake layer and the brightness of the cherry topping.
Freezing
If you want to prepare these bars in advance or save some for later, freezing is a great option. Wrap the cooled bars tightly in plastic wrap and then in aluminum foil or place them in a freezer-safe container. They can be frozen for up to 2 months without losing their delicious flavor or texture. To enjoy, simply thaw them overnight in the refrigerator for best results.
Reheating
Since these are cheesecake bars, reheating is generally not recommended as it can affect the texture and cause the creamy layers to become too soft or separate. Instead, serve them cold or at room temperature for the best tasting experience. If you want them slightly less cold, sit them out for 15-20 minutes before serving.
FAQs
Can I use fresh cherries instead of cherry pie filling?
Absolutely! Fresh or frozen cherries can be used, but you might want to cook them lightly with sugar and a bit of cornstarch to thicken before adding on top. This prevents excess moisture from making the bars soggy while maintaining that delicious cherry taste.
How do I prevent cracks in my cheesecake bars?
Cracks often result from overbaking or sudden temperature changes. Baking until the center is just set and letting the bars cool slowly in the oven with the door slightly open reduces this risk significantly. Also, using room temperature ingredients helps create a smooth batter that bakes evenly.
Can I substitute the sour cream?
Yes, you can substitute sour cream with Greek yogurt or crème fraîche for a similar effect on texture and tanginess. These alternatives keep the filling moist and creamy while slightly altering the flavor profile in a delicious way.
Is it necessary to line the pan with parchment paper?
Lining the pan with parchment paper is highly recommended because it makes it effortless to lift the bars out of the pan after chilling, allowing you to cut them cleanly without them falling apart. It also minimizes cleanup.
Can I make these bars gluten-free?
Definitely! Use gluten-free graham cracker crumbs or substitute with almond meal or gluten-free cookie crumbs for the crust. Just ensure your flour substitute in the cheesecake layer is also gluten-free, such as rice flour or a gluten-free baking blend.
Final Thoughts
These Cherry Cheesecake Bars Recipe combine ease, flavor, and eye-catching presentation in a way that truly delights both the maker and their guests. Whether it’s a holiday gathering, a casual treat, or a way to brighten up your dessert rotation, these bars promise creamy, fruity bliss in every bite. Don’t hesitate to give this recipe a try—you might find yourself coming back to it again and again as a beloved staple!
PrintCherry Cheesecake Bars Recipe
These Cherry Cheesecake Bars combine a buttery graham cracker crust with a smooth, creamy cheesecake filling and a sweet, tangy cherry topping. Perfectly baked and chilled to set, they make a festive and indulgent dessert that’s easy to slice and serve for any occasion.
- Prep Time: 20 minutes
- Cook Time: 40 minutes
- Total Time: 1 hour
- Yield: 12–16 bars 1x
- Category: Dessert
- Method: Baking
- Cuisine: American
Ingredients
For the Crust:
- 2 cups graham cracker crumbs
- ½ cup unsalted butter, melted
- ¼ cup granulated sugar
For the Cheesecake Filling:
- 16 oz (450g) cream cheese, softened
- ¾ cup granulated sugar
- 2 large eggs
- 1 tsp vanilla extract
- 2 tbsp sour cream
- 1 tbsp all-purpose flour
For the Cherry Topping:
- 1 can (21 oz) cherry pie filling
- Optional: ½ tsp almond extract for extra flavor
For Decoration (Optional):
- White chocolate shavings
- Festive sprinkles or edible glitter
- Crushed peppermint or mini candy canes
Instructions
- Prepare the crust: Preheat your oven to 325°F (160°C). Line a 9×13-inch baking pan with parchment paper, leaving a little overhang on the sides for easy lifting later. In a bowl, mix graham cracker crumbs, melted butter, and sugar until combined. Press the mixture firmly into the bottom of the prepared pan using the back of a spoon or a flat measuring cup. Bake for 10 minutes, then set aside to cool slightly.
- Make the cheesecake layer: In a large mixing bowl, beat the softened cream cheese with an electric mixer until smooth and creamy. Add sugar and mix until well incorporated. Beat in the eggs one at a time, followed by vanilla extract, sour cream, and flour. The batter should be smooth and lump-free.
- Assemble the bars: Pour the cheesecake batter evenly over the cooled crust. Use a spatula to smooth the top. Drop spoonfuls of cherry pie filling across the surface and gently swirl with a knife or skewer for a marbled look—or keep the cherry layer as a beautiful topping.
- Bake to perfection: Bake in the preheated oven for 35–40 minutes, or until the center is set but still slightly jiggly. Avoid overbaking, as it can cause cracks in the cheesecake. Once done, turn off the oven and let the bars sit inside with the door slightly open for 10 minutes. This helps prevent cracks and gives a creamy texture.
- Chill and set: Remove the pan from the oven and let it cool to room temperature. Then cover and refrigerate for at least 4 hours (or overnight) to allow the cheesecake to fully set.
- Slice and decorate: Lift the chilled cheesecake out of the pan using the parchment overhang. Cut into even squares or rectangles with a sharp knife, wiping between cuts for clean edges. Garnish with white chocolate shavings, crushed peppermint, or festive sprinkles for a holiday touch.
Notes
- Ensure your cream cheese and eggs are at room temperature for a smooth, creamy filling without lumps.
- Try using crushed vanilla wafers, shortbread cookies, or gingersnap crumbs as crust variations for a festive twist.
- Store the bars in an airtight container in the refrigerator for up to 5 days or freeze them for up to 2 months. Thaw overnight in the fridge before serving.
Keywords: cherry cheesecake bars, cheesecake bars, cherry dessert, holiday dessert, graham cracker crust, creamy cheesecake, cherry topping