Chocolate Easter Egg Nest Cake Recipe
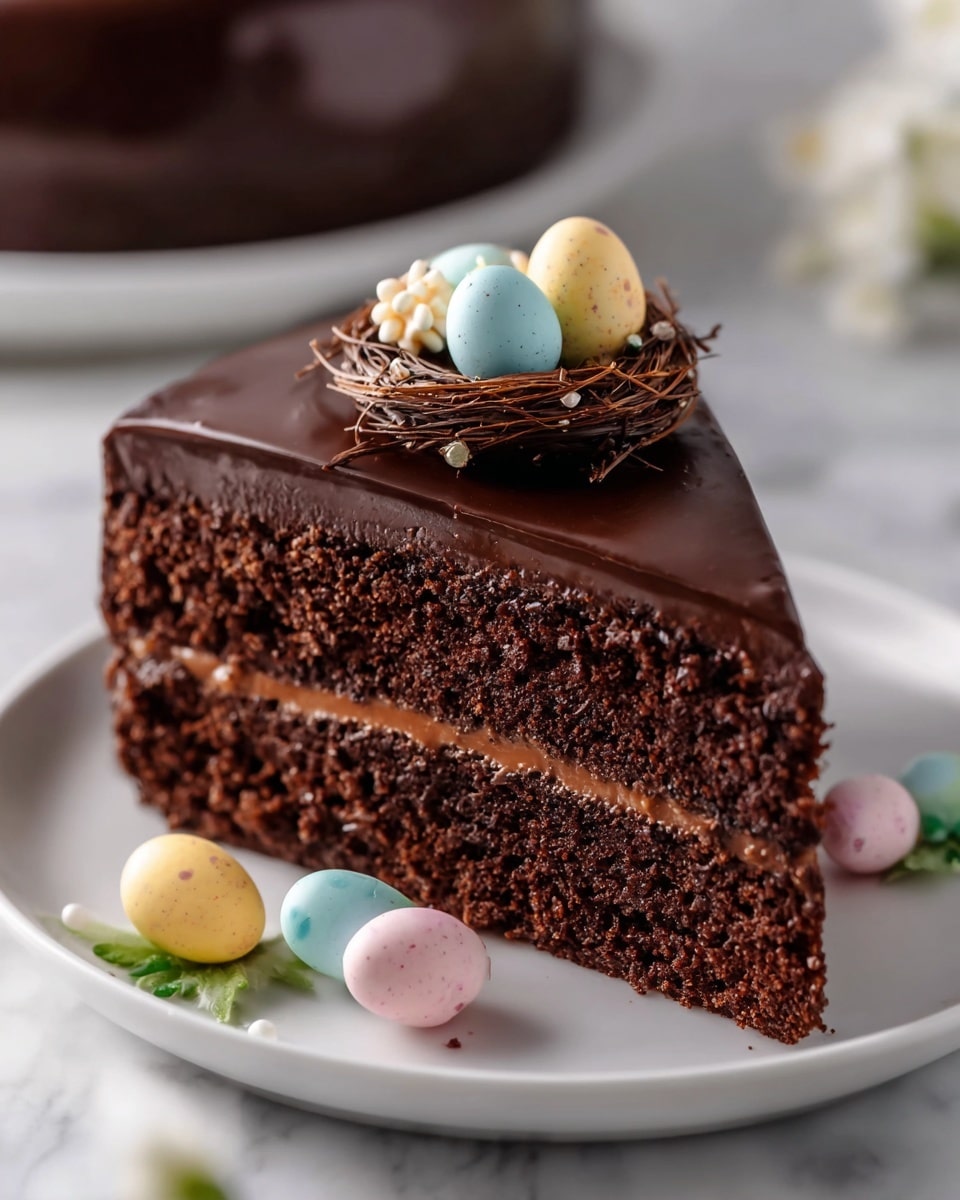
Picture this: The rich, intoxicating aroma of cocoa filling your kitchen as you pull a glossy, ganache-dripped chocolate cake out of the oven. The cake’s deep, dark hue promises indulgence, while a delicate, handcrafted chocolate nest perched on top gleams invitingly, cradling a colorful cluster of mini Easter eggs. This is not just any dessert—it’s a celebration of spring in every bite, an impressive yet approachable centerpiece perfect for gathering friends and family around the table. The Chocolate Easter Egg Nest Cake Recipe is a joy to make and even greater to share, blending luscious textures and flavors that will captivate everyone lucky enough to try it.
Why You’ll Love This Chocolate Easter Egg Nest Cake Recipe
- Decadent flavor: Experience a rich chocolate cake that’s moist and velvety, complemented by a silky smooth ganache topping that melts in your mouth.
- Stunning presentation: The whimsical chocolate nest crowned with colorful mini eggs creates a breathtaking showstopper perfect for festive occasions.
- Made from pantry essentials: Simple, familiar ingredients mean no frantic shopping runs—just quick prep for an impressive homemade dessert.
- Perfectly balanced textures: From the tender crumb of the cake to the creamy ganache and crisp nest, every bite is a delightful contrast of flavors and mouthfeels.
- Customizable and fun: Personalize your nest with your favorite candy eggs or add a splash of espresso in the batter to deepen the chocolate notes.
Why This Chocolate Easter Egg Nest Cake Recipe Works
This Chocolate Easter Egg Nest Cake Recipe nails the perfect balance thanks to three essential techniques. First, incorporating hot coffee into the batter intensifies the cocoa flavor, making the cake profoundly chocolaty without bitterness. Second, the ganache is carefully prepared by gently warming the cream to create a silky, glossy frosting that drapes elegantly and adds an indulgent creaminess. Finally, crafting the chocolate nest with piped melted chocolate on parchment paper not only gives a playful, decorative element but also adds a satisfying snap and texture that beautifully contrasts the softness of the cake underneath. Together, these elements make this recipe both delicious and visually captivating.
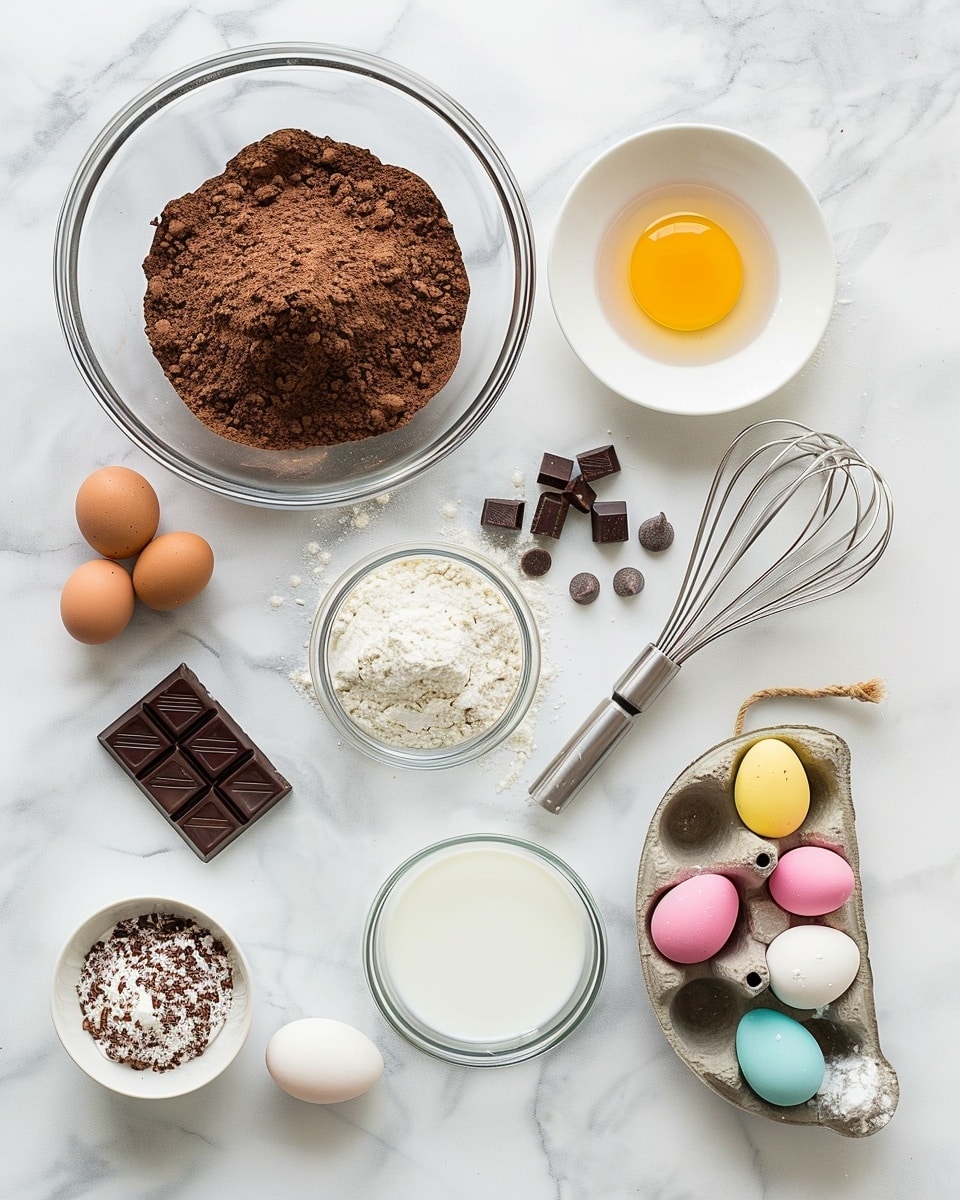
Ingredients You’ll Need
Gathering straightforward, quality ingredients is key to achieving this luscious cake. Each component plays a vital role in building layers of flavor and texture that harmonize beautifully.
- All-purpose flour (1 ¾ cups): Provides a tender, yet sturdy crumb for the cake.
- Unsweetened cocoa powder (¾ cup): Delivers that deep, rich chocolate essence.
- Granulated sugar (2 cups): Sweetens every bite just right.
- Baking powder and baking soda: The perfect combo for a light, airy rise.
- Salt (½ teaspoon): Enhances the chocolate flavor beautifully.
- Buttermilk (1 cup): Adds tender moisture and subtle tang.
- Vegetable oil (½ cup): Keeps the cake moist and soft.
- Large eggs (2): Provide structure and richness.
- Vanilla extract (2 teaspoons): Brings warmth and depth to the flavor.
- Hot water or coffee (1 cup): Deepens chocolate intensity and thins the batter for a moist cake.
- Heavy cream (1 cup): For the silky chocolate ganache.
- Dark chocolate (8 oz chopped + 6 oz melted): The star ingredient for ganache and the nest’s glossy strands.
- Unsalted butter (1 tablespoon): Adds richness and sheen to the ganache.
- Mini chocolate eggs or candy-coated Easter eggs: The charming finishing touch nestling atop the cake.
Ingredient Substitutions & Tips
- Buttermilk: If you don’t have buttermilk, simply mix 1 cup of milk with 1 tablespoon of vinegar or lemon juice and let it sit for 5 minutes.
- Dark chocolate: Use semi-sweet chocolate for a milder sweetness or vegan dark chocolate to keep it dairy-free (adjust heavy cream accordingly).
- Vegetable oil: Can be swapped with light olive oil or melted coconut oil for subtle flavor twists.
- Hot water or coffee: Using coffee will amplify the chocolate’s richness without tasting like coffee; hot water is fine for a classic approach.
👨🍳 Pro Tips for Perfect Results
- Use room temperature eggs: This ensures the batter emulsifies perfectly for a smooth, even crumb.
- Don’t skip the coffee or hot water: It really unlocks the cocoa’s full, rich potential.
- Allow the cake to cool completely before ganache: Prevents melting and keeps the ganache glossy and thick.
- Chill the chocolate nest well: Firm nests maintain their beautiful shape when placed on the cake.
- Line your pan well: Parchment paper makes removing the cake a breeze without damage.
How to Make Chocolate Easter Egg Nest Cake Recipe
Step 1: Prepare the Chocolate Cake
Preheat your oven to 350°F (175°C). Grease and line a 9-inch round cake pan with parchment paper for easy removal. In a large bowl, whisk together the flour, cocoa powder, sugar, baking powder, baking soda, and salt until evenly combined. Add the buttermilk, vegetable oil, eggs, and vanilla. Stir gently but thoroughly, then slowly mix in the hot water or coffee—the batter will be delightfully thin. Pour it into your pan and bake for 30 to 35 minutes. Once a toothpick comes out clean, let it cool in the pan for 10 minutes before transferring it to a wire rack to cool completely.
💡 Pro Tip: Use a light hand when mixing after adding the wet ingredients to keep the cake tender.
Step 2: Make the Chocolate Ganache
Warm the heavy cream over medium heat in a saucepan until you just see small bubbles forming around the edge—avoid boiling. Pour the hot cream over the chopped dark chocolate in a bowl. Let it rest for 2 to 3 minutes to soften, then stir gently until smooth and glossy. Stir in the butter for an extra silky finish. Allow the ganache to cool slightly until it thickens but remains pourable.
💡 Pro Tip: If your ganache looks grainy, a quick microwave zap of 10 seconds can help smooth it out.
Step 3: Create the Chocolate Nest
Melt the remaining dark chocolate in a microwave-safe bowl in 30-second intervals, stirring well between each session until just smooth and shiny. Transfer the chocolate to a piping bag or a ziplock bag with a small cut in the corner. Lay parchment on a baking sheet and pipe crisscrossing strands in a circular nest shape. Pop it into the refrigerator for 15 to 20 minutes until firm and crisp.
💡 Pro Tip: Keep your piping hand steady and build layers to give the nest dimension and durability.
Step 4: Assemble the Cake
Set the cooled cake on your serving plate. Pour the ganache evenly over the top, allowing luscious drips down the sides. Carefully peel the chocolate nest off the parchment and set it gently on the cake’s center. Fill the nest bowl with colorful mini chocolate eggs for that quintessential Easter charm. Serve immediately or keep refrigerated until ready to impress.
💡 Pro Tip: For extra flair, dust a little cocoa powder or edible glitter around the nest’s edge.
Common Mistakes to Avoid
Learn from these common pitfalls:
- Overmixing the batter: Can result in a dense, tough cake instead of a tender, moist crumb.
- Not cooling the cake before adding ganache: This causes the ganache to melt and run excessively, losing its glossy look.
- Boiling cream for ganache: Scorching the cream will make the ganache grainy and less smooth.
- Handling the chocolate nest too soon: Removing it from the refrigerator too early makes it fragile and prone to breaking.
- Skipping parchment paper in the pan: Makes it hard to remove the cake cleanly, risking cracks or sticking.
- Using low-quality chocolate: This dramatically affects the flavor and texture of both ganache and nest.
Delicious Variations to Try
Once you’ve nailed this Chocolate Easter Egg Nest Cake Recipe, why not experiment with these festive twists?
Salted Caramel Nest
Add a drizzle of homemade salted caramel inside the nest before placing the mini eggs for a sweet-salty surprise that elevates the chocolate richness.
Nutty Delight
Mix chopped toasted hazelnuts or pistachios into the ganache or sprinkle on top to add crunch and a nutty aroma.
Berry Burst
Scatter fresh raspberries or a spoonful of raspberry jam on top of the ganache before adding the nest to add a bright, fruity contrast.
Vegan Chocolate Nest Cake
Use almond or coconut milk-based buttermilk and replace dairy cream with coconut cream for the ganache. Choose vegan chocolate varieties to keep it plant-based and just as mouthwateringly good.
Mocha Marvel
Substitute hot water with freshly brewed espresso in the cake batter and even in the ganache for a fabulous coffee and chocolate flavor duo.
How to Serve Chocolate Easter Egg Nest Cake Recipe
Garnishes
Enhance the visual and flavor appeal with a dusting of cocoa powder or powdered sugar, chocolate shavings, or edible gold dust for sparkle. Fresh mint leaves add a pop of green and refreshing aroma.
Side Dishes
Serve alongside a scoop of vanilla or coffee ice cream, fresh berries, or a dollop of whipped cream to balance the cake’s rich intensity.
Creative Ways to Present
Place the cake on a rustic wooden board surrounded by pastel-colored Easter eggs and spring flowers for a stunning centerpiece. Or serve individual slices with mini nest decorations crafted from tempered chocolate on each plate for a personal touch.
Make Ahead and Storage
Storing Leftovers
Cover the cake with plastic wrap or store it in an airtight container in the refrigerator to keep it fresh for up to 3 days. The ganache helps preserve moisture beautifully.
Freezing
You can freeze the cake (without the ganache and nest) tightly wrapped in plastic wrap and foil for up to 2 months. Thaw completely in the fridge before adding ganache and assembling.
Reheating
Bring refrigerated slices to room temperature before serving for best flavor. Avoid microwaving ganache-topped slices as it can melt the topping unevenly.
FAQs
Can I make this cake gluten-free?
Yes! Use a 1:1 gluten-free baking flour blend instead of all-purpose flour, but ensure it contains xanthan gum for structure.
What if I don’t have buttermilk?
Simply mix 1 cup of milk with 1 tablespoon of vinegar or lemon juice and let it sit for 5 minutes before using.
Can I use milk chocolate instead of dark chocolate?
Dark chocolate provides depth and a rich flavor balance; milk chocolate will be sweeter and less intense but can be used if preferred.
How do I store the chocolate nest if I’m making it ahead?
Keep the nest refrigerated in an airtight container and assemble just before serving to maintain its crispness.
Is this recipe suitable for children to help with?
Absolutely, especially the nest-making step which can be a fun activity. Just handle the melting chocolate carefully with adult supervision.
Can I make cupcakes instead of a cake?
Yes! Adjust baking time to about 18-20 minutes and pipe the nest onto cupcakes using the same chocolate technique.
What is the purpose of the coffee or hot water?
It intensifies the chocolate flavor and creates a moister texture without adding a coffee taste.
Can I prepare this cake a day ahead?
Yes, bake and cool the cake, then cover and refrigerate. Prepare ganache and nest separately and assemble on serving day for freshness.
Final Thoughts
This Chocolate Easter Egg Nest Cake Recipe is the perfect blend of rich, comforting flavors and playful, festive charm. Whether you’re celebrating the joys of Easter or simply craving a luscious chocolate treat, this cake brings warmth, creativity, and indulgence to your table. Taking the time to craft the chocolate nest and silky ganache transforms an ordinary cake into a truly memorable dessert experience. It’s a sweet reminder that the best recipes are those made with love and shared with those who matter most.
Have you tried this Chocolate Easter Egg Nest Cake Recipe? I’d love to hear how it turned out! Leave a comment below. If you loved this recipe, please share it with friends and family. Happy cooking! 🍫🐣
PrintChocolate Easter Egg Nest Cake Recipe

This Chocolate Easter Egg Nest Cake is a delightful and festive dessert perfect for celebrating Easter. It features a moist, rich chocolate cake layered with silky dark chocolate ganache, topped with a decorative chocolate nest filled with mini chocolate eggs. The combination of a tender cocoa cake, luscious ganache, and crunchy chocolate nest creates a visually stunning and delicious centerpiece perfect for springtime gatherings.
- Prep Time: 25 minutes
- Cook Time: 35 minutes
- Total Time: 1 hour 35 minutes
- Yield: 12 servings 1x
- Category: Dessert
- Method: Baking
- Cuisine: American
Ingredients
For the Chocolate Cake
- 1 ¾ cups (220g) all-purpose flour
- ¾ cup (75g) unsweetened cocoa powder
- 2 cups (400g) granulated sugar
- 2 teaspoons baking powder
- 1 teaspoon baking soda
- ½ teaspoon salt
- 1 cup (240ml) buttermilk
- ½ cup (120ml) vegetable oil
- 2 large eggs
- 2 teaspoons vanilla extract
- 1 cup (240ml) hot water or coffee
For the Chocolate Ganache
- 1 cup (240ml) heavy cream
- 8 oz (225g) dark chocolate, chopped
- 1 tablespoon unsalted butter
For the Chocolate Nest
- 6 oz (170g) dark chocolate, melted
- Parchment paper
- Mini chocolate eggs or candy-coated Easter eggs
Instructions
- Prepare the chocolate cake: Preheat your oven to 350°F (175°C). Grease and line a 9-inch round cake pan (at least 2.5 inches deep) with parchment paper. In a large mixing bowl, whisk together the flour, cocoa powder, sugar, baking powder, baking soda, and salt. Add the buttermilk, vegetable oil, eggs, and vanilla extract and mix until smooth. Gradually stir in the hot water or coffee; the batter will be thin. Pour into the prepared pan and bake for 30-35 minutes until a toothpick inserted in the center comes out clean. Let the cake cool in the pan for 10 minutes, then transfer to a wire rack to cool completely.
- Make the ganache: Heat the heavy cream in a saucepan over medium heat until it begins to simmer, avoiding boiling. Remove from heat and pour over chopped dark chocolate. Let it sit for 2-3 minutes before stirring until smooth. Add the butter and stir until fully incorporated. Allow the ganache to cool slightly and thicken, but keep it pourable.
- Create the chocolate nest: Melt the dark chocolate in the microwave using 30-second intervals, stirring between each until smooth. Transfer melted chocolate to a piping bag or a small ziplock bag with a corner cut off. Place parchment paper on a baking tray and pipe chocolate in crisscrossing strands forming a circular nest shape. Refrigerate the tray for 15-20 minutes until the nest is firm.
- Assemble the cake: Place the cooled cake on a serving platter. Pour the chocolate ganache over the cake, allowing it to drip down the sides. Carefully peel the hardened chocolate nest from parchment paper and place it on top of the cake. Fill the nest with mini chocolate eggs. Serve and enjoy.
Notes
- Using hot coffee instead of water enhances the chocolate flavor in the cake.
- Make sure the ganache is thick enough to coat the cake without running off.
- The chocolate nest can be prepared a day ahead and stored in the refrigerator.
- Use good quality dark chocolate for a richer and smoother ganache and nest.
- Let the cake cool completely before adding ganache to avoid melting it.
Keywords: Chocolate Easter Cake, Chocolate Ganache, Easter Dessert, Chocolate Nest Cake, Holiday Cake, Festive Cake