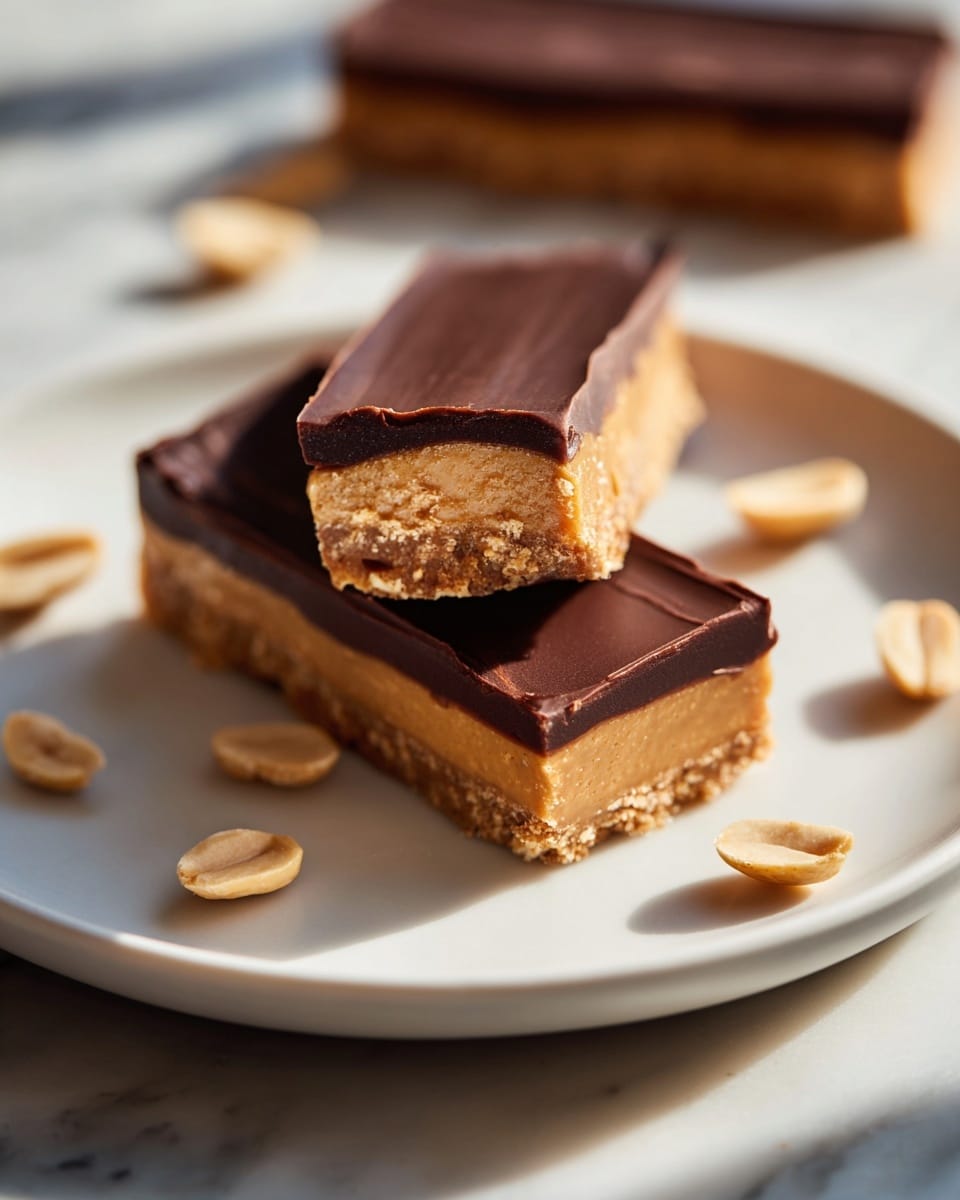
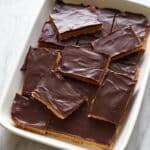
Easy 5-Minute Protein Bars with Peanut Butter and Chocolate Recipe
Picture this: the rich, nutty aroma of warm peanut butter mingling with the silky sweetness of melted chocolate fills your kitchen as you whip up these irresistible protein bars. The smooth, dense texture promises a satisfying bite that’s just the right balance of sweet and salty. Whether you’re rushing out the door or craving a wholesome snack, these bars are like a hug in edible form—ready in minutes and packing a punch of energy and flavor you’ll adore.
Why You’ll Love This Easy 5-Minute Protein Bars with Peanut Butter and Chocolate Recipe
- Quick and Easy: Ready in just 5 minutes, these bars are your go-to when time is tight but cravings are strong.
- Simple Ingredients: Uses common pantry staples like peanut butter and protein powder, so you can make them anytime without a special shopping trip.
- Perfect for On-the-Go: Portable and filling, they’re the perfect pick-me-up before your workout or between meetings.
- Impressive yet Effortless: They look and taste like you spent hours, but honestly, it’s just a few minutes of stirring and chilling!
- Customizable: Easily swap ingredients to fit your dietary needs or flavor cravings, making each batch uniquely yours.
Why This Easy 5-Minute Protein Bars with Peanut Butter and Chocolate Recipe Works
This recipe’s magic lies in its simplicity and balance. The creamy peanut butter acts as the perfect binder, bringing together the powdery protein and natural sweetness from maple syrup, creating a dough that’s easy to mold. Using unsweetened protein powder ensures you control the sweetness, making the bars more versatile to your taste. The optional melted chocolate coating adds a luscious finish that contrasts beautifully with the dense, chewy center, resulting in a treat that feels indulgent yet wholesome. The whole process is streamlined to save you time without sacrificing flavor.
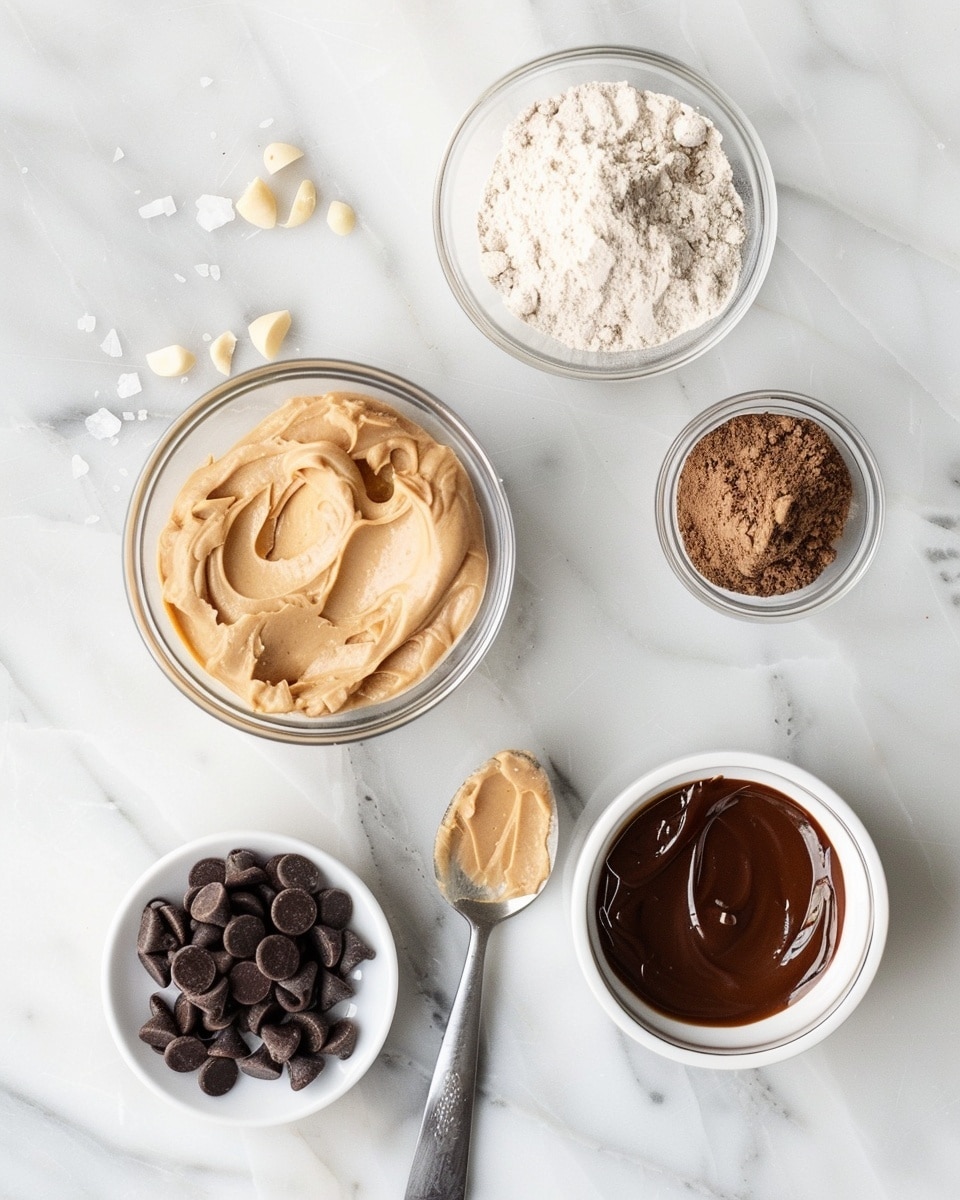
Ingredients You’ll Need
Each ingredient in this recipe plays a starring role—simple but essential to achieving the perfect balance of texture and taste in your protein bars.
- Peanut Butter: Provides richness, creaminess, and that classic nutty flavor staple to these bars.
- Protein Powder: Boosts the protein content and helps form the chewy texture of the bars.
- Pure Maple Syrup: Adds natural sweetness and helps bind the dry ingredients together.
- Salt: Enhances flavors and adds a subtle depth of taste.
- Melted Chocolate Chips (Optional): For that decadent chocolate coating that takes these bars to the next level.
Ingredient Substitutions & Tips
- Peanut Butter: Try almond butter, sunflower seed butter, or tahini for allergy-friendly alternatives.
- Protein Powder: Use plant-based protein powder to keep this vegan or try flavored versions, but keep an eye on sweetness levels.
- Pure Maple Syrup: Honey is a perfect natural substitute, and a low-carb sweetener like erythritol works well for keto-friendly bars.
- Melted Chocolate Chips: Use dairy-free or sugar-free chocolate chips to suit dietary needs or preferences.
👨🍳 Pro Tips for Perfect Results
- Tip 1: Use natural, unsweetened peanut butter for a richer, less sugary flavor.
- Tip 2: Make sure to blend all ingredients well to avoid crumbly bars.
- Tip 3: Chill the mixture properly to make cutting the bars neat and easy.
- Tip 4: If dipping in chocolate, stir in a teaspoon or two of oil to create a smooth, shiny coating.
- Tip 5: Taste the mixture and adjust sweetness or salt before chilling for perfect balance.
How to Make Easy 5-Minute Protein Bars with Peanut Butter and Chocolate Recipe
Step 1: Combine the Base Ingredients
Start by stirring together your peanut butter, protein powder, maple syrup, and salt in a mixing bowl. Use a spatula or a sturdy spoon to blend until all the dry elements disappear into a thick, sticky dough. This is the heart of your bars, so take a moment to savor the smell and texture—it’s pure anticipation!
💡 Pro Tip: For an even easier mix, warm the peanut butter slightly to loosen it up but don’t overheat.
Step 2: Shape Your Bars
You have two delicious options here: scoop the dough into a lined 8×8 inch pan and smooth the surface with a spatula for uniform bars, or go rustic and shape hand-formed bars. Either way, press firmly to ensure the bars hold together when chilled.
💡 Pro Tip: Wet your hands to prevent sticking if shaping bars by hand.
Step 3: Optional Chocolate Coating
If your heart desires extra indulgence, melt chocolate chips until silky smooth. Add a teaspoon or two of oil to get that glossy sheen. Spread it over the bars or dip each bar individually, then place them back in the pan.
💡 Pro Tip: Don’t rush the chocolate—chill bars first if you want a thick coating without melting the base.
Step 4: Chill Until Firm
Pop your pan or shaped bars into the fridge for at least 30 minutes so they set perfectly. Once chilled, slice neatly with a sharp knife if you used the pan method. The bars should be firm yet tender, ready to fuel your day.
💡 Pro Tip: Line your pan with parchment paper for effortless removal and slicing.
Common Mistakes to Avoid
Learn from these common pitfalls:
- Using overly sweet protein powder: Can overpower the flavor and make bars cloying.
- Skipping the chill time: Bars may fall apart if not properly set.
- Not spreading the dough evenly: Uneven thickness leads to uneven cooking and cutting.
- Overheating peanut butter: Can change its texture and make the dough oily.
- Ignoring salt: Salt is essential to balance sweetness and enhance flavors.
- Forgetting to prep the pan: Makes removal tricky and cuts messy bars.
Delicious Variations to Try
Once you’ve mastered the classic, try these mouthwatering spins to keep your snack game exciting!
Chocolate Banana Boost
Add mashed ripe banana to the mixture for natural sweetness and softness, then swirl in shredded dark chocolate before chilling.
Cranberry Almond Crunch
Mix in chopped almonds and dried cranberries for a delightful tart and crunchy surprise in every bite.
Mocha Madness
Stir a teaspoon of instant espresso powder into the base and top with a drizzle of dark chocolate for coffee lovers.
Vanilla Coconut Dream
Use vanilla-flavored protein powder and sprinkle shredded coconut on top for a tropical twist.
Spiced Chai Delight
Add a pinch of cinnamon, cardamom, and nutmeg for a warming, fragrant flavor profile perfect for cooler days.
How to Serve Easy 5-Minute Protein Bars with Peanut Butter and Chocolate Recipe
Garnishes
Sprinkle flaky sea salt on top of the chocolate coating, or add a few whole peanuts or cacao nibs for texture and charm.
Side Dishes
Pair these bars with a fresh fruit salad or a homemade yogurt dip for a balanced snack or light breakfast.
Creative Ways to Present
Wrap bars individually in parchment paper tied with twine for gift-giving or pack them in a bento box with other colorful snacks for an eye-catching lunch.
Make Ahead and Storage
Storing Leftovers
Keep your protein bars in an airtight container in the refrigerator for up to one week to maintain freshness and texture.
Freezing
Wrap bars individually in plastic wrap and store in a freezer-safe bag for up to 3 months. Thaw overnight in the fridge before enjoying.
Reheating
These bars are best enjoyed chilled but can be warmed slightly in your hands or microwave for 10-15 seconds if you prefer a softer bite.
FAQs
Can I use other nut butters?
Absolutely! Almond, cashew, or sunflower seed butters work beautifully and offer different flavor profiles.
Is this recipe gluten-free?
Yes, as long as you use gluten-free protein powder, these bars are naturally gluten-free.
Can I make these bars vegan?
Yes! Use plant-based protein powder and substitute maple syrup in place of honey if needed.
Do I need to bake these bars?
No baking required. This recipe is entirely no-bake, making it fast and simple.
How long will the bars keep?
They stay fresh in the fridge for up to one week and freeze well for longer storage.
Can I add mix-ins?
Definitely! Nuts, seeds, dried fruit, or spices all make fantastic additions.
What is the best protein powder to use?
Choose an unsweetened protein powder with a flavor you enjoy, like vanilla or chocolate, for best results.
How can I make the bars less sticky?
Chilling them well helps firm up the bars and reduce stickiness when handling.
Final Thoughts
There is something truly comforting about sinking your teeth into a homemade protein bar that marries peanut butter’s creamy richness with the decadent touch of chocolate. This Easy 5-Minute Protein Bars with Peanut Butter and Chocolate Recipe brings that joy to life with such effortless charm—you’ll want to make these again and again. Whether you need a quick snack before your workout, a wholesome treat for the kids, or a portable pick-me-up, these bars have got your back.
Have you tried this Easy 5-Minute Protein Bars with Peanut Butter and Chocolate Recipe? I’d love to hear how it turned out! Leave a comment below. If you loved this recipe, please share it with friends and family. Happy cooking! 😊
PrintEasy 5-Minute Protein Bars with Peanut Butter and Chocolate Recipe
These homemade protein bars are a quick, nutritious snack packed with peanut butter and protein powder, perfect for on-the-go energy. With just a few simple ingredients, you can whip up a customizable batch of bars that can be shaped by hand or in a pan, with an optional chocolate coating for extra indulgence.
- Prep Time: 5 minutes
- Cook Time: 0 minutes
- Total Time: 5 minutes plus chilling time
- Yield: 10 servings 1x
- Category: Snack
- Method: No-Cook
- Cuisine: American
- Diet: Gluten Free
Ingredients
Main Ingredients
- 1 1/2 cup peanut butter (or allergy-friendly substitute)
- 3/4 cup protein powder (about 90g)
- 1/4 cup pure maple syrup (or honey; or try these Keto Protein Bars)
- 1/2 tsp salt
Optional Topping
- 4 oz melted chocolate chips
- 2 tsp oil (optional, for smoother chocolate sauce)
Instructions
- Mix Ingredients: In a large bowl, combine the peanut butter, protein powder, pure maple syrup, and salt. Stir well until a thick dough forms that holds together when pressed.
- Shape or Press Dough: Either shape the dough into individual bars with your hands or spread it evenly into a lined 8×8 inch pan, smoothing the surface with a spatula.
- Optional Chocolate Coating: If using chocolate, melt the chocolate chips gently in a microwave or double boiler. For a smoother consistency, stir in 2 teaspoons of oil. Spread the melted chocolate evenly over the dough in the pan, or alternatively dip each bar into the chocolate sauce individually.
- Chill Bars: Place the bars or pan in the refrigerator and chill until firm, about 1-2 hours. This will allow the bars to set properly and make them easier to handle.
- Cut and Serve: If you used a pan, once chilled, cut the mixture into 10 bars. Store the bars in an airtight container in the refrigerator for best freshness.
Notes
- Choose a protein powder flavor you enjoy, as it greatly affects the taste.
- Unsweetened protein powder works best to control sweetness.
- You can substitute peanut butter with any allergy-friendly nut or seed butter.
- For a keto-friendly version, use keto-approved sweeteners and protein powders.
- The optional chocolate coating adds extra flavor but can be omitted for a simpler bar.
- Bars keep well refrigerated for up to one week or can be frozen for longer storage.
Keywords: protein bars, peanut butter bars, healthy snack, no bake protein bars, easy protein bars, homemade protein bars