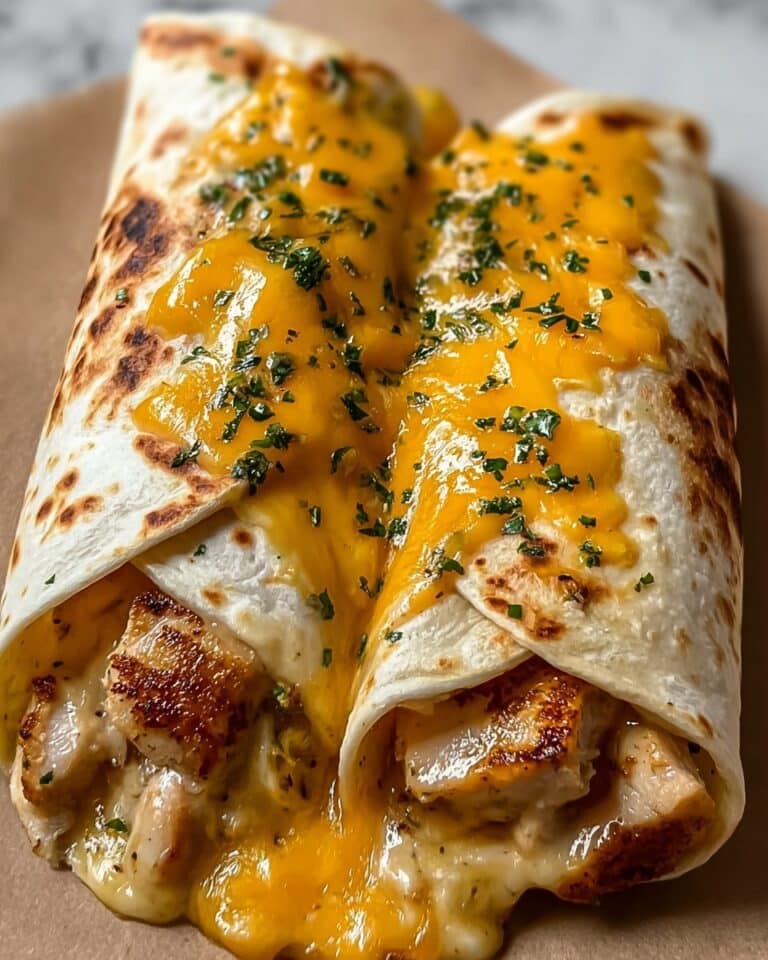
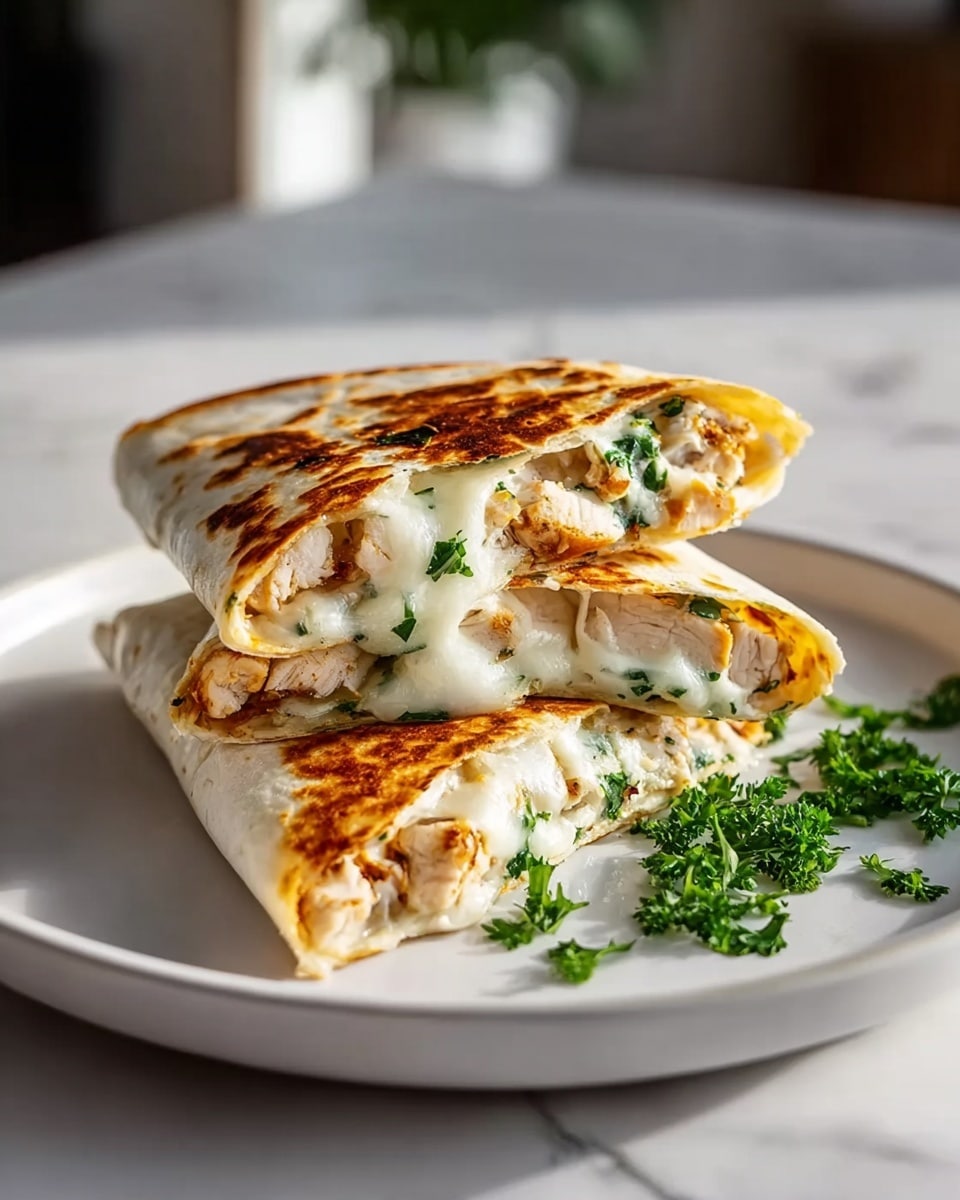
Garlic Chicken Wraps Recipe
Picture this: the irresistible sizzle of seasoned chicken hitting a warm skillet, filling your kitchen with the mouthwatering aroma of garlic and smoked paprika. The sight of melty cheese mingling with tender chicken, all wrapped snugly in a golden, toasted tortilla—this is comfort food elevated. This Garlic Chicken Wraps Recipe is everything you want when hunger strikes yet you crave something quick, flavorful, and downright satisfying. A perfect balance of creamy, savory, and crunchy awaits you in every bite, promising to become your new go-to meal.
Why You’ll Love This Garlic Chicken Wraps Recipe
- Quick and Easy: Ready in just 25 minutes, this recipe fits perfectly into busy weeknights or effortless weekend lunches.
- Simple Ingredients: Made with pantry staples like garlic powder, olive oil, and cheese, it’s a pantry-friendly gem that won’t have you hunting for exotic items.
- Perfect for Weeknights: Minimal prep and cooking time mean you can have a hot, hearty meal on the table without a fuss.
- Impressive Presentation: Golden, crispy wraps oozing with melted cheese and vibrant parsley—just as stunning as they are delicious.
- Customizable: Easily swap chicken breasts for thighs or add a spicy kick with chili flakes, tailoring the wraps precisely to your cravings.
Why This Garlic Chicken Wraps Recipe Works
This Garlic Chicken Wraps Recipe shines thanks to its clever seasoning blend that perfectly infuses the chicken with layers of garlicky, smoky goodness. Cooking the chicken just until golden ensures it remains juicy and tender inside the wrap. The magic lies in toasting the wraps after assembly, which creates a crispy, golden exterior while allowing the cheese inside to melt luxuriously, binding everything together into a harmonious bite. A touch of fresh parsley lends just the right hint of freshness to balance the richness.
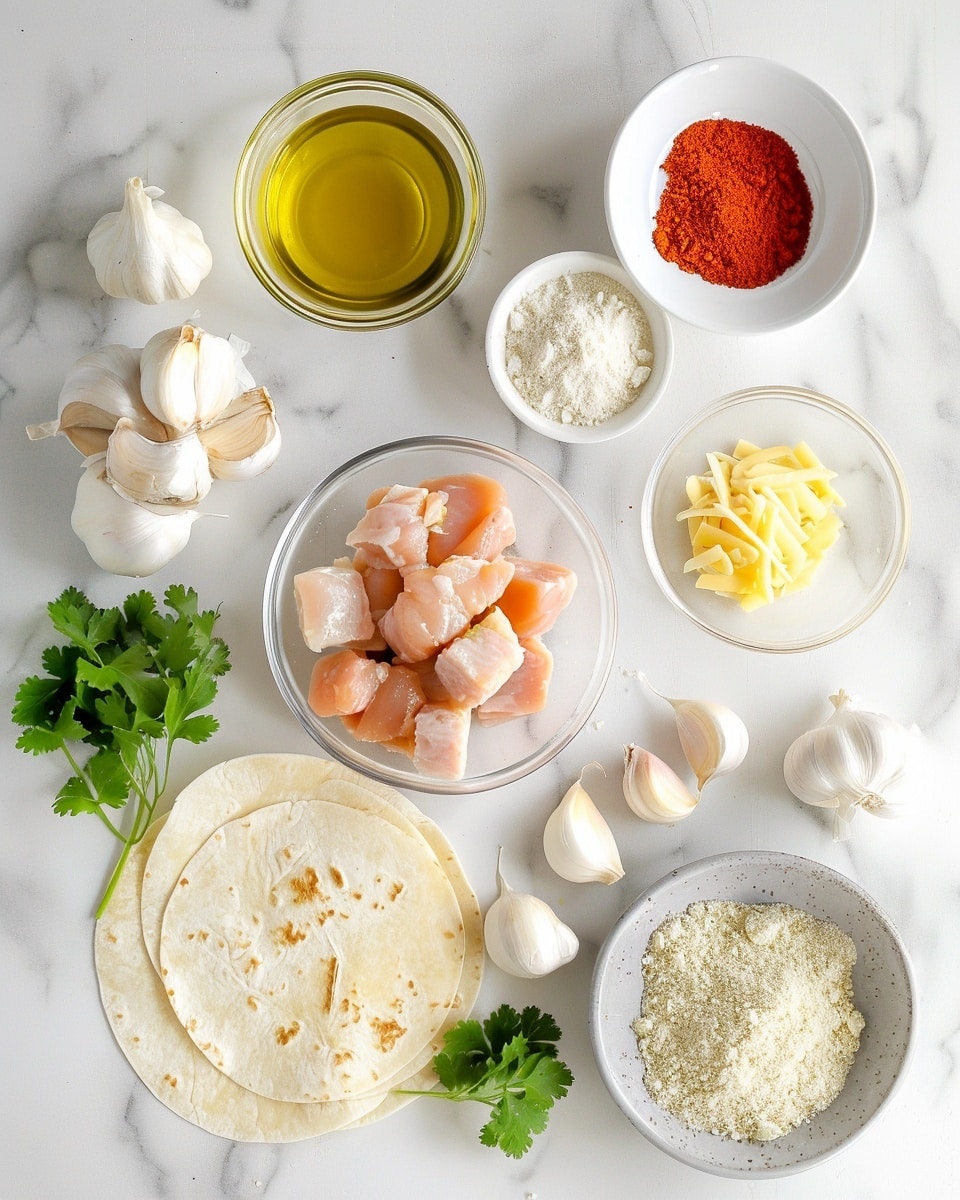
Ingredients You’ll Need
Simple, accessible ingredients come together to create a flavor-packed meal you’ll want to make again and again.
- 2 large chicken breasts (diced): The star protein that soaks up all the wonderful seasonings.
- 1 tablespoon olive oil: Helps the chicken cook to a gorgeous golden brown.
- 2 teaspoons garlic powder: Infuses that essential punch of garlic flavor without overpowering.
- 1 teaspoon onion powder: Adds subtle sweetness and depth.
- 1 teaspoon paprika: Introduces a smoky warmth that’s irresistibly inviting.
- 4 large flour tortillas: Soft, pliable wraps that hold everything together perfectly.
- 1 cup shredded cheddar cheese: Provides rich, sharp creaminess.
- 1/2 cup shredded mozzarella cheese: Melts beautifully for that gooey texture.
- 1/2 cup creamy garlic sauce: Brings luscious moisture and bold flavor to each bite.
- Fresh parsley (chopped): Adds a pop of vibrant color and fresh herbal notes.
Ingredient Substitutions & Tips
- Chicken breasts: For juicier wraps, swap with boneless chicken thighs without skin.
- Flour tortillas: Gluten-free wraps work wonderfully if you require a gluten-free option.
- Creamy garlic sauce: Substitute with garlic aioli, yogurt-based garlic dressing, or a dairy-free garlic sauce depending on dietary needs.
- Cheddar and mozzarella cheese: Feel free to use whichever melting cheeses you prefer, like Monterey Jack or mozzarella only for a milder taste.
👨🍳 Pro Tips for Perfect Results
- Use room temperature chicken: It cooks more evenly and stays tender.
- Don’t overcrowd the pan: Give chicken pieces space to brown nicely.
- Warm tortillas before assembling: This prevents cracking and makes folding easier.
- Toast wraps gently: Use medium heat and press lightly to achieve a crispy crust without burning.
- Customize your spice level: Add chili flakes or jalapeños for a fiery twist.
How to Make Garlic Chicken Wraps Recipe
Step 1: Season the Chicken
In a mixing bowl, toss the diced chicken breast with olive oil, garlic powder, onion powder, paprika, salt, and black pepper until every piece is evenly coated in that flavorful spice blend. This step really sets the stage for the entire dish, infusing every bite with tantalizing aroma and taste.
💡 Pro Tip: Let the chicken marinate for 10–15 minutes if you have time—it deepens the flavor beautifully.
Step 2: Cook the Chicken
Heat a non-stick skillet over medium heat, then add your seasoned chicken. Let each piece sizzle and turn golden, stirring occasionally. Cook for 6 to 8 minutes until the chicken is fully cooked through but still juicy. The garlic and paprika will release their fragrant, savory notes during this perfect sear.
💡 Pro Tip: Avoid crowding the pan to get a nice caramelization on the chicken pieces.
Step 3: Assemble the Wraps
Warm each tortilla slightly—either in a microwave for 15 seconds or directly over a low flame—to make them flexible. Spread 2 tablespoons of creamy garlic sauce across the center. Layer on the golden cooked chicken, then sprinkle with ¼ cup shredded cheddar and 2 tablespoons shredded mozzarella cheese. This layering builds irresistible gooeyness.
💡 Pro Tip: Don’t overload the fillings—this helps with folding and prevents breaking.
Step 4: Fold and Toast
Fold the tortilla burrito-style by folding in the sides, then rolling from the bottom up. Wipe your skillet clean and return it to medium heat. Toast each wrap for 2 to 3 minutes per side, gently pressing with a spatula until the tortilla is crisp and the cheeses inside have melted into a velvety blanket.
💡 Pro Tip: For extra texture and smoky flavor, use a grill pan instead of a flat skillet.
Step 5: Serve
Remove the wraps from the skillet and slice in half diagonally for a beautiful presentation. Garnish with a generous sprinkle of fresh chopped parsley that brightens each bite with herbal freshness. Serve hot and dive into layers of creamy, garlicky, cheesy chicken goodness.
Common Mistakes to Avoid
Learn from these common pitfalls:
- Overcooking the chicken: Results in dry, tough meat—keep it juicy and tender.
- Skipping the tortilla warming step: Leads to cracking and difficulty folding.
- Too much filling: Makes wraps hard to fold and prone to falling apart.
- Toasting at too high heat: Can burn the tortilla before cheese melts.
- Using cold chicken straight from the fridge: Causes uneven cooking.
- Ignoring seasoning balance: Under-salting or missing the key spices diminishes flavor impact.
Delicious Variations to Try
Once you’ve mastered the classic Garlic Chicken Wraps Recipe, experiment with these enticing twists that keep your wraps exciting while respecting halal dietary guidelines.
Spicy Jalapeño Kick
Add sliced jalapeños or a pinch of chili flakes inside the wrap to ignite your taste buds with a fiery, zesty punch.
Herb and Lemon Twist
Mix fresh chopped cilantro and a squeeze of lemon juice into the garlic sauce for a fresh, tangy lift.
Veggie Lover’s Delight
Include grilled bell peppers, onions, and shredded lettuce for added crunch and vibrant color.
Cheesy Mushroom Upgrade
Sauté mushrooms with the chicken and cheese for an earthy, rich flavor profile.
Avocado Cream Dream
Swap the garlic sauce for a smooth avocado spread to add luscious creaminess and healthy fats.
How to Serve Garlic Chicken Wraps Recipe
Garnishes
A sprinkle of fresh chopped parsley or cilantro adds brightness, while extra garlic sauce on the side invites personalized dipping.
Side Dishes
Pair these wraps with crisp green salads, tangy coleslaw, or roasted vegetable medleys to round out the meal.
Creative Ways to Present
Serve the wraps sliced and stacked in a rustic wooden tray for sharing, or wrap them individually in parchment paper for grab-and-go lunches bursting with flavor.
Make Ahead and Storage
Storing Leftovers
Keep any leftover cooked chicken and wrap components separately refrigerated in airtight containers for up to 3 days to preserve freshness.
Freezing
Assemble the wraps but skip toasting. Wrap them tightly in plastic wrap and freeze for up to 2 months, perfect for meal prep or quick lunches.
Reheating
Reheat frozen or refrigerated wraps by toasting them in a skillet over medium heat until warm and crispy, or use an oven at 350°F (175°C) for 10 minutes. Avoid microwaving to maintain the crisp exterior.
FAQs
Can I use boneless chicken thighs instead of breasts?
Absolutely! Boneless chicken thighs are even juicier and add a lovely depth of flavor. Just adjust cooking time slightly if needed.
Is it possible to make these wraps gluten-free?
Yes, substitute the flour tortillas with gluten-free wraps available at most grocery stores, and the rest of the recipe remains the same.
Can I prepare the chicken in advance?
For sure! Cooking the chicken ahead saves time and makes assembly quick—just store it properly in the fridge.
What else can I use instead of the creamy garlic sauce?
Garlic aioli, yogurt-based garlic dressing, or a dairy-free garlic sauce are great alternatives.
How can I add more spice to this recipe?
Add chopped jalapeños, chili flakes, or a dash of hot sauce inside the wrap for a flavorful kick.
Can I add vegetables to this wrap?
Definitely! Sautéed peppers, onions, or fresh greens work beautifully inside these wraps.
What’s the best way to warm tortillas without drying them out?
Use a quick microwave zap for 10-15 seconds or warm them over a low flame for a few seconds per side.
Can I freeze these wraps after assembling?
Yes, just make sure to freeze them before toasting to preserve texture and flavor.
Final Thoughts
There’s something incredibly comforting about this Garlic Chicken Wraps Recipe—a perfect harmony of warm, fragrant spices, tender chicken, and gooey cheese wrapped in a golden tortilla hug. Whether you’re feeding a hungry family or craving a quick solo dinner, this recipe delivers flavors that feel like a warm embrace. Try it tonight and watch it become a beloved staple in your kitchen.
Have you tried this Garlic Chicken Wraps Recipe? I’d love to hear how it turned out! Leave a comment below. If you loved this recipe, please share it with friends and family. Happy cooking! 😊
PrintGarlic Chicken Wraps Recipe

These Garlic Chicken Wraps are a quick and flavorful meal perfect for busy weeknights. Tender diced chicken breasts are seasoned with garlic, onion, and paprika, then cooked on the stovetop and wrapped in soft flour tortillas with creamy garlic sauce and melted cheddar and mozzarella cheeses. Toasted to golden perfection, these wraps offer a satisfying combination of juicy chicken, savory spices, and melty cheese with a fresh parsley garnish for brightness. Easily customizable and freezer-friendly, they make an ideal lunch or dinner option that’s both delicious and comforting.
- Prep Time: 10 minutes
- Cook Time: 15 minutes
- Total Time: 25 minutes
- Yield: 4 servings 1x
- Category: Lunch
- Method: Stovetop
- Cuisine: American
Ingredients
Chicken and Seasoning
- 2 large chicken breasts, diced (substitute: boneless chicken thighs for extra juiciness)
- 1 tablespoon olive oil
- 2 teaspoons garlic powder
- 1 teaspoon onion powder
- 1 teaspoon paprika
- Salt, to taste
- Black pepper, to taste
Wrap Assembly
- 4 large flour tortillas (use gluten-free wraps if needed)
- 1 cup shredded cheddar cheese
- ½ cup shredded mozzarella cheese
- ½ cup creamy garlic sauce (can substitute with garlic aioli – yogurt-based or dairy-free version)
- Fresh parsley, chopped (for garnish)
Instructions
- Season the Chicken: In a mixing bowl, combine the diced chicken with olive oil, garlic powder, onion powder, paprika, salt, and black pepper. Toss well until the chicken is evenly coated with the seasoning blend.
- Cook the Chicken: Heat a non-stick skillet over medium heat. Add the seasoned chicken and cook for 6–8 minutes, stirring occasionally, until the chicken is fully cooked and golden brown. Remove from heat and set aside.
- Assemble the Wraps: Warm each tortilla slightly to make it more pliable. Spread 2 tablespoons of creamy garlic sauce across the center of each tortilla. Layer with cooked chicken, then sprinkle with ¼ cup of cheddar and 2 tablespoons of mozzarella cheese.
- Fold and Toast: Fold each tortilla burrito-style—fold in the sides, then roll from the bottom up. Wipe out the skillet and return it to medium heat. Toast each wrap for 2–3 minutes per side, pressing gently with a spatula until golden brown and the cheese is melted.
- Serve: Remove wraps from the skillet and slice in half if desired. Garnish with fresh chopped parsley. Serve hot and enjoy!
Notes
- Use a grill pan for extra texture and smoky flavor.
- These wraps are freezer-friendly before toasting—perfect for batch meal prep.
- Make it spicy by adding chili flakes or jalapeños inside the wrap.
- Substitute boneless chicken thighs instead of breasts for juicier chicken.
- Use gluten-free tortillas to accommodate gluten sensitivities.
- Swap creamy garlic sauce with garlic aioli (yogurt-based or dairy-free) for a different flavor profile.
Keywords: garlic chicken wraps, chicken wraps recipe, easy chicken wrap, skillet chicken wraps, quick wraps, cheesy chicken wrap