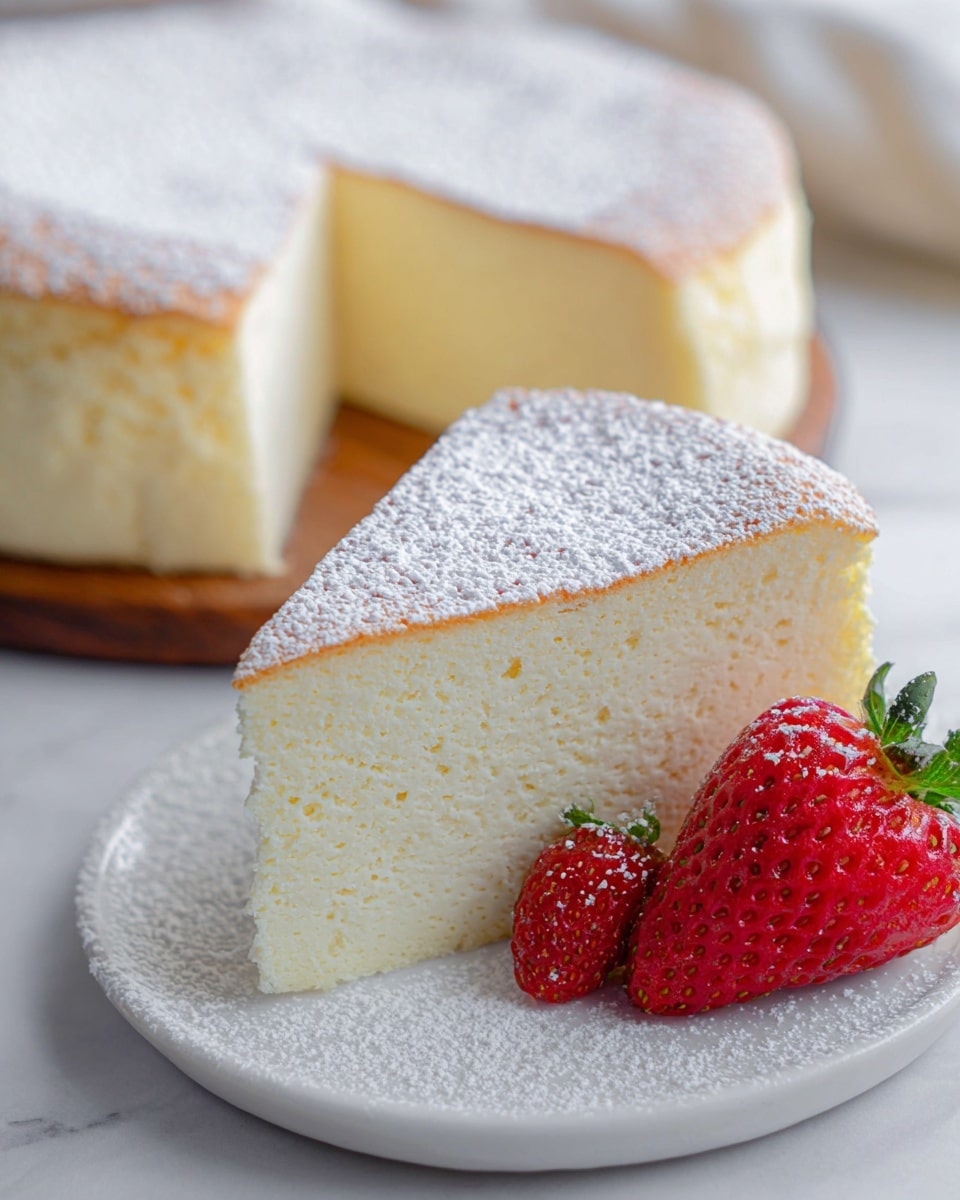
Japanese Cheesecake Recipe
Picture this: a billowy, cloud-soft cheesecake just out of the oven, its golden top gleaming gently under the kitchen light. The delicate aroma of cream cheese mingled with a hint of lemon zest floats through the air, inviting you closer. As you take your first bite, the cake melts effortlessly on your tongue, light as air yet decadently creamy. This Japanese Cheesecake Recipe isn’t just any dessert — it’s a magical experience that brings warmth, elegance, and a touch of awe to your table. Whether you’re treating yourself or delighting loved ones, this cake promises smiles and unforgettable moments.
Why You’ll Love This Japanese Cheesecake Recipe
- Light and Fluffy Texture: Unlike traditional dense cheesecakes, this one is airy and cloud-like, making every bite feel like a gentle hug.
- Simple yet Sophisticated Ingredients: With just cream cheese, eggs, and a few pantry staples, it’s a recipe that’s approachable without sacrificing elegance.
- Show-Stopping Presentation: Its golden, lightly browned top offers an impressive, professional look perfect for any occasion.
- Versatile Serving Options: Enjoy it warm, chilled, plain, or dusted with powdered sugar and paired with fresh berries or whipped cream.
- Perfect for Special Occasions and Everyday Treats: While sophisticated, it’s also sweetly simple, making it ideal for both celebrations and quiet evenings.
Why This Japanese Cheesecake Recipe Works
This Japanese Cheesecake Recipe achieves its uniquely light and bouncy texture thanks to a few key techniques. First, separating the eggs and whipping the egg whites into a meringue creates the signature airy lift. Second, gently folding the meringue into the cream cheese base ensures the batter remains light without over-deflating. Lastly, baking the cake in a water bath at a low temperature provides gentle, even heat that sets the cake slowly, preventing cracking and maintaining its delicate softness. These simple but precise steps yield a cheesecake that defies expectations—light yet creamy, rich yet not heavy.
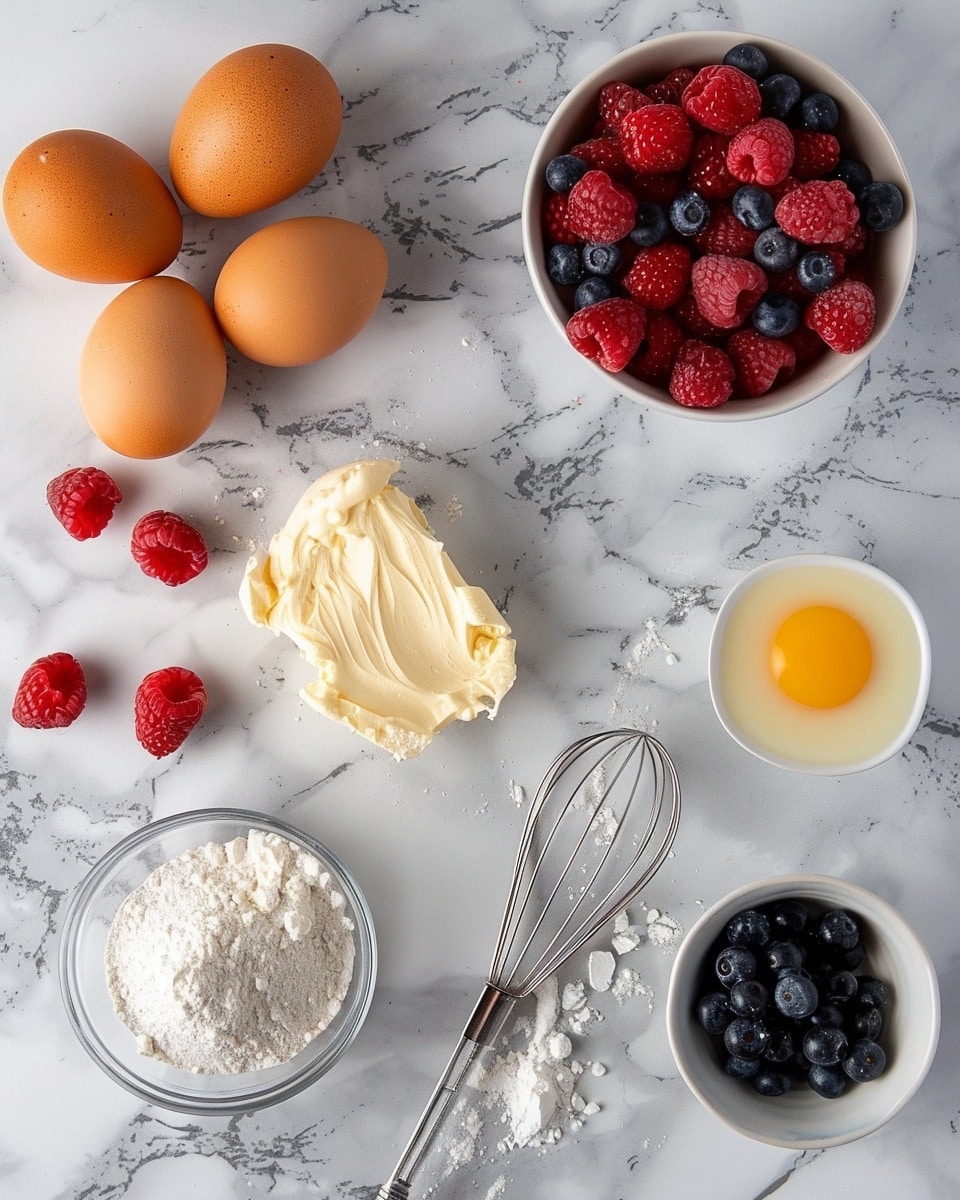
Ingredients You’ll Need
These ingredients are straightforward yet crucial for capturing the authentic flavor and texture of this delicate cheesecake.
- 6 large eggs (separated): The foundation for the airy meringue and rich base.
- 8 ounces cream cheese (softened): Provides that signature creamy richness.
- ¼ cup heavy cream (or full-fat milk): Adds silkiness to the batter.
- 4 tablespoons unsalted butter (cut into pieces): Ensures a smooth, luscious texture.
- ½ cup cake flour: Gives the cake the perfect delicate crumb.
- 1 tablespoon lemon zest (optional): Infuses a refreshing citrus brightness.
- 1½ teaspoons vanilla extract (optional): Enhances the flavor with warm undertones.
- ⅓ cup granulated sugar: Sweetens without overpowering.
- 2 teaspoons lemon juice: Stabilizes the meringue and adds subtle tang.
- Powdered sugar (for dusting): For a charming, elegant finish.
- Apricot jam (warmed for glazing): Adds beautiful shine and a fruity touch.
- Berries and sweetened whipped cream: Optional accompaniments to elevate your serving.
Ingredient Substitutions & Tips
- Cream Cheese: Use Neufchatel cheese or mascarpone for a slightly different texture but equally creamy result.
- Heavy Cream: Full-fat milk works well if heavy cream isn’t available, though the texture will be a touch lighter.
- Cake Flour: Substitute with all-purpose flour plus 2 teaspoons of cornstarch to maintain softness.
- Butter: Unsalted margarine can be used, but real butter gives the best flavor and texture.
👨🍳 Pro Tips for Perfect Results
- Use room temperature eggs: They whip better when they’re not cold from the fridge.
- Whisk egg whites carefully: Achieve medium-soft peaks for a tender, light cake.
- Don’t overmix the batter: Gentle folding keeps the air bubbles intact.
- Bake in a water bath: This gentle heat is key for the smooth, crack-free finish.
- Cool gradually: Rotating the cake while cooling helps it release cleanly from the pan.
How to Make Japanese Cheesecake Recipe
Step 1: Get Your Equipment Ready
Preheat your oven to 300°F and prepare an 8 by 3 inch cake pan lined with parchment paper on the bottom. You’ll also need a larger 9 by 9 inch pan to hold water for the water bath. Bring a few inches of water to a simmer on the stove, then reduce heat to keep it warm—this is what’ll keep your cheesecake moist and tender during baking.
💡 Pro Tip: Prepare everything in advance so the batter comes together smoothly and you avoid scrambling eggs.
Step 2: Make the Cream Cheese Base
In a heatproof bowl, combine softened cream cheese, butter, and heavy cream. Set the bowl over your simmering water, making sure it doesn’t touch the water, and whisk until everything is smooth and silky. Turn off the heat, then rapidly add the egg yolks, mixing them in lovingly. Sift cake flour over and whisk until you see no clumps, then add lemon zest and vanilla extract, stirring to combine. Set aside to cool gently.
💡 Pro Tip: Work quickly here so the egg yolks don’t cook in the heat—speed keeps the texture silky.
Step 3: Whip the Meringue
In a completely clean, dry bowl, whip the egg whites with lemon juice until frothy. Gradually add granulated sugar in three parts while whipping, continuing to beat until medium-soft peaks form—meaning soft and a bit bendable but still holding shape. This meringue is what gives your cheesecake its airy lift.
💡 Pro Tip: Lemon juice helps stabilize the egg whites, giving a firmer meringue and better volume.
Step 4: Fold Meringue Into Batter
Add one-third of the meringue to your cream cheese mixture and gently fold with a spatula. Careful now—fold until blended but don’t overmix. Repeat with the remaining meringue in two batches until smooth. This careful folding keeps the air bubbles intact for that cloud-like texture.
💡 Pro Tip: Use a gentle “cut and fold” technique to keep batter airy.
Step 5: Bake with a Water Bath
Pour your batter into the prepared cake pan and tap it firmly on the counter to release big air bubbles—or use a skewer to pop them. Place the cake pan into the water-filled 9 by 9 pan carefully and bake for 80 to 90 minutes. The top should be a beautiful golden brown, and a skewer inserted in the center should come out clean.
💡 Pro Tip: Keep water warm but not boiling during baking to ensure even, gentle cooking.
Step 6: Cool and Unmold the Cheesecake
Carefully remove the cheesecake and dry the bottom of the pan. Tilt the pan on its side, turning it every 20 to 30 seconds until the cake naturally releases from the sides. Flip the cake out gently onto a plate, remove the parchment paper, and let cool fully.
💡 Pro Tip: This slow cooling prevents cracks and helps the cake maintain its perfect softness.
Step 7: Serve and Enjoy!
Whether you savor this Japanese Cheesecake warm, chilled, or at room temperature, it’s pure bliss. Dust the top with powdered sugar or glaze with warmed apricot jam for a shiny finish. Serve alongside bright berries and a dollop of sweetened whipped cream for the ultimate treat.
💡 Pro Tip: The warmth brings out creaminess, while chilling improves the texture sliceability—try both to find your favorite!
Common Mistakes to Avoid
Learn from these common pitfalls to ensure your Japanese cheesecake turns out perfectly every time:
- Using cold eggs: This reduces volume when whipping whites, leading to a denser cake.
- Overmixing the batter: Deflates the meringue and ruins the light texture.
- Skipping the water bath: Results in cracks and a dry, uneven finish.
- Baking at too high temperature: Causes a rough crust and an undercooked center.
- Not cooling the cake gradually: Leads to shrinkage and cracking on the surface.
- Folding meringue too aggressively: Breaks down bubbles and flattens the cake.
Delicious Variations to Try
Once you’ve mastered this Japanese Cheesecake Recipe, have fun experimenting with these enticing twists that keep everything halal and scrumptiously fresh!
Matcha Japanese Cheesecake
Add 1 to 2 teaspoons of matcha green tea powder to the batter for a subtle earthy flavor and a lovely jade-green tint. It pairs beautifully with a dusting of powdered sugar or white chocolate shavings.
Yuzu Citrus Twist
Replace lemon zest and juice with yuzu juice and zest for a fragrant, zesty citrus kick that feels exotic yet balanced.
Berry Swirl
Gently fold in a swirl of pureed mixed berries into the batter before baking to create pretty marbled colors and bursts of fruity tanginess.
Vanilla Bean Infusion
Use the seeds of a fresh vanilla bean or high-quality vanilla bean paste instead of extract for a deeper, richer vanilla flavor that elevates every bite.
Coconut Cream Variation
Swap out heavy cream for canned coconut cream to introduce a subtle tropical undertone—great if you enjoy a bit of island flair in your cheesecake.
How to Serve Japanese Cheesecake Recipe
Garnishes
Lightly dust the cake with powdered sugar or brush the top with warm apricot jam for a glossy, inviting finish. Fresh berries such as strawberries, blueberries, or raspberries add vibrant color and a touch of tart contrast. A spoonful of sweetened whipped cream completes the experience with soft richness.
Side Dishes
This airy cheesecake pairs wonderfully with a cup of green or jasmine tea to cleanse the palate. Fresh fruit salad or a small scoop of vanilla bean ice cream can also make for delightful companions.
Creative Ways to Present
Serve each slice on a delicate china plate, topped with a fresh mint leaf and a raspberry for an elegant touch. For gatherings, create individual mini cheesecakes in ramekins for whimsical, personalized servings.
Make Ahead and Storage
Storing Leftovers
Wrap the cheesecake tightly with plastic wrap or store in an airtight container and refrigerate. It stays fresh for up to 3 days, and the flavors often deepen after a night of resting.
Freezing
Freeze leftover cheesecake by wrapping each slice securely in plastic wrap and then foil. Freeze for up to 1 month. Thaw overnight in the fridge before enjoying.
Reheating
Enjoy warmed slices by gently microwaving on low power for 15-20 seconds. Warming intensifies creaminess but avoid overheating, or the texture will change.
FAQs
Can I use all-purpose flour instead of cake flour?
Yes! For the fluffiest texture, combine ½ cup all-purpose flour with 2 teaspoons cornstarch to mimic cake flour.
Do I have to use a water bath?
It is highly recommended. The water bath ensures even baking and prevents cracks by maintaining gentle heat and moisture.
Can I make this cheesecake gluten-free?
Simply substitute the cake flour with a gluten-free cake flour blend that’s suitable for baking.
Is this recipe suitable for beginners?
Absolutely! While it involves a few technical steps, following the detailed instructions and tips makes it accessible and rewarding.
Why is my cheesecake sinking after baking?
This often happens if the meringue wasn’t whipped to the right consistency or the batter was overmixed, causing air bubbles to collapse.
Can I prepare the batter ahead of time?
It’s best to bake immediately after folding in the meringue for optimal rise and texture.
What’s the best way to measure cake flour?
Lightly spoon the flour into the measuring cup and level it off with a knife to avoid packing it tightly.
How long should I cool the cheesecake before serving?
For best results, cool completely at room temperature and then chill for at least one hour. However, it’s delicious warm as well!
Final Thoughts
This Japanese Cheesecake Recipe is a true treasure—a tender, airy delight that feels like a loving hug in every bite. It’s the perfect blend of simple ingredients and thoughtful technique that yields something unexpectedly elegant and comforting all at once. Perfect for special celebrations or simply to brighten an ordinary day, this cheesecake invites you to savor the joy of baking and sharing something truly special.
Have you tried this Japanese Cheesecake Recipe? I’d love to hear how it turned out! Leave a comment below. If you loved this recipe, please share it with friends and family. Happy cooking! 😊
PrintJapanese Cheesecake Recipe
This Japanese Cheesecake is a light, airy, and fluffy dessert combining the rich creaminess of cream cheese with a delicate texture. Baked in a water bath, this cake offers a subtle sweetness and a soft, melt-in-your-mouth experience, perfect for serving warm, chilled, or at room temperature with an optional glaze and fresh berries.
- Prep Time: 25 minutes
- Cook Time: 1 hour 10 minutes
- Total Time: 1 hour 35 minutes
- Yield: 8 servings 1x
- Category: Dessert
- Method: Baking
- Cuisine: Japanese
Ingredients
Cheesecake Batter
- 6 large eggs (separated, about 50g each, shell-on)
- 8 ounces cream cheese (preferably softened)
- ¼ cup heavy cream or full-fat milk
- 4 tablespoons unsalted butter (cut into smaller pieces)
- ½ cup cake flour (fluffed, spooned, and leveled)
- 1 tablespoon lemon zest (about 1 lemon, optional)
- 1½ teaspoons vanilla extract (optional)
- ⅓ cup granulated sugar
- 2 teaspoons lemon juice (about ⅓ of a lemon)
Finishing and Serving
- Powdered sugar (for dusting)
- Apricot jam (slightly warmed, for glazing)
- Berries (for serving)
- Sweetened whipped cream (for serving)
Instructions
- Prepare Equipment: Preheat the oven to 300°F (150°C). Line the bottom of an 8 by 3 inch round cake pan with parchment paper. Place this cake pan inside a larger 9 by 9 inch baking pan that will be used as a water bath.
- Prepare the Water Bath: Bring a few inches of water to a simmer in a large saucepan or pot on the stove. Once simmering, reduce heat to low to maintain the temperature. Fill the 9 by 9 inch baking pan halfway with hot water before baking.
- Make the Batter Base: In a heatproof bowl that fits on the saucepan without touching the water, combine the cream cheese, unsalted butter, and heavy cream. Gently heat while whisking until smooth and well combined. Remove from heat.
- Add Egg Yolks and Flour: Quickly add the egg yolks to the cream cheese mixture and whisk until blended. Sift in the cake flour and whisk until no clumps remain. Remove the bowl from the heat and whisk in lemon zest and vanilla extract if using. Set aside to cool.
- Make the Meringue: In a clean bowl, whip the egg whites and lemon juice on medium-high speed until frothy. Gradually add granulated sugar one-third at a time before reaching soft peaks. Once all sugar is added, continue whipping 10-20 seconds, then reduce to medium speed and whip until medium-soft peaks form.
- Fold Meringue into Batter: Gently fold one-third of the meringue into the cream cheese batter until well combined and no streaks remain. Repeat with the remaining meringue in two additions, folding carefully to retain airiness.
- Prepare for Baking: Pour the batter into the prepared cake pan. Tap the pan firmly on the counter a few times to release large air bubbles. Alternatively, use a skewer to pop bubbles.
- Bake the Cheesecake: Place the cake pan into the water bath inside the preheated oven. Bake for 80 to 90 minutes, or until the top is golden brown and a skewer inserted into the center comes out clean.
- Cool the Cake: Remove the cheesecake from the oven and dry the bottom of the cake pan. Let the cake cool slightly on its side, gently rotating the pan every 20 to 30 seconds until the cake loosens from the sides.
- Remove and Cool Completely: Carefully flip the cake out of the pan onto a plate. Remove the bottom parchment paper and flip the cake upright onto another serving plate. Allow to cool completely.
- Serve: Enjoy the cheesecake warm, at room temperature, or chilled after at least one hour in the refrigerator. Optionally dust with powdered sugar or brush the top with warmed apricot jam for a glossy glaze. Serve with fresh berries and sweetened whipped cream for an elegant presentation.
Notes
- Ensure the cream cheese mixture does not overheat to avoid scrambling the eggs.
- Folding the meringue gently is key to maintaining the cake’s fluffy texture.
- Using a water bath (bain-marie) creates a moist, delicate crumb and prevents cracking.
- Rotate the cake gently during cooling to help it release cleanly from the pan.
- The cake can be enjoyed at different temperatures depending on preference.
Keywords: Japanese cheesecake, fluffy cheesecake, water bath cheesecake, light cheesecake, Japanese dessert