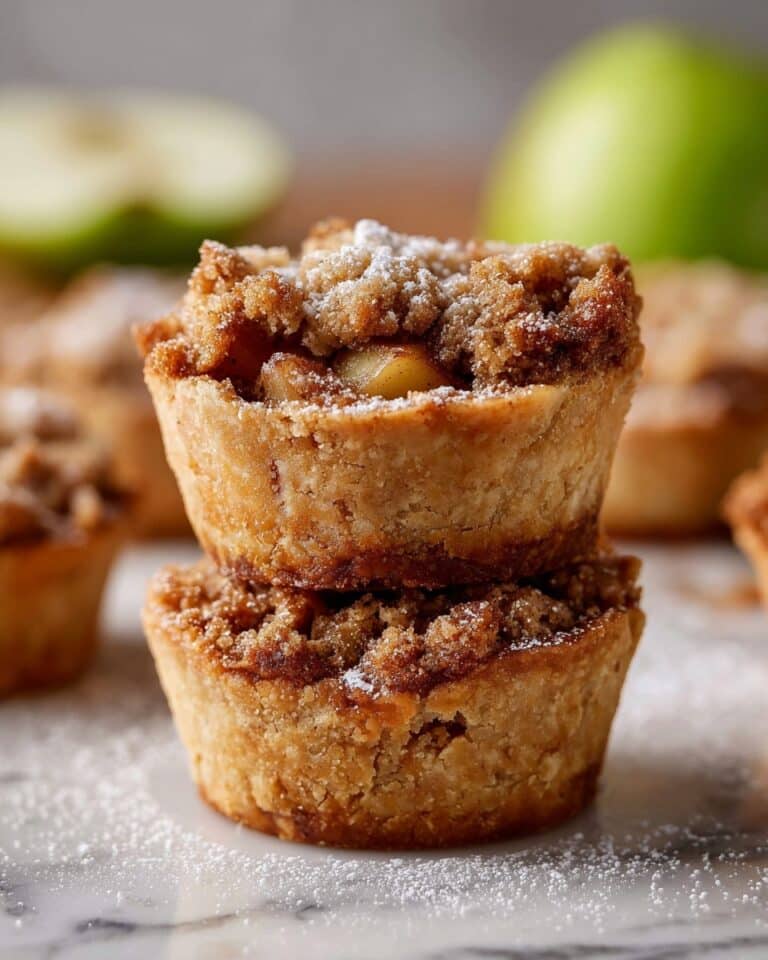
Skillet Apple Pie Dessert Biscuits Recipe
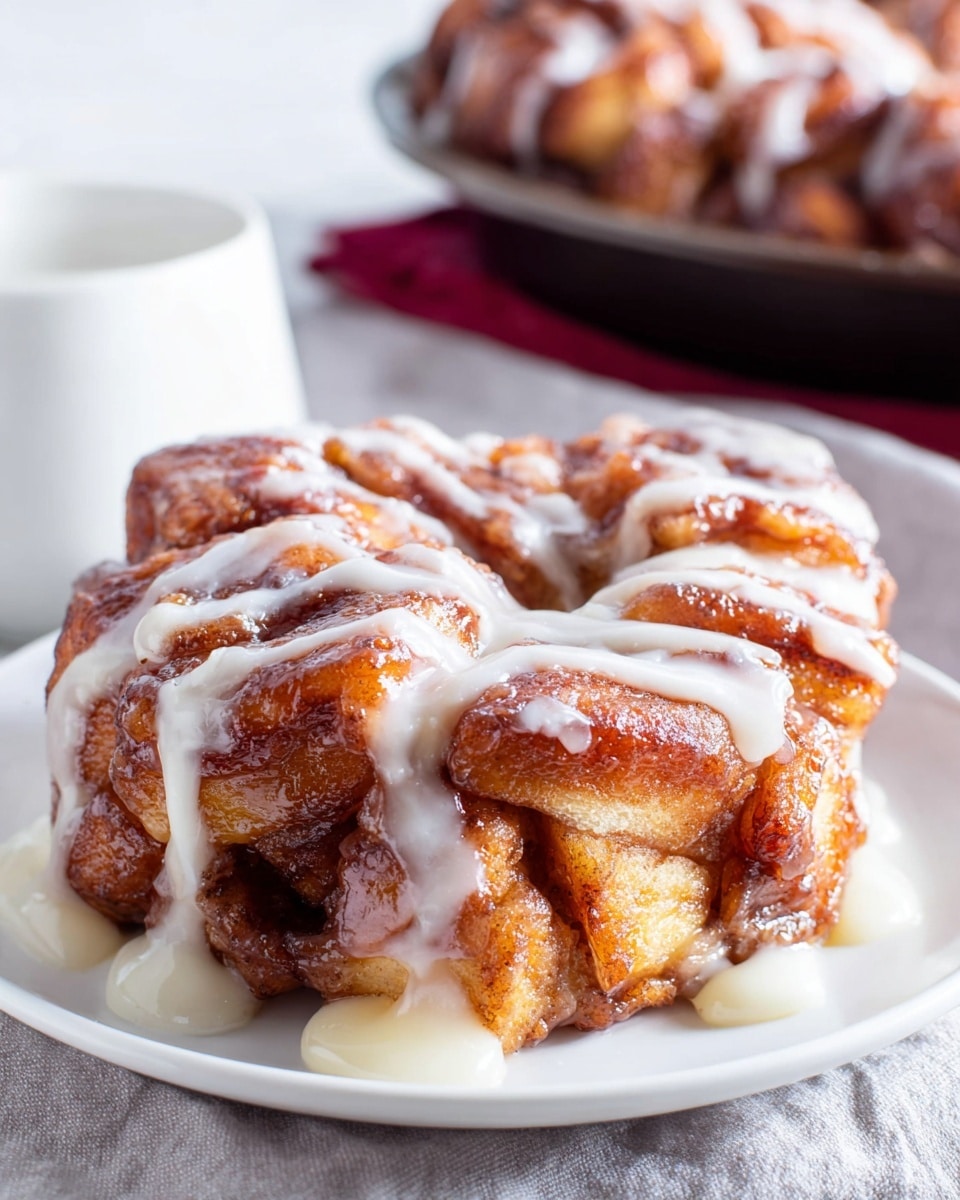
Picture this: the warm, cozy scent of cinnamon and baked apples swirling through your kitchen as golden biscuit edges peek out from a buttery skillet. The moment you break through the crisp exterior, you’re greeted by tender, juicy apple pieces nestled in cinnamon sugar goodness—a divine, nostalgic treat that feels like a warm hug on a chilly day. This Skillet Apple Pie Dessert Biscuits Recipe elevates simple ingredients into a show-stopping dessert that’s both irresistible and surprisingly easy to pull off. Whether it’s a family gathering or a quiet evening indulgence, get ready to impress and delight with every luscious bite.
Why You’ll Love This Skillet Apple Pie Dessert Biscuits Recipe
- Quick and Easy: Ready in just 50 minutes from start to finish, perfect when you want a homemade dessert without spending hours in the kitchen.
- Simple Ingredients: Uses pantry staples and fresh apples, making it accessible and wallet-friendly without sacrificing flavor.
- Perfect for Gathering: Serves 8, making it an ideal choice for sharing with friends and family around the table.
- Impressive Presentation: Beautifully baked in a cast iron skillet with golden biscuits and bubbling apple filling, it’s a feast for the eyes and palate alike.
- Customizable: Easily tailored by swapping apples or adjusting spices, plus the option to serve warm with vanilla ice cream for an extra special touch.
Why This Skillet Apple Pie Dessert Biscuits Recipe Works
This recipe shines because it masterfully combines textures and flavors for a delightful experience. The jumbo refrigerated biscuits create a flaky, buttery base that soaks up just enough apple-y goodness without getting soggy. Cooking the apple filling gently in sugar and cornstarch thickens the juices beautifully, resulting in a glossy, tender, cinnamon-spiced topping. The use of melted butter and cinnamon sugar layered on and around the biscuits creates a sweet, caramelized crust that contrasts perfectly with the soft apples. Baking everything together in a cast iron skillet ensures even heat distribution and a rustic, homey finish that’s as charming as it is delicious.
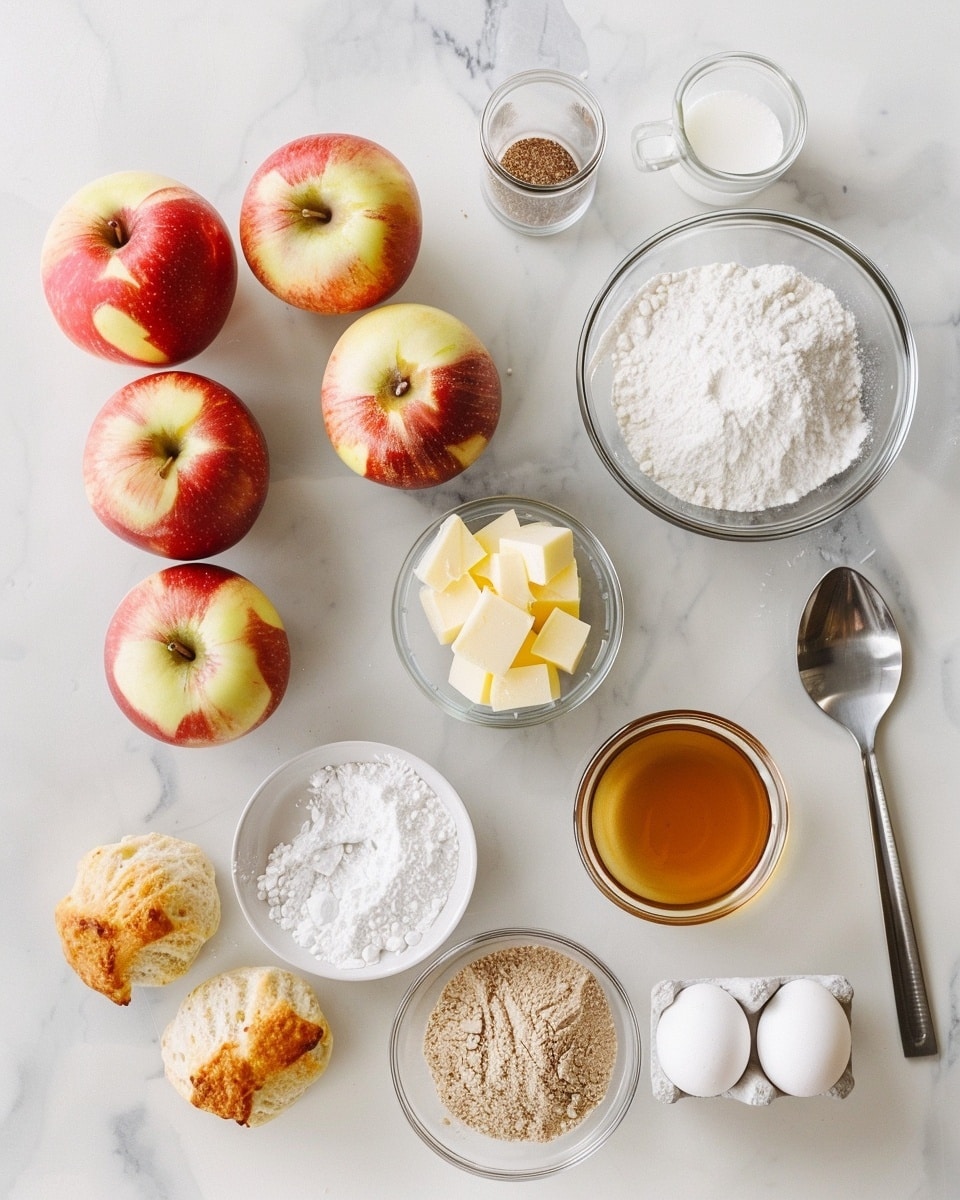
Ingredients You’ll Need
These straightforward ingredients come together harmoniously to create a comforting and flavorful dessert that feels both classic and cozy.
- Jumbo refrigerated biscuits (8): The buttery, flaky base that bakes up golden and tender.
- Apples (4, peeled and cut into ¾-inch pieces): The star fruit that adds natural sweetness and a fresh, juicy bite.
- Sugar (¾ cup): Sweetens the apple filling, balancing its tartness.
- Lemon juice (1 tbsp): Adds brightness and helps preserve the apples’ color and zing.
- Cinnamon (1¼ tsp and 1 tbsp): Provides warm, aromatic spice essential to apple desserts.
- Cornstarch (3 tbsp): Thickens the apple sauce to a luscious, pudding-like texture.
- Brown sugar (½ cup): Infuses a rich caramel note to the biscuit coating.
- Nutmeg (¼ tsp): Adds subtle warmth and complexity to the spice mix.
- Butter (½ cup melted + 1 tbsp softened): Brings richness and helps create the crispy crust and smooth icing.
- Powdered sugar (½ cup): For the sweet drizzle that finishes the dessert with a silky touch.
- Cream (3-4 tbsp): Loosens the icing to the perfect consistency for drizzling.
- Vanilla ice cream (optional): The perfect cooling counterpart when serving á la mode.
Ingredient Substitutions & Tips
- Jumbo biscuits: Feel free to use homemade biscuit dough if you prefer fresh, but refrigerated biscuits are a huge time-saver.
- Apples: Granny Smith, Honeycrisp, or Fuji apples work beautifully; just choose firm apples for the best texture.
- Cream: Half-and-half or even whole milk can substitute if you don’t have cream on hand, though the icing will be slightly thinner.
- Butter: Unsalted butter is best for controlling saltiness, but salted can work in a pinch; just reduce added salt elsewhere.
👨🍳 Pro Tips for Perfect Results
- Use a sharp knife to cut apples evenly: Uniform pieces ensure even cooking and a balanced bite.
- Don’t skimp on the butter: It’s key for that golden crust and luscious flavor.
- Coat each biscuit thoroughly: The cinnamon sugar layer caramelizes beautifully, so be generous with the coating.
- Let the biscuits cool slightly before icing: This prevents the icing from melting away too quickly, keeping the drizzle pretty and delicious.
- Serve warm, ideally with vanilla ice cream: The contrast of warm biscuits and cold ice cream is pure magic.
How to Make Skillet Apple Pie Dessert Biscuits Recipe
Step 1: Cook the Apples
Start by mixing sugar, cornstarch, and cinnamon in a saucepan. Add the peeled, chopped apples and lemon juice, then stir everything together gently. Cook over medium-low heat, stirring occasionally, for about 15 minutes. This slow simmer lets the apples soften and release their natural juices, while the cornstarch thickens it into a luscious cinnamon-spiced compote.
💡 Pro Tip: Don’t rush this step; a gentle simmer is key to tender apples without turning mushy.
Step 2: Prep Your Skillet and Biscuit Coating
Preheat your oven to 375°F. Melt the butter while the apples cook. Spray your 12-inch cast iron skillet with non-stick spray, then spoon a couple tablespoons of melted butter into the bottom. Swirl it around to coat evenly—this buttery base will help create that irresistible crust.
💡 Pro Tip: Using a cast iron skillet enhances heat retention and adds rustic charm to your dessert.
Step 3: Coat the Biscuits
In a separate bowl, combine brown sugar, cinnamon, and nutmeg for the biscuit coating. One by one, dip each biscuit into the remaining melted butter and let the excess drip off. Then, roll each biscuit in the cinnamon sugar mixture until fully coated on both sides. This step creates a sweet, spiced caramelized shell once baked.
💡 Pro Tip: Press the biscuits lightly into the sugar mixture for an extra thick coating.
Step 4: Arrange and Top
Place the coated biscuits evenly around the skillet. Spoon the warm apple mixture with its syrupy juices over the top, aiming to get as many apple chunks as possible perched on each biscuit. Pour any remaining melted butter over everything, then sprinkle the remaining cinnamon sugar mix for a final flourish before baking.
💡 Pro Tip: Try not to overcrowd the apples so they don’t slip off during baking.
Step 5: Bake to Golden Perfection
Bake the skillet for 30 to 35 minutes at 375°F. Keep an eye on the biscuits; the dessert is done when the middle biscuit is moist but no longer doughy. It should have a lovely golden color and a beautiful crust on top.
💡 Pro Tip: Use a toothpick to test the center biscuit; it should come out with minimal moist crumbs.
Step 6: Prepare the Icing and Serve
While the dessert cools for about 10 minutes, mix softened butter, powdered sugar, and cream until smooth and pourable. Drizzle this icing over the warm biscuits and apples. Serve as is, or for a showstopper, add a scoop of vanilla ice cream for that perfect melting contrast.
💡 Pro Tip: The icing adds a silky sweetness that balances the tartness of the apples beautifully.
Common Mistakes to Avoid
Learn from these common pitfalls:
- Under-cooking the apples: Can result in a hard, unpleasant texture instead of tender softness.
- Skipping the cinnamon sugar coating: This step creates the caramelized crust that makes this dessert special.
- Overcrowding the skillet: Crowding prevents even cooking and can cause the apples to steam rather than bake.
- Baking at the wrong temperature: Too hot or too cool can cause uneven cooking or burning of edges.
- Adding icing too soon: Drizzling when too hot melts the icing away and loses that pretty drizzle effect.
- Using very soft or mealy apples: They may completely fall apart or not hold their shape during baking.
Delicious Variations to Try
Once you’ve mastered the classic Skillet Apple Pie Dessert Biscuits Recipe, here are some tasty twists to explore:
Spiced Pear and Apple Mix
Swap half the apples for ripe pears for a subtle floral sweetness and tender texture that compliments cinnamon beautifully.
Maple Drizzle Finish
Replace the powdered sugar icing with pure maple syrup drizzled warm over the biscuits just before serving for a rich, autumnal flavor.
Caramel Pecan Crunch
Top the finished biscuits with toasted pecans and a drizzle of store-bought or homemade caramel sauce for added crunch and decadence.
Orange Zest and Cardamom
Add a teaspoon of freshly grated orange zest and a pinch of ground cardamom to your apple filling for a fragrant twist with bright citrus notes.
Vegan Version
Use plant-based butter and coconut cream in the icing to enjoy this Skillet Apple Pie Dessert Biscuits Recipe without dairy, maintaining the full flavor.
How to Serve Skillet Apple Pie Dessert Biscuits Recipe
Garnishes
A dusting of powdered sugar, a sprinkle of chopped toasted nuts, or a few fresh apple slices add beautiful finishing touches and subtle crunch.
Side Dishes
Pair alongside a scoop of vanilla or cinnamon ice cream, a dollop of whipped cream, or a hot cup of chai or black coffee for a complete indulgent experience.
Creative Ways to Present
Serve directly from the cast iron skillet for rustic charm or portion into pretty dessert plates, drizzling extra icing or syrup artfully. For gatherings, include small bowls of ice cream or caramel sauce on the side.
Make Ahead and Storage
Storing Leftovers
Store any uneaten dessert in an airtight container in the refrigerator for up to 3 days. The flavors deepen overnight, making leftovers just as delicious.
Freezing
This dessert freezes best before baking—arrange and coat the biscuits in the skillet, cover tightly, and freeze. To bake later, thaw in the refrigerator overnight and proceed with the baking step.
Reheating
Warm leftovers gently in a 350°F oven for 10-15 minutes until heated through. Avoid microwaving to preserve the biscuit’s crisp edge and avoid sogginess.
FAQs
Can I use homemade biscuit dough instead of refrigerated?
Absolutely! Homemade biscuit dough will work wonderfully, adding a personal touch. Just ensure pieces are similar in size for even baking.
What type of apples work best for this recipe?
Firm apples like Granny Smith, Fuji, or Honeycrisp are ideal. They hold their shape and provide a nice balance of tart and sweet flavors.
Can I make this dessert vegan?
Yes! Substitute butter with vegan margarine or coconut oil and use plant-based cream alternatives for the icing to keep it vegan-friendly.
Is it okay to prepare some parts ahead of time?
You can cook the apples a day ahead and store them refrigerated. Assemble and bake when ready for optimal freshness.
How do I know when the biscuits are fully baked?
Check that the central biscuit is no longer doughy and has a moist but cooked appearance. A toothpick test is also helpful.
Can I add nuts to this recipe?
Yes! Adding chopped nuts like pecans or walnuts between the biscuits or on top adds a delightful crunch.
What should I serve this dessert with?
Serve it warm, with or without vanilla ice cream, whipped cream, or a drizzle of caramel sauce for extra indulgence.
Can I make this dessert gluten-free?
Only if you use gluten-free biscuits or substitute with a gluten-free biscuit recipe. The apple filling itself is naturally gluten-free.
Final Thoughts
There’s something truly heartwarming about gathering around a skillet bubbling with soft apples and golden biscuits kissed by cinnamon and butter. This Skillet Apple Pie Dessert Biscuits Recipe reminds me of cozy family evenings, the joy of simple ingredients transformed into something magical, and the smiles shared over that first, dreamy bite. It’s the kind of dessert that’s both nostalgic and exciting, perfect for any occasion where you want to impress without stress.
Have you tried this Skillet Apple Pie Dessert Biscuits Recipe? I’d love to hear how it turned out! Leave a comment below. If you loved this recipe, please share it with friends and family. Happy cooking! 🍎🥧
PrintSkillet Apple Pie Dessert Biscuits Recipe

A comforting and delicious Skillet Apple Pie Dessert Biscuits recipe featuring jumbo biscuits coated in cinnamon sugar, layered with warm spiced apples, baked to golden perfection in a cast iron skillet, and topped with a smooth vanilla glaze. Perfect for a cozy dessert served warm, optionally with vanilla ice cream.
- Prep Time: 15 minutes
- Cook Time: 35 minutes
- Total Time: 50 minutes
- Yield: 8 servings 1x
- Category: Dessert
- Method: Baking
- Cuisine: American
Ingredients
Apple Filling
- 4 apples, peeled and cut into ¾ inch pieces
- ¾ cup sugar
- 1 tbsp lemon juice
- 1¼ tsp cinnamon
- 3 tbsp cornstarch
Biscuit Coating
- 8 jumbo refrigerated biscuits
- ½ cup brown sugar
- 1 tbsp cinnamon
- ¼ tsp nutmeg
- ½ cup butter, melted
Icing
- ½ cup powdered sugar
- 1 tbsp softened butter
- 3–4 tbsp cream or half-n-half
Optional
- vanilla ice cream (for serving á la mode)
Instructions
- Prepare the Apple Filling: In a saucepan, mix sugar, cornstarch, and cinnamon. Add the peeled and cut apples along with the lemon juice. Stir well to combine and cook over medium-low heat for 15 minutes until the apples soften and the mixture thickens. Remove from heat and set aside.
- Preheat and Prepare Skillet: Preheat the oven to 375°F (190°C). Melt the butter in a bowl. Spray a 12-inch cast iron skillet with non-stick spray and add a couple of tablespoons of the melted butter to the bottom. Swirl the butter to coat the skillet evenly.
- Coat the Biscuits: In a separate bowl, combine brown sugar, cinnamon, and nutmeg. Dip each jumbo biscuit one at a time into the remaining melted butter, letting excess drip off. Then coat each side of the biscuit thoroughly in the cinnamon sugar mixture.
- Arrange Biscuits and Add Apples: Place the coated biscuits evenly spaced around the skillet. Spoon the cooked apples and their cooking liquid onto the top of the biscuits, trying to get as many apples on top as possible to prevent sliding. Pour over the remaining melted butter and sprinkle with remaining cinnamon sugar mixture.
- Bake the Dessert: Bake in the preheated oven for 30-35 minutes until the biscuits are baked through and the center biscuit is no longer doughy, though the interior remains moist.
- Make the Icing: While the biscuits cool for 10 minutes, stir together powdered sugar, softened butter, and cream until smooth and creamy.
- Serve: Drizzle the icing over the warm apple biscuits. Serve as is or topped with vanilla ice cream for a delightful á la mode dessert experience.
Notes
- Use firm apples such as Granny Smith or Honeycrisp for best texture and flavor.
- The biscuits will be moist inside but should never look raw; adjust baking time if needed.
- This dessert is best enjoyed warm shortly after baking.
- Substitute half-n-half with heavy cream or milk if desired for the icing.
- Cast iron skillet ensures even heat distribution and creates a nice crust on the biscuits.
- For a gluten-free version, use gluten-free biscuits and cornstarch alternatives.
Keywords: Skillet Apple Pie, Dessert Biscuits, Apple Biscuits, Cinnamon Sugar Biscuits, Cast Iron Skillet Dessert, Easy Apple Dessert, Fall Dessert