Traditional Irish Scones Recipe
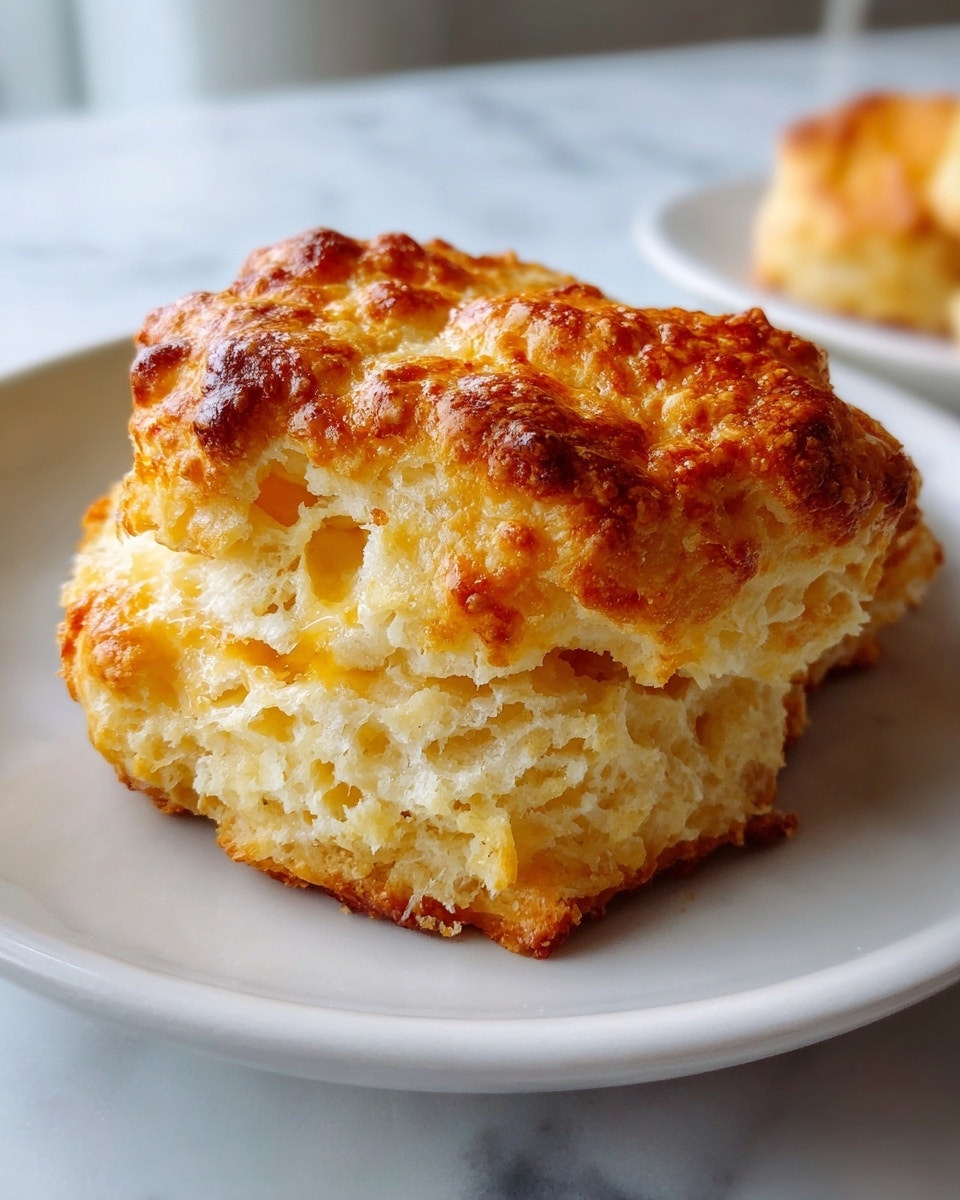
Picture this: the warm, buttery aroma of freshly baked scones filling your kitchen, the golden crust just begging to be broken open, revealing a soft, tender crumb inside. That first bite is pure heaven—light, flaky, and gently sweet with the perfect hint of saltiness from the butter. This Traditional Irish Scones Recipe is one of those treasures you’ll want to make again and again, whether for a cozy breakfast or an afternoon tea that impresses every guest.
Why You’ll Love This Traditional Irish Scones Recipe
- Quick and Easy: Ready in just 21 minutes, these scones come together faster than you’d expect, making them perfect for a spontaneous treat.
- Simple Ingredients: Using common pantry staples like flour, butter, and buttermilk, you already have everything you need to bake these scrumptious scones without a special grocery trip.
- Perfect for Weekend Brunches: Whether it’s a lazy Sunday morning or a festive holiday breakfast, these scones add a homemade charm that’s warm and welcoming.
- Impressive Presentation: Their golden-brown tops with a subtle sheen look as delightful as they taste – ideal for sharing with family or friends when you want to impress.
- Customizable: From adding currants to incorporating a drizzle of honey or jam on the side, these scones welcome your personal twists while still honoring tradition.
Why This Traditional Irish Scones Recipe Works
This recipe nails traditional Irish scones thanks to a few key elements. First, using cold butter cut into cubes and rubbing it into the flour ensures a tender, flaky texture—almost like little pockets of buttery bliss in every bite. The combination of both baking powder and baking soda helps the scones to rise beautifully, creating a light, airy crumb that doesn’t feel dense or heavy. Lastly, the cold buttermilk and egg mixture adds moisture and subtle richness, tying everything together into a soft dough that’s easy to work with and bakes up perfectly golden.
Ingredients You’ll Need
The magic behind these Traditional Irish Scones is simple ingredients working together harmoniously to create that classic flavor and texture.
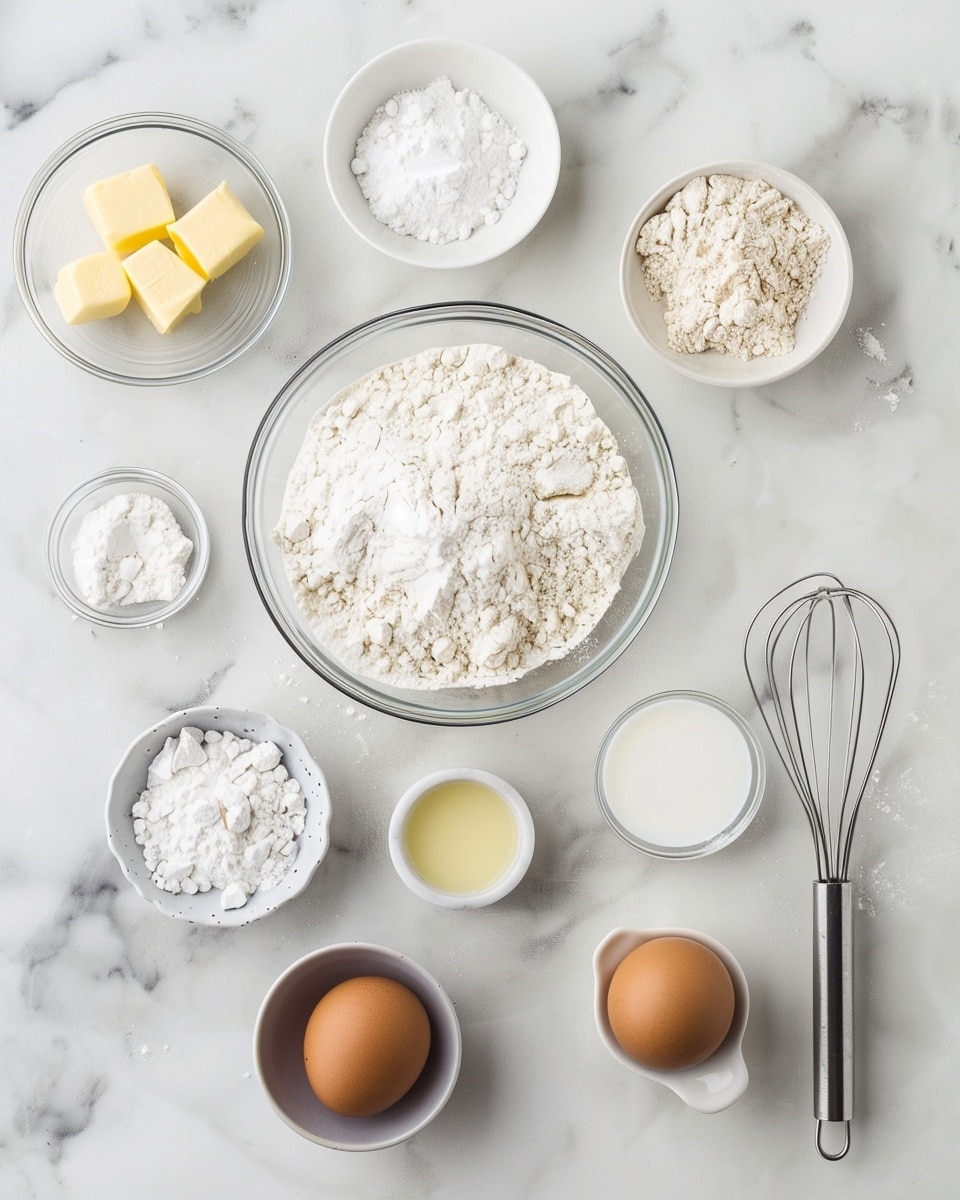
- All-purpose flour (2 ½ cups, sifted): The foundation for the scones, providing the perfect balance of strength and tenderness.
- Sugar (¼ cup): Adds just the right touch of sweetness to complement the buttery richness.
- Baking powder (1 tablespoon): A leavening agent that gives scones their lift and airy crumb.
- Baking soda (1 teaspoon): Works alongside baking powder to tenderize and lighten the texture.
- Salt (generous pinch): Enhances flavors and balances the sweetness.
- Salted butter (1¼ sticks, cold and cubed): The star of richness, cold to ensure flaky pockets throughout the dough.
- Buttermilk (½ cup, cold): Adds moisture and a slight tang that brings out the depth of flavor.
- Large egg (1): Helps bind the dough and contributes to its tender bite.
Ingredient Substitutions & Tips
- Buttermilk: If you don’t have buttermilk, mix ½ cup of milk with 1 tablespoon of lemon juice or white vinegar and let it sit for 5 minutes to curdle.
- Salted Butter: You can use unsalted butter but add an extra ¼ teaspoon of salt to the dry ingredients to maintain flavor balance.
- All-purpose flour: For a slightly lighter scone, substitute up to half the flour with cake flour, but adjust baking time if needed.
- Sugar: Swap granulated sugar for coconut sugar or honey for a different, natural sweetness.
👨🍳 Pro Tips for Perfect Results
- Keep the butter cold: Cold butter ensures flaky layers, so don’t let it soften before mixing.
- Don’t overwork the dough: Handle the dough gently to keep the scones tender and light.
- Use a sharp cutter: Press straight down when cutting the scones to help them rise evenly.
- Brush tops for shine: An egg wash or milk brush adds that gorgeous golden finish.
- Serve warm: Freshly baked or gently warmed scones taste best—try warming leftovers before enjoying.
How to Make Traditional Irish Scones Recipe
Step 1: Preheat and Mix Dry Ingredients
Begin by preheating your oven to 425°F (220°C) for that perfect baking temperature. In a large bowl, sift together 2 ½ cups of all-purpose flour, 1 tablespoon of baking powder, 1 teaspoon of baking soda, and a generous pinch of salt. Stir in ¼ cup of sugar to ensure every bite has a subtle sweetness.
💡 Pro Tip: Sifting the flour and leaveners aerates the mixture for lighter scones.
Step 2: Incorporate Butter
Now, rub the cold, cubed butter (1¼ sticks) into the flour mixture with your fingertips. Do this until it looks like coarse breadcrumbs—this is the secret to those melt-in-your-mouth crumbly layers.
💡 Pro Tip: If your hands warm the butter too quickly, pop the bowl in the fridge for 10 minutes before continuing.
Step 3: Prepare Wet Mixture
In a separate bowl, whisk together the cold buttermilk (½ cup) and a large egg until smooth. This rich, tangy mix is what gives the dough its soft, tender texture.
💡 Pro Tip: Keep the wet ingredients cold to stop the butter from melting prematurely.
Step 4: Form the Dough
Make a well in the center of the dry ingredients and pour in the buttermilk-egg mixture gradually. Gently mix with a wooden spoon or your hands just until a soft dough forms that’s slightly sticky but holds together.
💡 Pro Tip: Avoid over-mixing—this keeps your scones from turning tough.
Step 5: Knead the Dough
Turn the dough out onto a lightly floured surface. Knead just a few times to bring the dough together and smooth out cracks. Add a sprinkle of flour if the dough is too sticky but avoid adding too much.
💡 Pro Tip: The dough should feel soft to the touch but not sticky.
Step 6: Shape and Cut Scones
Roll the dough out gently to about 1 inch (2.5 cm) thickness. Using a floured cutter or glass, carefully cut the dough into rounds. You should get 6 to 8 scones depending on the size of your cutter.
💡 Pro Tip: Press the cutter straight down without twisting to help the scones rise evenly.
Step 7: Prepare for Baking
Place the cut rounds on a baking sheet lined with parchment paper or lightly floured. This prevents sticking and makes for easy cleanup.
💡 Pro Tip: Leave space between scones so their edges become beautifully crisp.
Step 8: Apply Wash and Bake
Brush the tops of each scone with milk or an egg wash (egg beaten with a drop of water). This small step adds a shimmering golden-brown finish after baking. Bake in the preheated oven for 10 to 15 minutes, until the tops are beautifully golden.
💡 Pro Tip: Rotate the baking sheet halfway through baking for even browning.
Step 9: Serve
Remove the scones from the oven and enjoy immediately for the best warmth and freshness. These scones also taste lovely slightly warmed or even cold with your favorite preserves or butter.
💡 Pro Tip: For an indulgent treat, serve with clotted cream and fruity jam.
Common Mistakes to Avoid
Learn from these common pitfalls:
- Using warm butter: It melts into the dough and ruins that flaky texture.
- Over-kneading the dough: Tough scones are no fun—less is more here.
- Twisting the cutter: Twisting seals the edges and prevents proper rise.
- Skipping the egg wash: Scones bake up pale and less inviting without it.
- Not using enough flour on the surface: Sticky dough can be tricky to handle and shape.
- Overbaking: Watch closely to keep scones tender and moist inside.
Delicious Variations to Try
Once you’ve mastered this classic Traditional Irish Scones Recipe, try these flavorful twists to keep things exciting:
Currant or Raisin Scones
Add ½ cup of currants or raisins to the dry ingredients before mixing for a naturally sweet and chewy surprise in every bite.
Cheddar and Chive
For a savory spin, fold ½ cup of grated cheddar and 2 tablespoons chopped fresh chives into the flour mixture. Perfect with soups or salads.
Lemon and Poppy Seed
Mix in zest of one lemon and 1 tablespoon of poppy seeds for a bright, citrusy version that’s ideal for springtime gatherings.
Cinnamon and Brown Sugar
Sprinkle cinnamon and brown sugar over the dough before cutting and baking for a spicy-sweet aroma and taste.
Maple Drizzle
After baking, drizzle warm scones lightly with pure maple syrup for an extra touch of sweetness and sticky goodness.
How to Serve Traditional Irish Scones Recipe
Garnishes
Classic accompaniments include a generous spread of creamy butter, clotted cream, or tangy homemade jam. Fresh berries or thin apple slices add a lovely fresh note.
Side Dishes
Pair your scones with a hot cup of tea, a bowl of fresh fruit salad, or a light egg scramble for a well-rounded meal.
Creative Ways to Present
Arrange the scones on a rustic wooden board alongside bowls of honey, jam, and butter pats. Add edible flowers or fresh mint for an extra visual appeal that will wow your guests.
Make Ahead and Storage
Storing Leftovers
Store leftover scones in an airtight container at room temperature for up to two days to keep their freshness and texture.
Freezing
Wrap scones individually in plastic wrap and place in a freezer bag. Freeze for up to 3 months to enjoy those homemade flavors anytime.
Reheating
To reheat, warm scones in a preheated 350°F (175°C) oven for 5 to 7 minutes or microwave on medium power for 20 seconds. Serve warm for the best taste.
FAQs
Can I make this recipe dairy-free?
Yes! Substitute the butter with a dairy-free margarine and use a plant-based milk mixed with lemon juice to mimic buttermilk.
What if I don’t have buttermilk?
You can easily make a buttermilk substitute by combining ½ cup milk with 1 tablespoon lemon juice or vinegar and letting it sit for 5 minutes.
How can I make my scones fluffier?
Make sure your baking powder and baking soda are fresh, keep butter cold, and avoid over-mixing the dough for tender, fluffy scones.
Can I add dried fruits or nuts?
Absolutely! Currants, raisins, chopped nuts, or even fresh berries can be folded into the dough for extra flavor and texture.
Is it okay to use frozen butter?
Yes, as long as it is very cold when you mix it in. You might need to work quickly or grate the butter for easier incorporation.
Can I bake these scones at a lower temperature?
The high temperature encourages the signature rise and golden crust, so it’s best to stick with 425°F (220°C).
How do I know when the scones are done?
They should be golden brown on top and sound hollow when tapped on the bottom. A toothpick inserted should come out clean.
Can I make these scones vegan?
You can make vegan adaptations by using plant-based butter, non-dairy milk with acid for buttermilk substitute, and an egg replacer like flax egg.
Final Thoughts
There’s something profoundly comforting and joyous about baking Traditional Irish Scones Recipe from scratch. The aroma alone elevates any morning, and the taste brings everyone around the table together. Whether you’re sharing with loved ones or savoring a quiet moment, these scones hit the perfect note of tradition and warmth. Don’t be surprised if they become your new favorite go-to recipe!
Have you tried this Traditional Irish Scones Recipe? I’d love to hear how it turned out! Leave a comment below. If you loved this recipe, please share it with friends and family. Happy cooking! ☀️
PrintTraditional Irish Scones Recipe

This Traditional Irish Scone Recipe produces tender, golden-brown scones with a delicate crumb and slightly sweet flavor. Perfect for breakfast or afternoon tea, these scones combine classic ingredients like cold butter, buttermilk, and a touch of sugar, baked to perfection for a delightful homemade treat.
- Prep Time: 10 minutes
- Cook Time: 15 minutes
- Total Time: 25 minutes
- Yield: 6 to 8 scones 1x
- Category: Baking
- Method: Baking
- Cuisine: Irish
Ingredients
Dry Ingredients
- 2 ½ cups all-purpose flour (sifted)
- ¼ cup sugar
- 1 tablespoon baking powder
- 1 teaspoon baking soda
- Generous pinch of salt
Wet Ingredients
- 1¼ sticks salted butter (cold and cut into cubes)
- ½ cup buttermilk (cold)
- 1 large egg
Instructions
- Preheat and Mix Dry Ingredients: Preheat your oven to 425°F (220°C). In a large bowl, sift together the all-purpose flour, baking powder, baking soda, and salt. Add the sugar and stir to combine evenly.
- Incorporate Butter: Using your hands, rub the cold, cubed butter into the flour mixture until it resembles coarse breadcrumbs. This helps create the tender texture typical of scones.
- Prepare Wet Mixture: In a separate bowl, whisk the large egg into the cold buttermilk until well combined.
- Form the Dough: Make a well in the center of the dry ingredients and pour in the buttermilk and egg mixture gradually. Mix gently until a soft dough forms that holds together but is not overly sticky.
- Knead the Dough: Turn the dough out onto a floured surface and knead it a few times just to smooth out cracks. Add a bit more flour if the dough is too sticky to handle.
- Shape and Cut Scones: Roll the dough to about 1 inch (2.5 cm) thickness. Using a floured cutter or glass, cut the dough into rounds to yield about 6 to 8 scones.
- Prepare for Baking: Place the scones onto a floured or buttered baking sheet, or alternatively use parchment paper for easy cleanup.
- Apply Wash: Brush the tops of each scone with milk or an egg wash (egg beaten with a drop of water) to encourage a golden brown finish during baking.
- Bake the Scones: Bake the scones in the preheated oven for 10 to 15 minutes, or until the tops are a beautiful golden brown.
- Serve: Enjoy the scones immediately for best freshness. They can also be warmed the next day or eaten cold as desired.
Notes
- Ensure the butter and buttermilk are cold to achieve a flaky texture.
- Handle the dough gently to avoid overworking and tough scones.
- You can substitute buttermilk with milk plus 1 tablespoon of lemon juice or vinegar if buttermilk is unavailable.
- Brush with milk for a slightly softer crust or egg wash for a shinier, deeper golden crust.
- For added flavor, consider adding currants, raisins, or a splash of vanilla to the wet mixture.
Keywords: Irish scones, traditional scones, buttery scones, homemade scones, easy scone recipe, breakfast scones, teatime treats